Oh my goodness, you guys, get ready for something truly spectacular! I still remember the first time I tasted a really, truly amazing triple chocolate layer cake. It was at a fancy bakery, and I swear, I almost cried happy tears. The rich chocolate, the moist crumb, that dreamy frosting – it was pure magic. I knew right then and there that I HAD to recreate that experience in my own kitchen, but even better, if I could!
And let me tell you, after countless experiments (and a few delicious “oops” moments), I’ve cracked the code. This isn’t just any chocolate cake; it’s THE triple chocolate layer cake. It’s got three decadent layers of chocolatey goodness, a ridiculously smooth chocolate frosting, and a sprinkle of chocolate shavings that just screams “celebration!” Trust me, this cake isn’t just a dessert; it’s a showstopper, a conversation starter, and quite possibly, the best thing you’ll ever bake. I’m going to guide you through every single step, sharing all my secrets so you can whip up this impressive dessert like a pro, even if you’re a beginner. Let’s do this!

Why You’ll Love This Triple Chocolate Layer Cake
Okay, so why *this* triple chocolate layer cake, you ask? Because it’s an absolute dream, that’s why! You might look at it and think it’s super complicated, but honestly, it’s surprisingly straightforward to put together. You’ll get:
- Impressive Looks, Easy Prep: Seriously, everyone will think you slaved away for hours, but it’s our little secret how simple it is!
- Unbeatable Flavor: This isn’t just sweet; it’s deep, rich, and truly chocolatey – in the best way possible.
- Versatile Perfection: Birthdays, holidays, Tuesday night cravings? This cake fits every occasion!
The Irresistible Charm of this Triple Chocolate Layer Cake
Just imagine that first forkful. The tender, moist cake, the silky-smooth frosting, and that satisfying crunch of chocolate shavings. It’s a symphony of textures and flavors that just melts in your mouth. It’s not just a dessert; it’s a warm hug, a moment of pure bliss, and a guaranteed smile-maker for anyone who tastes it. What’s not to love?
Essential Equipment for Your Triple Chocolate Layer Cake
Alright, let’s talk tools! You don’t need a fancy chef’s kitchen for this triple chocolate layer cake, promise. Most of these things you probably already have lying around, which is awesome. We’re talking about the basics that’ll make your baking journey smooth and fun. Getting your equipment ready before you start is like setting the stage for a delicious show!
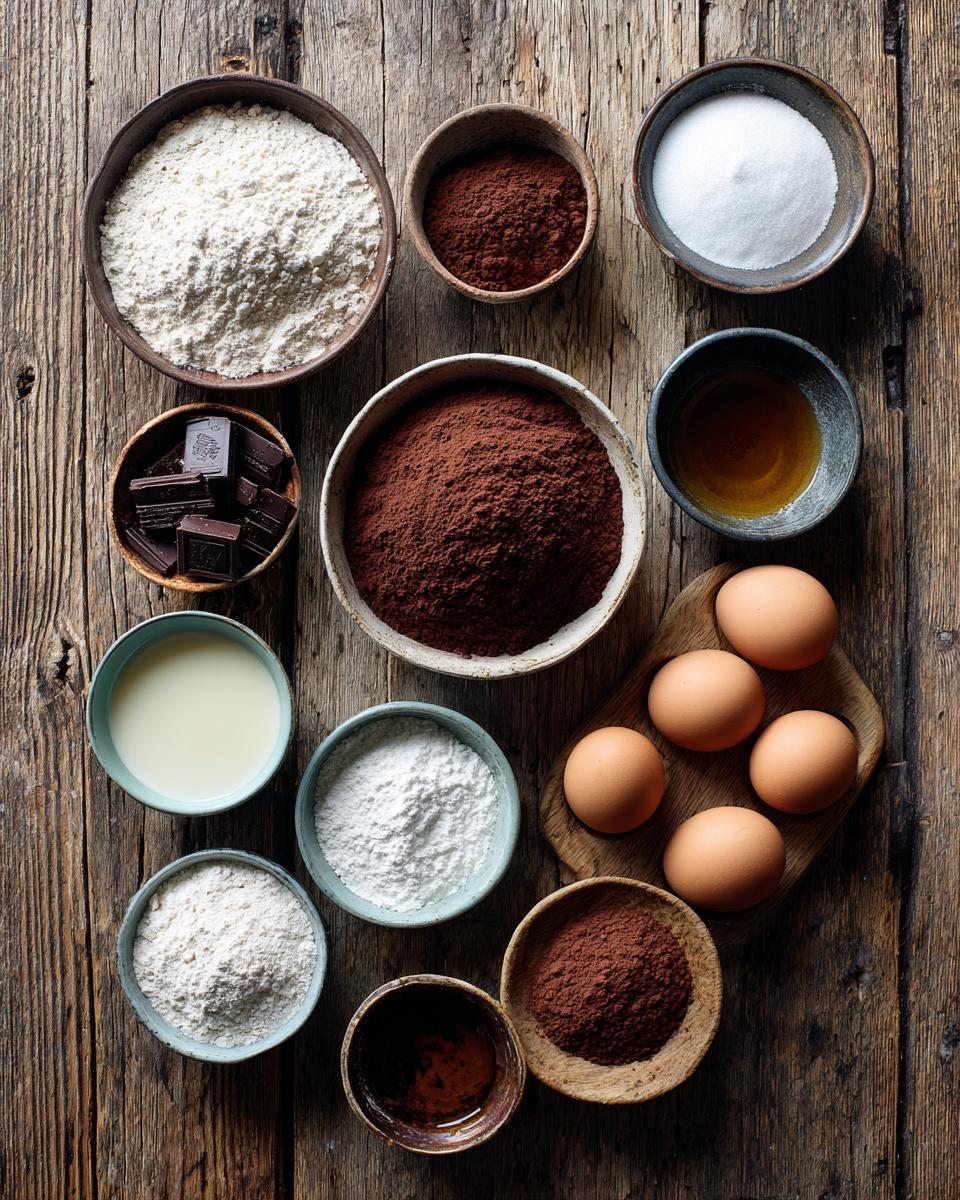
Ingredients for the Perfect Triple Chocolate Layer Cake
Okay, now for the good stuff – the ingredients! This is where the magic really starts to happen. I’m a stickler for using good quality ingredients, especially when it comes to chocolate. Think of it as investing in pure joy! We’re going for rich, deep chocolate flavor here, so make sure you grab unsweetened cocoa powder. And don’t skimp on the butter – real butter makes all the difference in both the cake and the frosting. Getting everything measured out and ready before you start is a game-changer, trust me!
Key Ingredients for the Triple Chocolate Layer Cake Batter
For those incredible cake layers, you’ll need the usual suspects like 2 cups of all-purpose flour, 1¾ cups granulated sugar, 1½ teaspoons baking soda, and 1 teaspoon baking powder. But the real stars? That ¾ cup of unsweetened cocoa powder for that deep chocolatey goodness, 1 cup of creamy buttermilk, and 1 cup of hot, strong brewed coffee. The buttermilk keeps it tender, and the coffee? Oh, it just makes the chocolate sing!
Decadent Frosting Ingredients for Your Triple Chocolate Layer Cake
Now, for the frosting – this is where we get truly decadent! You’ll want 1 cup of unsalted butter, softened to perfection, and about 3 cups of powdered sugar (also known as confectioners’ sugar). Don’t forget ½ cup of unsweetened cocoa powder to keep that rich chocolate flavor going strong. A splash of ¼ cup of milk and a teaspoon of alcohol-free vanilla extract will bring it all together into the most dreamy, fluffy chocolate frosting you’ve ever tasted!
How to Prepare Your Triple Chocolate Layer Cake
Alright, bakers, this is it! The moment we’ve been waiting for: putting all those fantastic ingredients to work and creating something truly spectacular. Don’t feel intimidated by the layers; we’re going to tackle this step-by-step, and I promise, you’ll feel like a total kitchen wizard when you’re done. Just take your time, enjoy the process, and remember, baking is all about love and a little bit of chocolatey magic!
First things first, let’s get that oven preheated to 350°F (175°C). While it’s warming up, grab your three 8-inch round cake pans. Now, don’t skip this next part! Grease and flour them really well. I like to use a little butter or oil and then dust with cocoa powder instead of flour for chocolate cakes – it prevents those white flour streaks on the outside of your beautiful dark cake. Just tap out any excess. This ensures your gorgeous layers pop right out when they’re done.
Crafting the Moist Triple Chocolate Layer Cake Layers
In a big bowl, whisk together your dry ingredients: flour, granulated sugar, ¾ cup cocoa powder, baking soda, baking powder, and salt. Give it a good whisk to make sure everything’s evenly distributed. Next, pour in your buttermilk, vegetable oil, eggs, and that amazing alcohol-free vanilla extract. Beat it on medium speed with your electric mixer until it’s *just* combined. And here’s a pro tip: don’t overmix! Overmixing develops too much gluten, and we want a tender, moist cake, not a tough one.
Now for the secret weapon: that hot, strong coffee! Gradually add it to your batter, mixing until it’s smooth. Yes, the batter will be pretty thin – almost like a thick soup – but don’t worry, that’s exactly how it should be! Divide the batter evenly among your three prepared cake pans. Pop them in the preheated oven and bake for about 25-30 minutes. You’ll know they’re ready when a wooden skewer or toothpick inserted into the center comes out clean. Let them cool in the pans for about 10 minutes, then carefully invert them onto a wire rack to cool completely. Patience is a virtue here; don’t try to frost warm cakes, or you’ll have a chocolatey mess!
Whipping Up the Dreamy Triple Chocolate Layer Cake Frosting
While your cakes are cooling, let’s make that absolutely divine frosting! In a large bowl, beat your softened butter until it’s super creamy and light. This usually takes a couple of minutes. Then, gradually add your powdered sugar and ½ cup cocoa powder, beating until everything is combined. It might look a little dry at first, but keep going!
Finally, add your milk and that delightful alcohol-free vanilla extract. Now, crank up the speed on your mixer and beat, beat, beat until the frosting is light, fluffy, and absolutely dreamy. Scrape down the sides of the bowl a few times to make sure everything is incorporated. You want it smooth and spreadable, but still holding its shape.
Assembling Your Magnificent Triple Chocolate Layer Cake
Okay, your cakes are cool, your frosting is fluffy – it’s assembly time! Place one cooled cake layer on your serving plate or cake stand. Spread a generous amount of that decadent frosting evenly over the top. Don’t be shy! Next, carefully place the second cake layer on top, lining it up as best you can. Frost that layer, too. Then, add your third and final cake layer.
Now, frost the top and sides of the entire cake. I like to do a thin “crumb coat” first, chill it for 15 minutes, and then apply the final layer of frosting for a super smooth finish. But honestly, even a rustic look is gorgeous with this cake! For the grand finale, garnish with those beautiful dark chocolate shavings. You can make them with a vegetable peeler or a sharp knife from a block of chocolate. Stand back and admire your masterpiece!
Expert Tips for a Flawless Triple Chocolate Layer Cake
You’ve done all the hard work, now let’s make sure your triple chocolate layer cake is absolutely perfect! These little nuggets of wisdom are things I’ve picked up over many years (and many cakes!) that really make a difference. Baking is a science, but it also has a lot of heart, and these tips help bring both together. Don’t worry if your first cake isn’t absolutely “perfect” – every cake is a learning experience, and honestly, they all taste delicious!
One of my biggest tips? Read the whole recipe through before you even start. Seriously! It helps you get a feel for the flow and makes sure you don’t miss any steps. Also, always use a timer, but trust your gut (and that skewer test!) when it comes to doneness. Ovens can be quirky, so what works for mine might be a minute or two off for yours.
Achieving the Best Triple Chocolate Layer Cake Texture
For that melt-in-your-mouth texture, temperature is EVERYTHING. Make sure your butter, eggs, and buttermilk are at room temperature. It helps them emulsify properly, creating a smoother batter. And please, please, please: do NOT overmix! Once the dry and wet ingredients are just combined, stop. Overmixing develops gluten, leading to a tough, dry cake. Bake until a skewer comes out clean, but no longer, to keep that beautiful moisture locked in!
Triple Chocolate Layer Cake: Storage and Reheating
Okay, so by some miracle, you might actually have leftover triple chocolate layer cake (it’s rare, I know!). To keep it tasting amazing, make sure you store it properly. Pop any remaining slices or the whole cake into an airtight container. At room temperature, it’s generally good for up to 3 days. If you want it to last a bit longer, you can keep it in the fridge for up to 5 days. If you refrigerate it, just let it come back to room temperature for about 30 minutes before serving for the best flavor and texture. No need to reheat this beauty!
Frequently Asked Questions About This Triple Chocolate Layer Cake
I get asked a lot of questions about this triple chocolate layer cake, and I love it! It means you’re just as excited about baking this chocolatey goodness as I am. Here are some of the most common things people wonder about, and my best answers to help you make your cake absolutely perfect every time. Don’t be shy if you have more questions; baking is a journey, and we’re all learning together!
Can I Make This Triple Chocolate Layer Cake Ahead of Time?
Absolutely, you clever baker, you! The cake layers themselves can be baked a day or two in advance. Just let them cool completely, wrap them tightly in plastic wrap, and store them at room temperature. You can even make the frosting a day ahead and keep it covered in the fridge; just give it a good whip with your mixer before you’re ready to assemble your triple chocolate layer cake!
Substitutions for Ingredients in Your Triple Chocolate Layer Cake
I totally get it! Sometimes you’re missing an ingredient or have dietary needs. If you don’t have buttermilk, don’t fret! You can easily make your own: just add 1 tablespoon of white vinegar or lemon juice to a measuring cup, then fill it up to the 1-cup line with regular milk. Let it sit for 5-10 minutes until it curdles a bit – ta-da, homemade buttermilk! And if you’re not a coffee drinker, don’t worry, the hot coffee just enhances the chocolate flavor, it doesn’t make the cake taste like coffee. You can use hot water or even hot cocoa instead, but the coffee really does give that chocolate an extra oomph!
Nutritional Information for Your Triple Chocolate Layer Cake
Okay, so while we’re all about indulging in this amazing triple chocolate layer cake, I know some of you like to keep an eye on the nutritional side of things. Just a little heads-up: the nutritional values I’ve provided are estimates. They can totally change based on the specific brands of ingredients you use, how big your slices are (no judgment here!), and any little tweaks you make to the recipe. Think of it as a general guide, not a super strict rulebook!
PrintTriple Chocolate Layer Cake
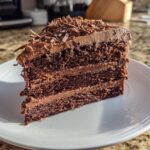
This triple chocolate layer cake is a rich dessert. It has three layers of chocolate cake, chocolate frosting, and chocolate shavings.
- Prep Time: 30 minutes
- Cook Time: 30 minutes
- Total Time: 1 hour 30 minutes
- Yield: 12 servings 1x
- Category: Dessert
- Method: Baking
- Cuisine: American
- Diet: Vegetarian
Ingredients
- 2 cups all-purpose flour
- 1 3/4 cups granulated sugar
- 3/4 cup unsweetened cocoa powder
- 1 1/2 teaspoons baking soda
- 1 teaspoon baking powder
- 1 teaspoon salt
- 1 cup buttermilk
- 1/2 cup vegetable oil
- 2 large eggs
- 1 teaspoon vanilla extract
- 1 cup hot strong brewed coffee
- 1 cup unsalted butter, softened
- 3 cups powdered sugar
- 1/2 cup unsweetened cocoa powder
- 1/4 cup milk
- 1 teaspoon vanilla extract
- 4 ounces dark chocolate, shaved for garnish
Instructions
- Preheat oven to 350°F (175°C). Grease and flour three 8-inch round cake pans.
- In a large bowl, whisk together flour, granulated sugar, 3/4 cup cocoa powder, baking soda, baking powder, and salt.
- Add buttermilk, vegetable oil, eggs, and 1 teaspoon vanilla extract. Beat with an electric mixer on medium speed until just combined.
- Gradually add the hot coffee, mixing until the batter is smooth. The batter will be thin.
- Divide the batter evenly among the prepared cake pans.
- Bake for 25-30 minutes, or until a wooden skewer inserted into the center comes out clean.
- Let cakes cool in pans for 10 minutes, then invert onto a wire rack to cool completely.
- To make the frosting, beat softened butter in a large bowl until creamy.
- Gradually add powdered sugar and 1/2 cup cocoa powder, beating until combined.
- Add milk and 1 teaspoon vanilla extract. Beat on high speed until light and fluffy.
- Once cakes are completely cool, place one layer on a serving plate. Spread with a generous amount of frosting.
- Top with the second cake layer, spread with frosting.
- Place the third cake layer on top and frost the top and sides of the cake.
- Garnish with chocolate shavings.
Notes
- Ensure all ingredients are at room temperature for best results.
- Do not overmix the cake batter, as this can lead to a dry cake.
- Hot coffee enhances the chocolate flavor without making the cake taste like coffee.
- For extra richness, add a tablespoon of instant espresso powder to the coffee.
- Leftover cake can be stored at room temperature in an airtight container for up to 3 days, or refrigerated for up to 5 days.
Nutrition
- Serving Size: 1 slice
- Calories: 550
- Sugar: 70g
- Sodium: 350mg
- Fat: 28g
- Saturated Fat: 16g
- Unsaturated Fat: 10g
- Trans Fat: 0g
- Carbohydrates: 75g
- Fiber: 4g
- Protein: 6g
- Cholesterol: 80mg


