Oh my goodness, these spinach and feta puff pastry twists are my go-to party trick! That first bite of flaky pastry with the salty feta and earthy spinach always gets people asking for the recipe. I’ve been making them for years – ever since my cousin’s baby shower where they disappeared before I could even grab one. Trust me, once you taste that golden, crispy exterior giving way to the warm, savory filling, you’ll understand why I always double the batch now. As someone who’s hosted more potlucks than I can count, I can promise these little twists will be the first thing gone from your appetizer spread.

Why You’ll Love These Spinach and Feta Puff Pastry Twists
Listen, I know you’re going to adore these little bundles of joy as much as I do – here’s why:
- They’re stupid easy – With just 6 ingredients and store-bought puff pastry, you’re 30 minutes away from party-worthy appetizers
- That perfect crunch – That flaky, golden-brown pastry shatters the moment you bite in, giving way to the creamy feta filling
- Crowd-pleaser magic – Even picky eaters can’t resist these – I’ve seen veggie-haters go back for thirds!
- Make-ahead friendly – Assemble them in the morning, then just pop in the oven when guests arrive
- Endlessly adaptable – Swap in different cheeses or add sun-dried tomatoes for your own signature twist
Seriously, I’ve brought these to everything from book club to football Sundays, and they always steal the show. The best part? Everyone thinks you spent hours when really – our little secret – it’s one of the easiest appetizers in my repertoire!
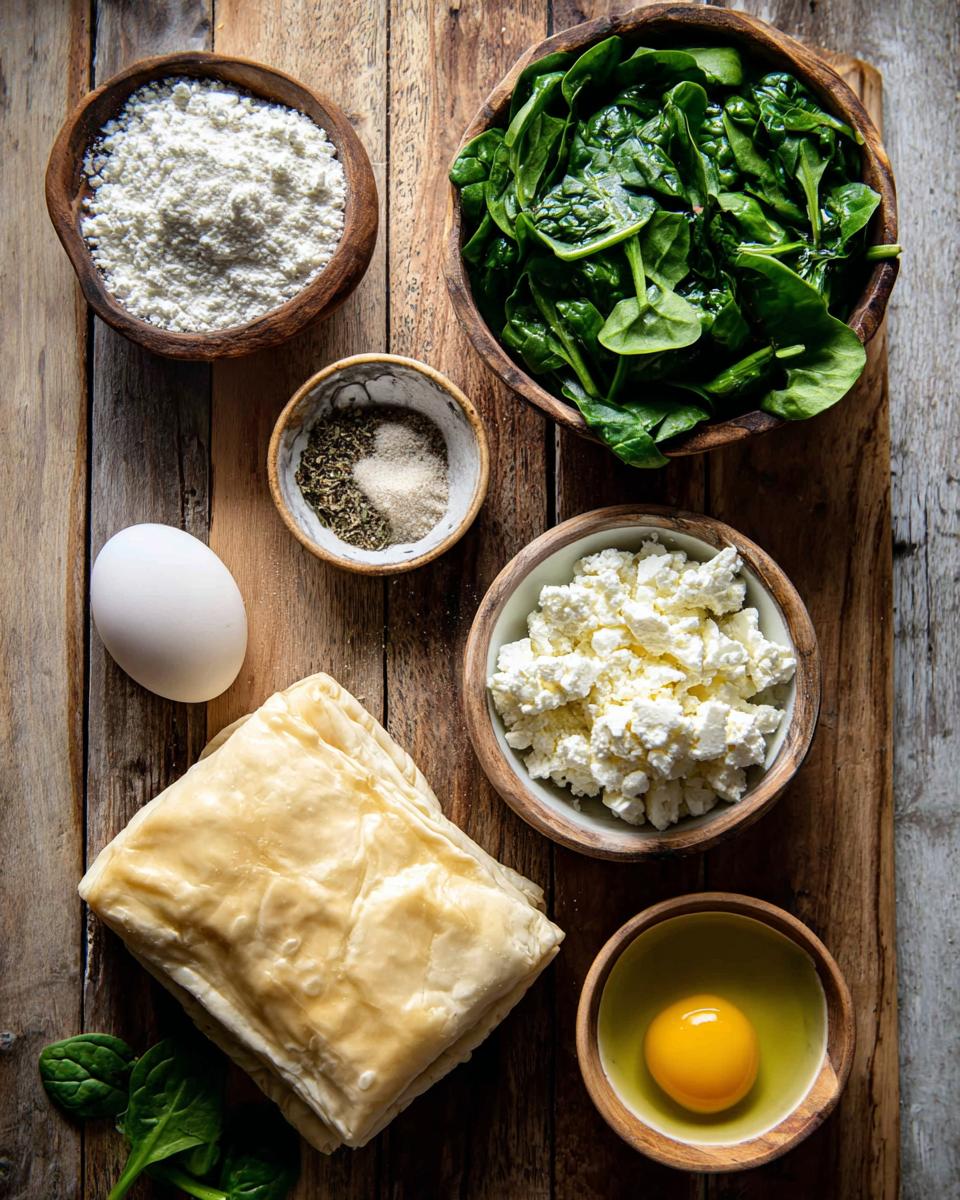
Ingredients for Spinach and Feta Puff Pastry Twists
Okay, let’s talk ingredients – and I promise, there’s no fancy stuff here! Just simple, flavorful components that come together like magic. I’ve made these twists so many times I could probably do it in my sleep, but I still double-check my ingredient list every time because proportions matter. Here’s what you’ll need:
- 1 sheet puff pastry – The star of the show! Make sure it’s thawed (I leave mine in the fridge overnight – no shortcuts here or you’ll end up with a sticky mess)
- 1 cup fresh spinach, chopped – Don’t even think about frozen here, we want that bright, fresh flavor and perfect texture
- 1/2 cup feta cheese, crumbled – I prefer the block kind you crumble yourself – that pre-crumbled stuff is too dry
- 1 egg, beaten – This is our golden glow-maker (just wait till you see how it transforms the pastry!)
- 1 tbsp olive oil – A good glug to bring everything together
- 1/2 tsp garlic powder – Our secret flavor booster (fresh garlic is too wet and makes the pastry soggy)
- 1/4 tsp black pepper – Freshly ground if you’ve got it, but any kind works
A quick pro tip about the puff pastry – if you’re in a hurry, you can thaw it at room temp for about 40 minutes, but check it frequently. You want it pliable but still cool to the touch. And whatever you do, don’t try to unroll it when it’s still frozen – I learned that lesson the hard way with pastry shards everywhere!
Equipment You’ll Need
Okay, let’s talk tools – and don’t worry, you won’t need anything fancy here! I’ve made these twists in everything from a tiny apartment kitchen to my mom’s well-stocked cooking space, and honestly, the basics are all you really need. Here’s what I grab every single time:
- Baking sheet – Half-sheet pan is perfect, but any size works as long as it fits in your oven
- Parchment paper – Non-negotiable! It keeps the twists from sticking and makes cleanup a breeze
- Mixing bowl – Medium-sized for our spinach and feta filling – nothing fancy required
- Pastry brush – That $2 silicone one from the grocery store works better than fancy brushes in my experience
- Sharp knife or pizza cutter – For slicing the pastry into perfect little twistable strips
- Rolling pin – Just to lightly smooth out the pastry if needed (I’ve used a bottle in a pinch!)
See? Nothing complicated. The beauty of this recipe is that it works with whatever basic kitchen gear you’ve got. Though I will say – after making these dozens of times, that little pastry brush has become my MVP for getting that perfect golden finish!
How to Make Spinach and Feta Puff Pastry Twists
Alright, let’s get to the fun part – turning these simple ingredients into those gorgeous golden twists everyone will be fighting over! I’ll walk you through each step just like I’m right there in the kitchen with you. Don’t worry if it’s your first time – these are way easier than they look, I promise!
Step 1: Prepare the Filling
First things first – let’s make our flavor-packed filling. Grab that fresh spinach and give it a good chop – not too fine, we want some texture here. Now, here’s my secret weapon against soggy pastry: after chopping, take a paper towel and gently press those spinach pieces to remove any excess moisture. Trust me, this makes all the difference!
Toss the spinach into your mixing bowl with the crumbled feta, olive oil, garlic powder, and black pepper. Mix it all together with your hands – yes, your hands! – until everything is nicely combined. You’ll know it’s ready when you see those little flecks of green evenly distributed through the feta. Set this aside while we work on the pastry.
Step 2: Assemble and Twist
Now for the magic! Unroll your thawed puff pastry onto a lightly floured surface. If there are any cracks at the edges, just pinch them together – no one will notice once we’re done. Spread your spinach-feta mixture evenly over one half of the pastry sheet, leaving about a half-inch border around the edges. This border is crucial – it’s what will seal our twists!
Carefully fold the empty half of the pastry over the filling, then press down all around the edges to seal. Use a sharp knife or pizza cutter to slice the whole rectangle into about 12 strips – I usually go for 1-inch wide, but don’t stress about being perfect. Here comes the fun part: grab each strip by both ends and gently twist it 3-4 times. You’ll see that beautiful spiral start to form! Place each twisted beauty onto your parchment-lined baking sheet, pressing the ends down lightly so they don’t uncurl.
Step 3: Bake to Perfection
Almost there! Give each twist a generous brush with that beaten egg – this is what gives them that gorgeous golden shine. Pop them into your preheated 400°F oven and resist the temptation to open the door for at least 15 minutes. I like to rotate the pan halfway through for even browning.
You’ll know they’re done when they’re puffed up and that beautiful deep golden color – usually about 15-18 minutes total. Don’t wait for them to get too dark though, or the pastry can taste bitter. Oh, and that heavenly smell filling your kitchen? That’s how you know you nailed it!
Let them cool just a minute or two before serving – they’re best when that flaky pastry is still warm and crisp. But be warned: these disappear FAST, so grab one for yourself before your guests descend!
Tips for Perfect Spinach and Feta Puff Pastry Twists
After making these twists more times than I can count (and learning from all my mistakes!), I’ve picked up some game-changing tricks that’ll take yours from good to absolutely irresistible. Listen up, because these little nuggets of wisdom will save you from the pitfalls I’ve faced!
Keep everything cool
Puff pastry is fussy about temperature – it’s why I always work quickly and sometimes even pop my assembled twists in the fridge for 10 minutes before baking. That extra chill keeps the butter layers distinct, giving you those incredible flaky layers we all love. If your kitchen’s warm, this step is non-negotiable!
Filling distribution is key
Here’s where I messed up my first few batches – spreading the filling too thick in some spots, barely any in others. Use the back of a spoon to create an even layer, right up to (but not over!) that half-inch border. Uneven filling means some twists will burst open while baking – not the end of the world, but not as pretty.
Twist with confidence
Don’t be timid when twisting those strips! A gentle but firm 3-4 twists gives the perfect spiral. I used to barely twist them, ending up with sad little half-turns. More twists = more surface area = more crispy golden edges. Win-win!
The paper towel trick
Remember how I mentioned wringing out the spinach? I can’t stress this enough – excess moisture is the enemy of crispy pastry. After chopping, I actually sandwich the spinach between two paper towels and press firmly. Your future crispy, flaky self will thank you.
Egg wash matters
That golden sheen isn’t just pretty – it adds flavor and helps the pastry crisp up. But here’s my secret: I add a tiny pinch of salt to my beaten egg wash. Just enough to enhance the flavor without making it salty. And don’t skimp – a generous brush over the entire surface is what gives you that professional bakery look.
Serving Suggestions
Oh, the possibilities with these golden beauties! While they’re absolutely divine on their own (I may or may not have eaten a whole batch straight from the baking sheet once), here are my favorite ways to serve them that’ll make you look like a total entertaining pro:
Dipping Sauces That Steal the Show
That crispy pastry just begs to be dipped! My go-to is a simple garlic yogurt sauce – just mix Greek yogurt with minced garlic, lemon juice, and a pinch of salt. But here’s what else works magic:
- Spicy honey – Just warm honey with a dash of crushed red pepper flakes (trust me on this one!)
- Roasted red pepper dip – Jarred peppers blended with cream cheese and a splash of balsamic
- Easy tzatziki – Store-bought works fine, or make your own with grated cucumber and dill
Salad Pairings That Balance Perfectly
For a light lunch or fancy brunch, I love serving these twists with:
- A simple arugula salad with lemon vinaigrette and shaved parmesan
- Greek salad – The crisp veggies and olives complement the rich pastry beautifully
- Tomato cucumber salad with fresh mint – So refreshing against the savory filling
Cocktail Party Perfection
When I’m feeling fancy, I arrange these on a platter with:
- Assorted olives and marinated artichokes
- Sliced prosciutto rolled into little cones
- A bowl of warm marinara for dipping (yes, it works shockingly well!)
The best part? These twists are equally at home at a casual game day spread as they are at a fancy dinner party. Last Christmas, I served them alongside White grape juice, and they disappeared before the main course! Whatever you pair them with, just make sure to have plenty – I’ve learned the hard way that people will hover near the platter waiting for more.
Storage and Reheating
Okay, confession time – these twists rarely last long enough to need storing in my house! But on the rare occasion I have leftovers (or when I’m smart enough to make extra), here’s exactly how I keep them tasting almost as good as fresh-from-the-oven:
The Right Way to Store Them
First rule: let them cool completely before storing – no one wants soggy pastry! I transfer them to an airtight container with a sheet of parchment between layers if stacking. They’ll keep beautifully at room temp for about 6 hours (great for parties!), but for longer storage, pop them in the fridge where they’ll stay fresh for 2-3 days.
Reheating Like a Pro
Now, here’s my golden rule for reviving these twists: never microwave them unless you enjoy sad, limp pastry! Instead, I use my toaster oven or regular oven at 350°F for about 5-7 minutes. This brings back that incredible crispiness we love. If they’re looking a bit pale, a quick spritz of water before reheating helps refresh the crust.
Freezing for Future Cravings
Yes, you can freeze these! I assemble and twist them completely, then freeze unbaked on a parchment-lined sheet. Once frozen solid, transfer to a freezer bag. When cravings hit, bake straight from frozen – just add a few extra minutes to the baking time. They won’t be quite as perfect as fresh, but still miles better than store-bought!
One last tip: if you’re reheating a whole batch, I sometimes give them a quick brush with melted butter before popping them back in the oven. It’s not necessary, but oh boy, does it make them taste freshly baked again!
Spinach and Feta Puff Pastry Twists Variations
Okay, let’s play with our food! While I’m obsessed with the classic version, half the fun of cooking is making recipes your own. Here are my favorite twists (pun totally intended) that’ll keep this recipe exciting every time you make it:
The Mediterranean Upgrade
Sometimes I channel my inner Greek grandmother (I wish I had one!) by tossing in:
- Sun-dried tomatoes – Just 2 tbsp chopped adds the most incredible sweet-tangy punch
- Kalamata olives – Roughly chopped for little bursts of briny goodness
- Fresh dill – About 1 tbsp mixed into the filling transports you straight to Santorini
Cheese Swap Magic
Feta’s fantastic, but don’t be afraid to mix it up:
- Goat cheese – Creamier texture with a lovely tang (use 1/3 cup since it’s stronger)
- Ricotta + parmesan – For an Italian vibe (1/4 cup each, drained well)
- Vegan feta – Surprisingly good alternatives exist now – my dairy-free friends rave!
Protein Power Moves
Want to make these heartier? I’ve had great success with:
- Crispy pancetta bits – About 1/4 cup cooked until crunchy (cool before adding)
- Chopped artichoke hearts – The jarred kind, drained and patted dry
- Cooked sausage crumbles – Breakfast-style turns these into brunch superstars
Spice It Up
For those who like a little heat:
- Red pepper flakes – Just 1/4 tsp mixed into the filling
- Harissa paste – A tiny 1/2 tsp adds incredible depth
- Za’atar seasoning – Sprinkle over the egg wash before baking
The beauty of this recipe is how forgiving it is – I’ve probably made two dozen variations by now, and they’ve all been delicious in their own way. My advice? Start with the classic, then get creative once you’re comfortable with the technique. Just remember: whatever you add, keep it relatively dry (blot those ingredients well!) and you’ll be golden. Literally!
Nutritional Information
Okay, let’s talk numbers – but first, full disclosure! These nutrition stats are estimates based on standard ingredients. Your exact counts might vary depending on brand choices or ingredient substitutions. That said, here’s what you’re looking at per twist (based on making 12 from this recipe):
- Calories: About 120 per twist (perfect for guilt-free snacking!)
- Fat: 8g (mostly from that glorious puff pastry and feta)
- Carbs: 9g (the flaky layers do their thing)
- Protein: 3g (thanks to the egg and cheese)
- Sodium: Around 180mg (the feta does most of the heavy lifting here)
Now, here’s my nutritionist friend’s favorite part – each twist packs about half a gram of fiber and only half a gram of sugar naturally from the spinach. Not bad for something that tastes this indulgent, right? Just remember – these numbers can change if you go wild with the feta (no judgment here!) or use different brands.
Pro tip: If you’re watching sodium, look for lower-salt feta options or reduce the amount slightly. And hey – with all that fresh spinach, you’re basically eating salad… wrapped in flaky pastry heaven!
Frequently Asked Questions
Over the years, I’ve gotten so many questions about these twists – and made every mistake imaginable so you don’t have to! Here are the answers to the things people ask me most:
Q1. Can I use frozen spinach instead of fresh?
Technically yes, but I don’t recommend it! Frozen spinach releases way more water, which makes the pastry soggy. If you must use frozen, thaw it completely, then squeeze out every last drop of moisture with a clean kitchen towel. Even then, the texture won’t be quite as nice as fresh.
Q2. How do I prevent sogginess?
Three golden rules: 1) Dry your spinach well (I press between paper towels), 2) Don’t overfill the pastry, and 3) Make sure your oven is fully preheated before baking. That initial blast of heat is crucial for getting that perfect crispness!
Q3. Can I make these ahead of time?
Absolutely! Assemble the twists up to 4 hours ahead and keep them chilled until baking. You can even freeze them unbaked (see my storage tips section). Just add a couple extra minutes to the baking time if cooking from frozen.
Q4. My twists uncoiled while baking – what went wrong?
Ah, the dreaded un-twist! This usually happens if you didn’t press the ends firmly enough onto the baking sheet before baking. Next time, really smoosh those ends down – it helps to twist them a bit tighter than you think you should.
Q5. Can I use phyllo dough instead of puff pastry?
While phyllo would give you crispiness, it’s much more delicate and doesn’t hold the filling as well. Puff pastry’s layers are what create that perfect flaky-chewy texture we love. If you try phyllo, brush each layer with butter and keep the filling very dry!
Share Your Spinach and Feta Puff Pastry Twists
Okay, now it’s your turn! I want to see your beautiful creations – the golden twists, the creative variations, even the “oops” moments (we’ve all had them!). There’s nothing I love more than hearing how you’ve made this recipe your own. Did you add sun-dried tomatoes? Try a different cheese? Maybe you twisted them into fun shapes? Tell me everything!
Drop a comment below with your experience – did they turn out perfectly crisp? Any brilliant modifications I should try? Questions about technique? I read every single one and love chatting about these little bites of joy. And if you’re feeling fancy, tag me on Instagram with your photos using #SpinachFetaTwists – seeing your versions makes my day!
Most importantly – enjoy every flaky, savory bite. These twists have brought so much happiness to my gatherings, and I hope they do the same for yours. Now get twisting, and don’t forget to save one for yourself before they disappear!
PrintSpinach and Feta Puff Pastry Twists

Flaky puff pastry twists filled with spinach and feta for a savory snack or appetizer.
- Prep Time: 15 minutes
- Cook Time: 18 minutes
- Total Time: 33 minutes
- Yield: 12 twists 1x
- Category: Appetizer
- Method: Baking
- Cuisine: Mediterranean
- Diet: Vegetarian
Ingredients
- 1 sheet puff pastry (thawed)
- 1 cup fresh spinach (chopped)
- 1/2 cup feta cheese (crumbled)
- 1 egg (beaten, for egg wash)
- 1 tbsp olive oil
- 1/2 tsp garlic powder
- 1/4 tsp black pepper
Instructions
- Preheat oven to 400°F (200°C). Line a baking sheet with parchment paper.
- In a bowl, mix spinach, feta, olive oil, garlic powder, and black pepper.
- Roll out puff pastry on a floured surface. Spread the spinach-feta mixture evenly over half of the pastry.
- Fold the other half over the filling and press edges to seal.
- Cut into 1-inch strips. Twist each strip and place on the baking sheet.
- Brush with egg wash. Bake for 15-18 minutes until golden brown.
Notes
- Thaw puff pastry according to package instructions.
- Use fresh spinach for best texture.
- Serve warm for maximum crispiness.
Nutrition
- Serving Size: 1 twist
- Calories: 120
- Sugar: 0.5g
- Sodium: 180mg
- Fat: 8g
- Saturated Fat: 3g
- Unsaturated Fat: 4g
- Trans Fat: 0g
- Carbohydrates: 9g
- Fiber: 0.5g
- Protein: 3g
- Cholesterol: 20mg


