Oh, Pain aux Raisins! Just saying the name makes me feel like I’m strolling through a bustling French patisserie, the smell of warm butter and sweet pastries wafting through the air. These little “snail pastries” are pure magic, aren’t they? There’s something so utterly charming about a perfectly swirled, raisin-studded viennoiserie that just screams comfort and elegance all at once. I remember the first time I tried one on a trip to Paris; it was a revelation! I knew right then and there I had to figure out how to bring that magic into my own kitchen.
And let me tell you, after countless batches, a few “oops” moments, and a whole lot of flour on my counter, I’ve finally cracked the code to making the most incredible homemade Pain aux Raisins. This isn’t just any recipe; it’s *the* recipe. It takes that classic French charm and makes it totally achievable for us home bakers. Trust me, if you’ve ever been intimidated by fancy French pastries, this is where you start. You’re going to fall in love with the process, and even more so with that first warm, buttery bite!
Why You’ll Love This Pain aux Raisins Recipe
Okay, so why should you dive into making these Pain aux Raisins yourself? Because it’s an absolute game-changer, that’s why! You get to control every single delicious aspect, from the plumpness of the raisins to the richness of the pastry cream. Plus, the smell that fills your kitchen while these bake? Pure heaven, I tell ya! It’s an experience, not just a recipe.
- Unbeatable Freshness: Nothing, and I mean *nothing*, beats a warm pastry straight from your oven.
- Customizable Goodness: Want more raisins? Go for it! A hint of orange zest in your pastry cream? You’re the boss!
- Serious Bragging Rights: Seriously, tell your friends you made Pain aux Raisins and watch their jaws drop.
- Pure Comfort: There’s just something incredibly satisfying about creating something so beautiful and delicious from scratch.
The Allure of Homemade Pain aux Raisins
Sure, you can grab a Pain aux Raisins from a bakery, but it just doesn’t compare. Homemade means you’re getting that incredible, flaky, buttery dough at its absolute peak. No stale crusts here! You also know exactly what’s going into it, which is a huge plus. And honestly, there’s a special kind of pride that comes with pulling a tray of these golden, swirled beauties out of your own oven. It’s a little slice of French bakery magic, right in your home!
Essential Equipment for Perfect Pain aux Raisins
Alright, before we get our hands all floury, let’s talk tools! You don’t need a professional pastry kitchen, but having the right gear makes this Pain aux Raisins journey so much smoother. Trust me, a little preparation here saves a lot of frustration later. We’re aiming for deliciousness, not a kitchen disaster!
Tools for Crafting Your Pain aux Raisins
First up, a good, sturdy mixing bowl – a large one for the dough is key. A stand mixer with a dough hook is a huge help for kneading, but strong arms and a clean counter work just as well! You’ll definitely want a reliable measuring cup and spoons for accuracy. A rolling pin is non-negotiable for getting that dough nice and even, and a sharp knife or bench scraper will make cutting those beautiful swirls a breeze. Oh, and don’t forget the parchment paper for easy cleanup and no-stick baking sheets!
Ingredients for Delicious Pain aux Raisins
Okay, let’s get down to the yummy stuff – the ingredients! This is where the magic really starts to happen. I’m going to walk you through exactly what you’ll need, right down to the temperature of your milk. Don’t skimp on quality here; fresh ingredients really do make all the difference, especially when you’re aiming for that authentic French bakery taste. You’ll thank yourself later when you bite into these beauties!
Dough Ingredients for Pain aux Raisins
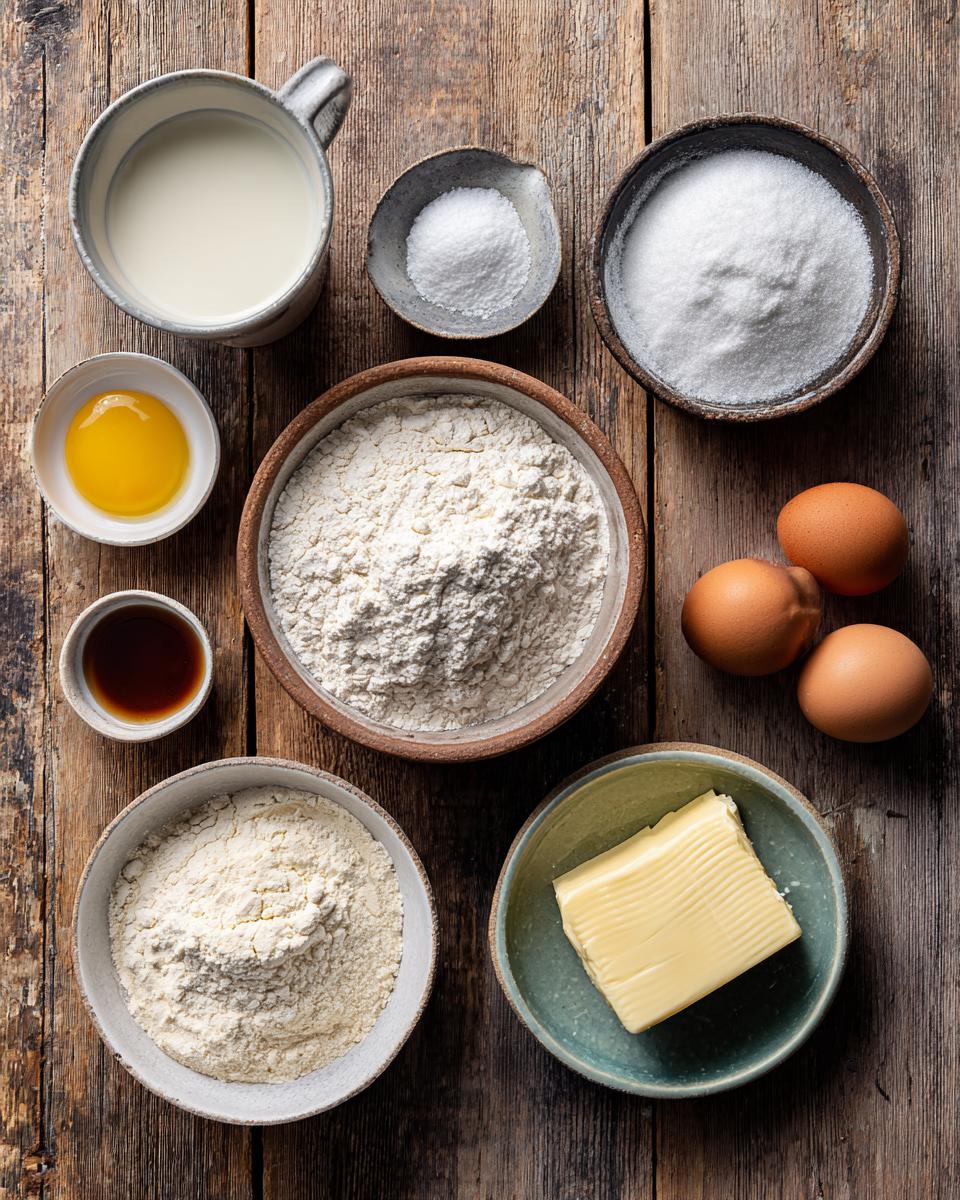
For the heart of our Pain aux Raisins, the dough, we need:
- 1 cup warm milk (105-115°F): This temperature is super important for waking up our yeast!
- 1/4 cup granulated sugar: Just enough to give the yeast a little meal and add some sweetness.
- 2 1/4 teaspoons active dry yeast: Make sure it’s active and not expired, or your dough won’t rise!
- 3 1/2 cups all-purpose flour, plus more for dusting: Good quality all-purpose flour works perfectly here.
- 1 teaspoon salt: Don’t skip this; it balances the sweetness and brings out the flavor.
- 1/2 cup unsalted butter, softened: Let it sit out for a bit so it’s nice and pliable, but not melted.
- 1 large egg: For richness and binding.
- 1 teaspoon alcohol-free vanilla extract: A lovely hint of warmth.
Filling and Finishing for Pain aux Raisins
And for that irresistible swirl and golden finish, grab these:
- 1 cup raisins: Plump and juicy, please!
- 1/2 cup pastry cream (store-bought or homemade): You can absolutely use your favorite store-bought kind to save time, or whip up a batch from scratch if you’re feeling ambitious!
- 1 tablespoon milk: For our egg wash – just a splash!
How to Make Pain aux Raisins: Step-by-Step Instructions
Alright, bakers, this is where the magic happens! Don’t be intimidated; we’re going to break this down into super manageable steps. Just follow along, and you’ll be pulling warm, glorious Pain aux Raisins from your oven in no time. Think of it as a little dance between you and the dough – gentle at first, then a bit more vigorous, and finally, a beautiful creation!
Preparing the Dough for Pain aux Raisins
First things first, let’s get that yeast happy! In a small bowl, combine your warm milk (remember that 105-115°F range is key!), granulated sugar, and active dry yeast. Give it a gentle stir and let it sit for about 5 minutes. You’re looking for it to get nice and foamy on top – that means your yeast is alive and ready to party!
While your yeast is proofing, grab a large bowl (or your stand mixer bowl). Whisk together your flour and salt. Once your yeast mixture is foamy, pour it into the flour mixture. Add your softened butter, the large egg, and the alcohol-free vanilla extract. Mix it all up until you have what looks like a shaggy, slightly messy dough. Don’t worry, it’s supposed to look like that!
Now for the fun part: kneading! Turn that shaggy dough out onto a lightly floured surface. Knead it for a good 8-10 minutes. If you’re using a stand mixer with a dough hook, let it do the work for you on medium speed. You want the dough to become smooth, elastic, and not super sticky. It should feel alive under your hands!
Once kneaded, lightly oil a clean bowl, pop your dough in, and cover it with plastic wrap. Find a warm spot in your kitchen (a slightly warm oven that’s turned off, or near a sunny window, works great!). Let it rise for 1-2 hours, or until it’s beautifully doubled in size. This is where patience pays off!
Assembling Your Pain aux Raisins
Okay, your dough has risen like a champ! Gently punch it down to release the air. Now, on a lightly floured surface, roll the dough out into a nice 12×18 inch rectangle. Try to get it as even as you can – a ruler can be your best friend here!
Next, spread that luscious pastry cream evenly over the entire surface of the dough, but make sure to leave a 1-inch border along one of the long sides. This little border helps seal everything in. Sprinkle your plump raisins all over the pastry cream. Don’t be shy!
Now, starting from the long side *with* the pastry cream (not the plain border side!), carefully and tightly roll up the dough into a log. You want it snug, like a cozy blanket. Once rolled, use a sharp knife or a piece of unflavored, unwaxed dental floss to cut the log into 12 equal slices, each about 1 1/2 inches thick. Dental floss gives you super clean cuts without squishing the layers!
Baking and Finishing Your Pain aux Raisins
Line a baking sheet with parchment paper. Place your beautiful Pain aux Raisins slices cut-side up on the sheet, leaving a bit of space between them because they’re going to puff up again. Loosely cover them with plastic wrap and let them rise for another 30-45 minutes. They should look puffy and a bit bigger.
While they’re doing their final rise, preheat your oven to 375°F (190°C). In a small bowl, whisk together that 1 tablespoon of milk and your beaten egg for a lovely egg wash. Just before baking, gently brush the tops of your pastries with this egg wash – it gives them that gorgeous golden shine!
Pop them into the preheated oven and bake for 18-22 minutes, or until they’re beautifully golden brown and smell absolutely incredible. Once baked, let them cool on a wire rack. I know, I know, it’s hard to wait, but they’re even better when they’ve had a few minutes to set up. Enjoy your homemade French masterpiece!
Tips for Perfect Pain aux Raisins
Making Pain aux Raisins is a labor of love, and a few little tricks can make all the difference between good and absolutely *amazing*! I’ve learned these the hard way, so you don’t have to. Pay attention to these details, and your pastries will be bakery-worthy every single time. It’s all about understanding what the dough needs!
Achieving the Best Pain aux Raisins Texture
The secret to that perfect, tender-chewy, yet flaky texture starts with your dough. Don’t rush the kneading! Those 8-10 minutes are crucial for developing the gluten, which gives your Pain aux Raisins structure and elasticity. Also, make sure your butter is truly softened, not melted – melted butter makes for a greasy, dense dough. And for rising, find a consistently warm, draft-free spot. Yeast loves warmth! If your kitchen is cold, a slightly warm (turned off!) oven can be your best friend. Finally, don’t overbake! Keep an eye on them; a golden brown crust is what you’re looking for, not a dark, dry one. Overbaking steals away that precious moisture.
Pain aux Raisins: Storage and Reheating
So you’ve somehow managed to have leftover Pain aux Raisins? Amazing self-control! But seriously, knowing how to store and reheat these beauties properly means you can enjoy that fresh-baked goodness for a little longer. Nobody wants a sad, stale pastry, right?
Keeping Your Pain aux Raisins Fresh
For best results, store your cooled Pain aux Raisins in an airtight container at room temperature for up to 2 days. If you want them to last longer, you can pop them in the fridge for up to 4-5 days, but they might dry out a tiny bit. My favorite trick for longer keeping is freezing! Once completely cool, wrap each pastry individually in plastic wrap, then place them in a freezer-safe bag or container. They’ll keep happily for up to a month. To reheat, just let them thaw at room temperature, then warm them gently in a toaster oven or a regular oven at 300°F (150°C) for about 5-10 minutes. It brings back that lovely, fresh-baked feel!
Common Questions About Pain aux Raisins
I get a lot of questions about making Pain aux Raisins, and I love answering them! It shows you’re really thinking about the process, which is fantastic. Here are some of the most common ones that pop up, along with my best advice to help you on your pastry journey!
Can I Prepare Pain aux Raisins Ahead of Time?
Absolutely, yes! This is one of my favorite things to do, especially if I want fresh Pain aux Raisins for breakfast without waking up at 4 AM. You can make the dough and assemble the pastries the night before. After cutting the log into slices and placing them on the baking sheet, instead of letting them do their second rise at room temperature, cover them loosely with plastic wrap and pop them in the fridge overnight. In the morning, take them out and let them come to room temperature for about 30-60 minutes while your oven preheats. Then proceed with the egg wash and baking as usual. It’s a total game-changer!
What if My Pain aux Raisins Dough Doesn’t Rise?
Oh, this can be so frustrating, I know! The most common culprit for a dough that won’t rise is inactive yeast. Make sure your yeast isn’t expired and that your milk is at the right temperature (105-115°F is perfect). Too hot, and you kill the yeast; too cold, and it won’t activate. Another factor is the environment – yeast loves warmth! If your kitchen is cold, try putting the covered bowl in a slightly warm (turned off!) oven with just the light on, or near a sunny window. If it still doesn’t rise after the first proofing, unfortunately, you might need to start over with fresh yeast.
What Can I Substitute for Pastry Cream in Pain aux Raisins?
While classic Pain aux Raisins shine with pastry cream, you absolutely have options if you’re out or want to try something a little different! A simple spread of cream cheese mixed with a touch of sugar and alcohol-free vanilla extract makes a delicious, tangy alternative. You could also use a thick lemon curd for a zesty twist, or even a rich almond frangipane. Just make sure whatever you choose is thick enough not to run out during baking. Get creative – it’s your pastry!
Estimated Nutritional Information for Pain aux Raisins
Just a heads-up, the nutritional information provided here is an estimate! It can totally vary based on the specific brands you use, how much pastry cream you glob on, or even the size you cut your Pain aux Raisins. So, take these numbers with a grain of salt (figuratively, of course!).
Share Your Pain aux Raisins Experience
Well, there you have it – my absolute favorite way to make these delightful Pain aux Raisins! I really hope you give this recipe a try. When you do, please, please, come back and tell me all about it! Did you love them? Did you add your own special twist? I’d absolutely adore seeing your creations, so snap a pic and tag me on social media! Happy baking, my friends!
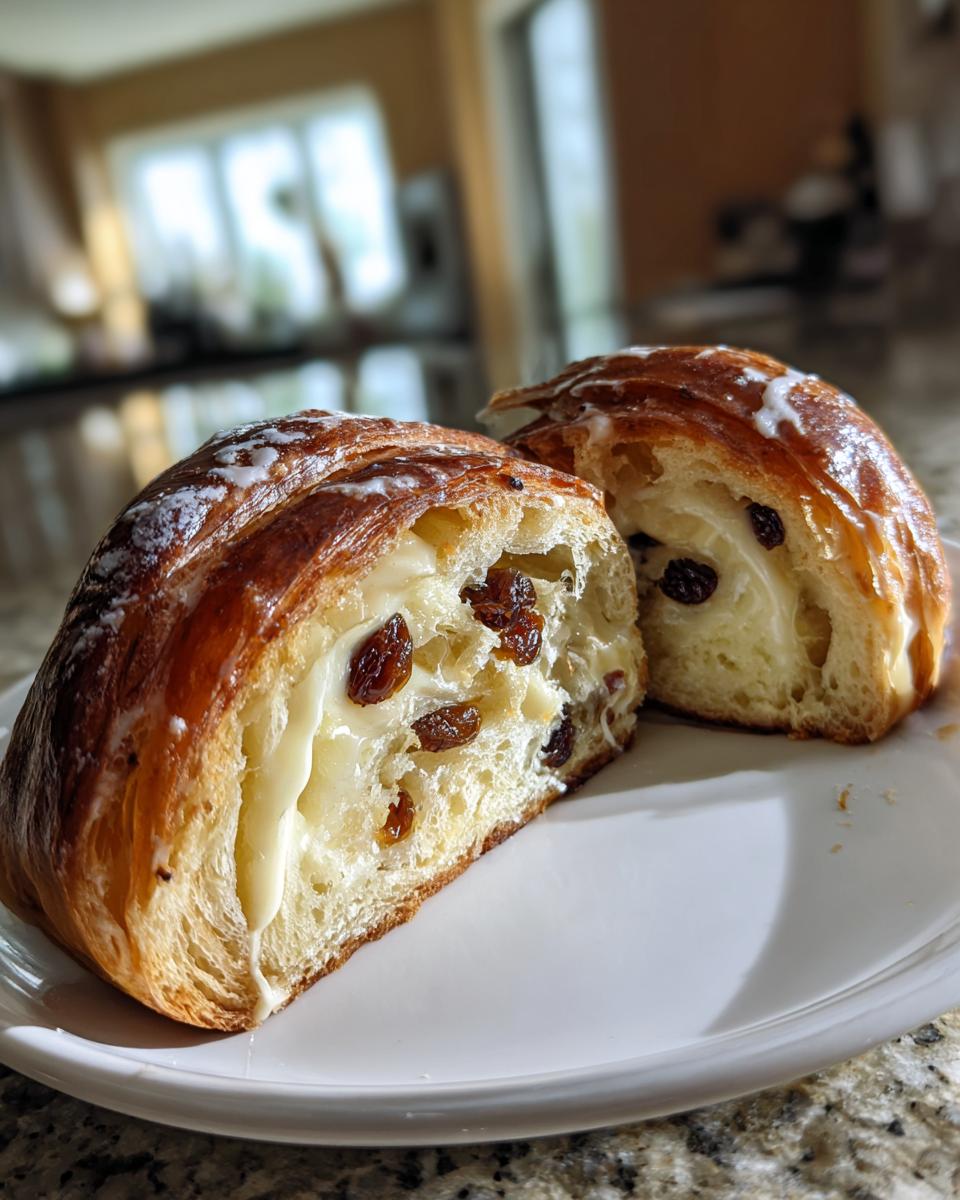
PrintHomemade Pain aux Raisins

Pain aux Raisins, also known as a snail pastry, is a breakfast pastry that originated in France. It is typically made with a leavened butter pastry, similar to croissant dough, with raisins and pastry cream. It is a type of ‘viennoiserie’.
- Prep Time: 30 minutes
- Cook Time: 20 minutes
- Total Time: 2 hours 50 minutes
- Yield: 12 pastries 1x
- Category: Breakfast
- Method: Baking
- Cuisine: French
- Diet: Vegetarian
Ingredients
- 1 cup warm milk (105-115°F)
- 1/4 cup granulated sugar
- 2 1/4 teaspoons active dry yeast
- 3 1/2 cups all-purpose flour, plus more for dusting
- 1 teaspoon salt
- 1/2 cup unsalted butter, softened
- 1 large egg
- 1 teaspoon vanilla extract
- 1 cup raisins
- 1/2 cup pastry cream (store-bought or homemade)
- 1 tablespoon milk (for egg wash)
Instructions
- In a small bowl, combine warm milk, sugar, and yeast. Let stand for 5 minutes, until foamy.
- In a large bowl, whisk together flour and salt. Add the yeast mixture, softened butter, egg, and vanilla extract. Mix until a shaggy dough forms.
- Turn the dough out onto a lightly floured surface and knead for 8-10 minutes, until smooth and elastic.
- Place the dough in a lightly oiled bowl, cover with plastic wrap, and let rise in a warm place for 1-2 hours, or until doubled in size.
- Punch down the dough and roll it into a 12×18 inch rectangle on a lightly floured surface.
- Spread the pastry cream evenly over the dough, leaving a 1-inch border on one long side. Sprinkle the raisins over the pastry cream.
- Starting from the long side with the pastry cream, tightly roll up the dough into a log.
- Cut the log into 12 equal slices, about 1 1/2 inches thick.
- Place the slices cut-side up on a parchment-lined baking sheet, leaving some space between them. Cover loosely with plastic wrap and let rise for another 30-45 minutes, or until puffy.
- Preheat oven to 375°F (190°C).
- In a small bowl, whisk together 1 tablespoon milk and a beaten egg for an egg wash. Brush the tops of the pastries with the egg wash.
- Bake for 18-22 minutes, or until golden brown.
- Let cool on a wire rack before serving.
Notes
- For a richer flavor, use full-fat milk.
- You can make the dough and assemble the pastries the night before and refrigerate them. In the morning, let them come to room temperature for 30 minutes before baking.
- Leftover Pain aux Raisins can be stored in an airtight container at room temperature for up to 2 days, or frozen for up to 1 month.
Nutrition
- Serving Size: 1 pastry
- Calories: 350
- Sugar: 25g
- Sodium: 180mg
- Fat: 18g
- Saturated Fat: 10g
- Unsaturated Fat: 5g
- Trans Fat: 0g
- Carbohydrates: 40g
- Fiber: 2g
- Protein: 6g
- Cholesterol: 60mg


