Oh my gosh, you have to try these Oven-Baked Cheesy Tacos—they’re crispy, loaded with flavor, and the easiest way to feed a hungry crowd! I swear by this method after years of messy stovetop frying (remember those splatter burns? Ouch!). Every Thursday is taco night at our house, and these beauties get devoured before I can even snap a decent photo.
The magic happens when that cheddar melts into every nook of the taco shell while baking. You get that perfect crunch without standing over a skillet. My kids go wild for the golden edges, and I love that I can prep everything ahead—no last-minute chaos when friends drop by unexpectedly. Trust me, once you taste that beefy, cheesy goodness straight from the oven, you’ll never go back to soggy takeout tacos again.
Why You’ll Love These Oven-Baked Cheesy Tacos
- Crispy perfection: Baking transforms ordinary shells into golden, shatteringly crisp vessels—no greasy frying required!
- Cheese pull magic: Melted cheddar blankets every inch of filling, creating that irresistible stretch with every bite.
- 20-minute wonder: From fridge to table faster than delivery—just brown, stuff, bake, and devour.
- Crowd-pleaser: Kids customize their toppings while adults rave about the restaurant-quality crunch (I call that a win-win).
- No babysitting: The oven does all the work—say goodbye to grease splatters and unevenly cooked shells!
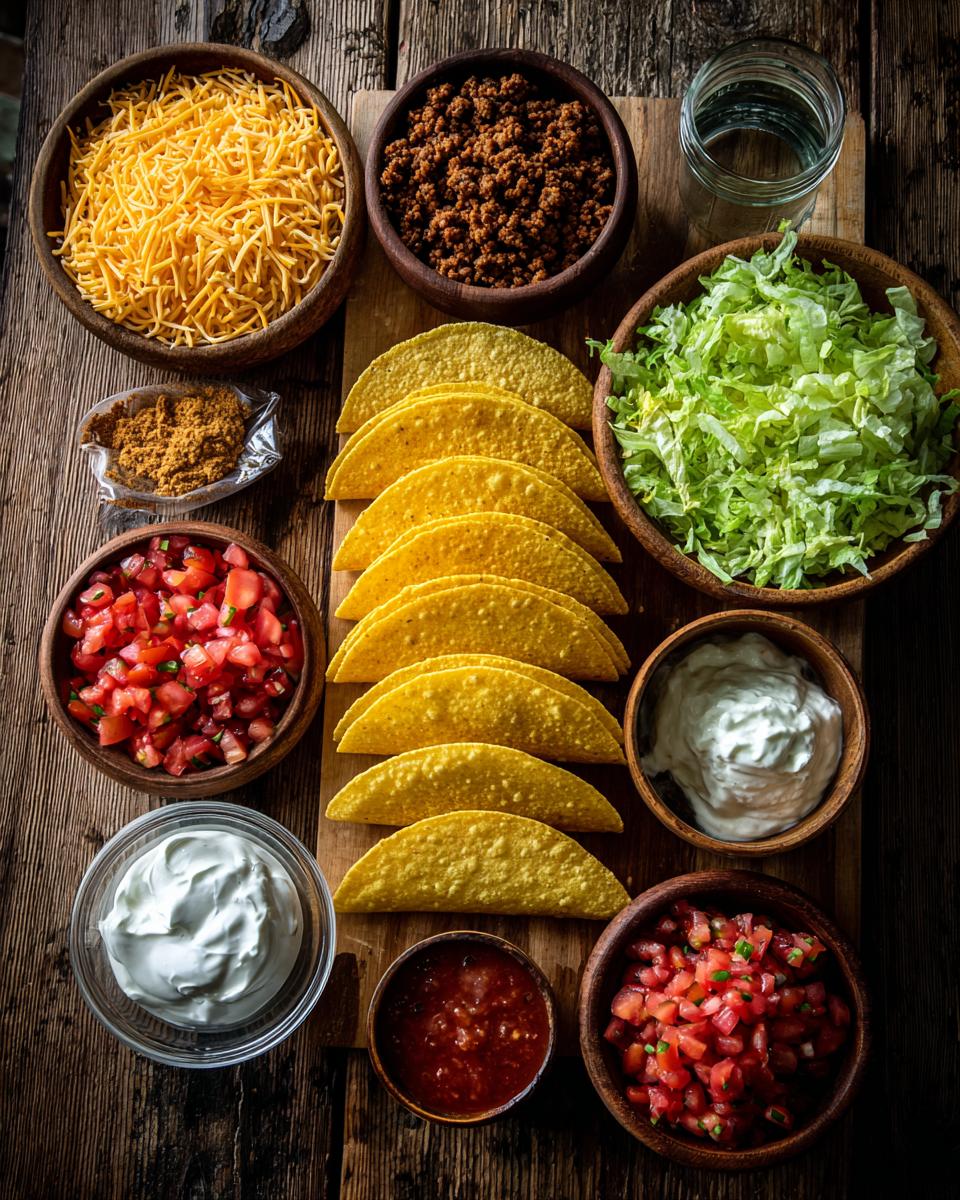
Ingredients for Oven-Baked Cheesy Tacos
Grab these simple ingredients—you probably have most in your kitchen already! I always use stand-and-fill taco shells (they hold up so much better in the oven) and lean ground beef (85/15 fat ratio gives flavor without greasiness). Here’s everything you’ll need:
- Taco Base:
- 8 stand-and-fill taco shells (the sturdiest for baking!)
- 1 lb lean ground beef (85/15)
- 1 packet taco seasoning (or 3 tbsp homemade)
- ½ cup water (for mixing with seasoning)
- Cheese & Fillings:
- 1 cup packed shredded cheddar cheese (measure firmly—no skimping!)
- ½ cup chopped crisp lettuce
- ¼ cup diced fresh tomatoes
- Toppings:
- ¼ cup sour cream
- ¼ cup salsa (I use medium heat for kick)
See how I measure the cheese packed? That’s my grandma’s trick—it ensures every taco gets that glorious cheese waterfall when baked. And don’t worry if your tomato dicing isn’t perfect—rustic chunks taste just as good!
How to Make Oven-Baked Cheesy Tacos
Okay, let’s get these crispy, cheesy beauties in the oven! I promise it’s easier than folding a fitted sheet (why are those things so impossible?). Just follow these simple steps, and you’ll have taco night magic in no time. First thing—preheat that oven to 375°F (190°C) so it’s nice and toasty when your tacos are ready to bake.
Step 1: Cook the Beef Filling
Grab your favorite skillet—I use my trusty cast-iron—and crank it to medium-high heat. Toss in that lean ground beef and break it up with a wooden spoon (my kids call this “meat confetti”). Cook until it’s browned all over, about 5-6 minutes. Here’s the key: drain that excess fat really well! I tilt the skillet and press the beef with a spoon against the side to get every last drop out. Nobody wants greasy tacos.
Now sprinkle in your taco seasoning and pour in that ½ cup water. Stir like you mean it, then let it simmer for 5 minutes until the liquid thickens into a glossy coating. Your kitchen should smell amazing right about now!
Step 2: Assemble the Tacos
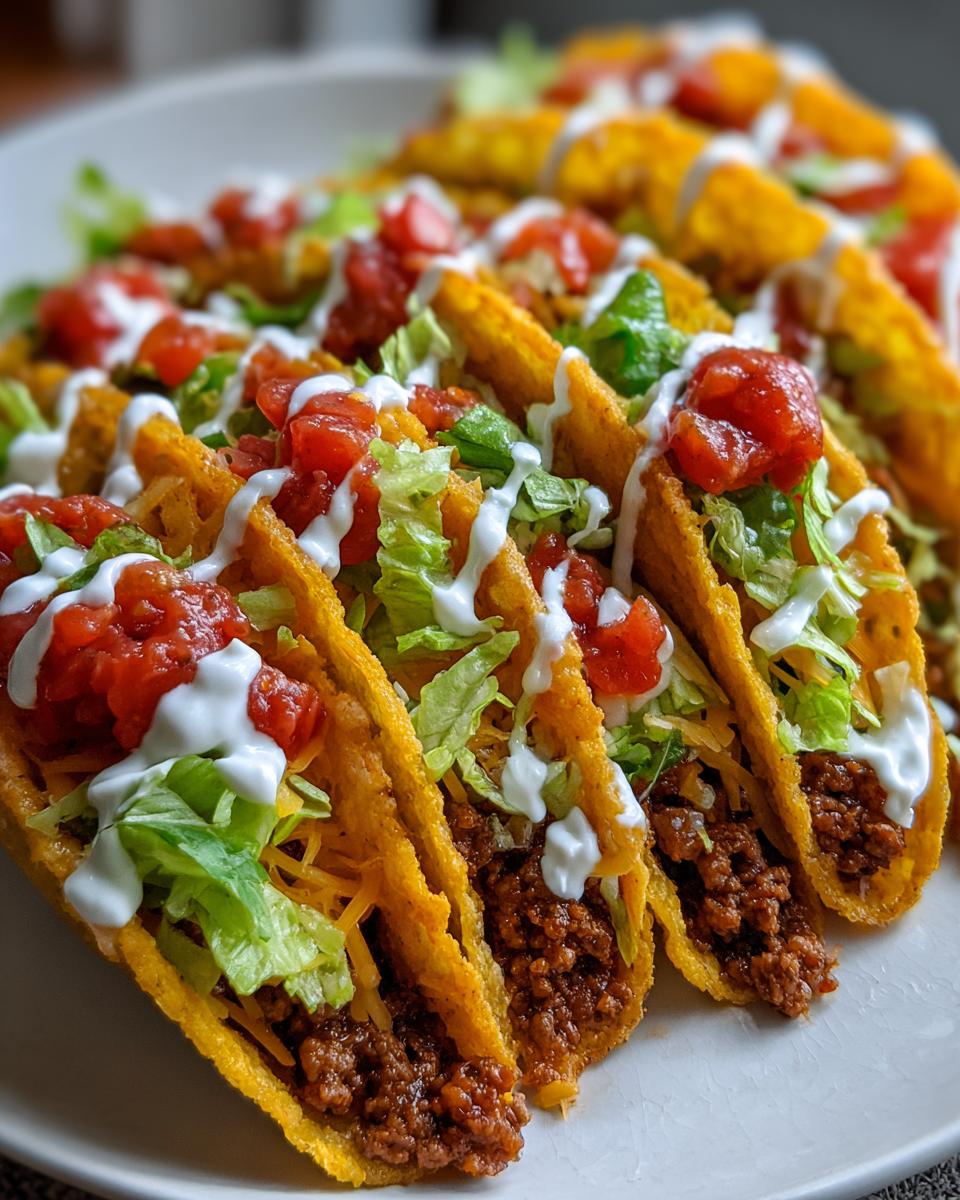
Time for the fun part! Line up those stand-and-fill shells on a baking sheet—I can usually fit about 6 on a standard sheet. Here’s my secret: layer the cheese first! Sprinkle a little cheddar in the bottom of each shell before adding the beef. This creates a melty “glue” that holds everything together and prevents soggy bottoms. Genius, right?
Divide the beef mixture evenly among the shells, then top with another generous handful of cheese. Don’t be shy—this is where the magic happens! I like to gently press the cheese into the beef so it gets extra cozy while baking.
Step 3: Bake Until Crispy
Slide that baking sheet into your preheated oven and let the transformation begin! Bake for 10-12 minutes, but start checking at 8 minutes—ovens can be sneaky. You’ll know they’re done when the shell edges turn golden and the cheese is bubbly with those irresistible brown speckles. (Pro tip: If your cheese isn’t quite browned enough, broil for 30 seconds—but watch closely!)
Let them cool for just a minute (that cheese is lava-hot!), then load up with your fresh toppings. The first bite through that crispy shell into the molten cheese and savory beef? Absolute perfection. Now try not to eat three in a row—I dare you!
Tips for Perfect Oven-Baked Cheesy Tacos
After making these tacos more times than I can count (my family seriously can’t get enough!), I’ve picked up some foolproof tricks to guarantee crispy, cheesy success every single time. These little tweaks make all the difference—trust me!
- Spritz for crunch: Lightly spray shells with oil before filling—this gives them that extra golden crispness we all crave. I use avocado oil spray for its high smoke point.
- Drain like a pro: Press cooked beef against the skillet with a spoon to remove every drop of fat. Soggy tacos start with greasy filling!
- Cheese insurance: Layer shredded cheese both under and over the beef—it acts as a moisture barrier and creates that epic cheese pull.
- Fresh toppings wait: Add lettuce, tomatoes, and cold toppings after baking to keep everything crisp and vibrant. Nobody wants wilted lettuce!
- Broil boost: If your cheese needs more color after baking, hit it with 30 seconds under the broiler—but don’t blink, it burns fast!
Oh, and here’s my secret weapon—if your shells tend to tip over in the oven, crumple small pieces of foil between them as “bookends.” Works like a charm!
Ingredient Substitutions & Variations
Listen, I know everyone’s kitchen (and dietary needs) are different—that’s why I love how flexible these tacos are! Here are all my favorite swaps and upgrades that still deliver that crispy, cheesy goodness. No judgement if you riff on this—some of my best kitchen accidents started as substitutions!
- Meat magic: Swap ground beef for ground turkey, chicken, or even plant-based crumbles (just add an extra tablespoon of oil when browning). For a fiber boost, mix in half a can of rinsed black beans with the beef—my vegetarian sister swears by this trick!
- Cheese choices: Out of cheddar? Monterey Jack melts beautifully, or mix in some pepper jack for heat. For dairy-free, Violife or Daiya shreds work surprisingly well (spritz with oil to help them brown).
- Shell workarounds: In a pinch, sturdy corn tortillas can replace stand-and-fill shells—just fold them over the filling and bake seam-side down. Want extra crisp? Brush both sides with oil before shaping!
- Flavor boosters: Stir a spoonful of chipotle in adobo into the beef for smoke, or add a handful of sautéed onions and bell peppers to the filling. My secret? A dash of fish sauce in the beef—sounds weird, but it adds incredible depth!
- Topping adventures: Pico de gallo instead of plain tomatoes, pickled jalapeños for tang, or swap sour cream for Greek yogurt. My kids love crushed Doritos on top for extra crunch (don’t tell their dentist).
See? The possibilities are endless! Just remember—if you’re changing up the filling moisture (like adding veggies), pat them dry first to keep those shells crisp. Now go make these tacos your own!
Serving Suggestions for Oven-Baked Cheesy Tacos
These crispy tacos are stars on their own, but let’s be real—everything’s better with a supporting cast! Here’s my go-to lineup for turning taco night into a full fiesta. (Pro tip: Set up a topping bar with small bowls—it keeps everyone happy and saves you from playing short-order cook!)
- Classic Mexican rice: That fluffy, tomato-y goodness soaks up any runaway cheese like a dream. I cheat with the instant kind when I’m short on time—no shame!
- Chunky guacamole: The cool creaminess cuts through the rich cheese perfectly. My trick? Leave the avocado a little chunky and add extra lime to keep it bright green.
- Charred corn salad: Toss grilled corn with cilantro, cotija cheese, and lime juice for a sweet-and-smoky side that balances the tacos’ richness.
- Quick black beans: Canned beans warmed with garlic and cumin make a hearty, fiber-packed addition. Top with queso fresco if you’re feeling fancy!
- Crunchy slaw: A vinegar-based slaw (skip the mayo!) adds refreshing crunch. I throw in shredded carrots and purple cabbage for color.
For drinks, I always set out icy horchata or margaritas for the adults (because let’s be honest—tacos taste better with a lime wedge on the glass rim). And if you’ve got space left? Warm churros dusted with cinnamon sugar. You’re welcome.
Storage & Reheating Instructions
Okay, let’s talk leftovers—because let’s be real, sometimes you actually have some of these tacos survive to the next day (miracle, I know!). Here’s how to keep that crispy magic alive for round two. My golden rule? Store components separately unless you enjoy sad, soggy shells—nobody wants that heartbreak!
- Fridge savvy:
- Keep leftover beef filling in an airtight container for up to 3 days—just make sure it’s completely cooled first. I like to press plastic wrap directly on the surface before sealing to prevent drying.
- Store any extra shredded cheese and toppings in their own containers. Pro tip: Lay a damp paper towel over chopped lettuce to keep it crisp!
- Baked shells lose their crunch fast, so if you must store them, tuck them in a paper towel-lined bag—but honestly, they’re best fresh.
- Reheat like a pro:
- For the beef: Microwave in 30-second bursts or warm in a skillet with a splash of water to revive the texture. Stir like crazy to prevent hotspots!
- To recrisp shells: Pop them in a 350°F (175°C) oven for 5 minutes—just until they’re warm and crispy again. Watch closely—they go from perfect to burnt fast!
- Assemble with fresh toppings after reheating. Trust me, warm lettuce is a crime against taco-kind.
Freezing? The beef filling holds up beautifully for up to 2 months—portion it into freezer bags flat for quick thawing. But shells and cheese? Nah, they don’t freeze well. Some things are worth making fresh, amigos!
Nutrition Information
Okay, let’s talk numbers—but remember, these are just estimates based on my exact ingredients. Your tacos might vary slightly depending on cheese brands, beef fat content, or how generously you pile on those toppings (no judgment here—I’ve been known to double the sour cream!). Here’s the breakdown per taco:
- Calories: 250
- Total Fat: 15g (Saturated Fat: 6g, Unsaturated Fat: 7g)
- Cholesterol: 40mg
- Sodium: 450mg
- Total Carbohydrates: 18g (Fiber: 2g, Sugar: 2g)
- Protein: 12g
Want to lighten things up? Try lean ground turkey (saves about 30 calories per taco) or load up with extra veggies like shredded zucchini mixed into the beef—it sneaks in nutrients without sacrificing flavor. And hey, if you’re balancing out taco night with salad tomorrow… well, that’s just smart life math!
Note: These values don’t include extra toppings like guac or sour cream—because let’s be honest, those are non-negotiable for some of us!
FAQs About Oven-Baked Cheesy Tacos
Got questions? I’ve got answers! After making these tacos on repeat for years (and fielding texts from friends mid-taco-crisis), here are the solutions to all your crispy, cheesy dilemmas. Bookmark this page—you’ll want these tips when taco cravings strike at midnight!
- Can I use soft tortillas instead of stand-and-fill shells?
Oh honey, no—they’ll turn into sad, floppy messes! Stand-and-fill shells have extra structure to stay crispy in the oven. In a pinch, try brushing corn tortillas with oil and baking them folded over the filling (seam-side down). They won’t be as sturdy, but they’ll crisp up nicely!
- Help—my tacos get soggy! What am I doing wrong?
Three words: drain that beef! Excess fat is the #1 sogginess culprit. Press it hard against the skillet with a spoon—I even blot with paper towels sometimes. Also, that cheese layer under the beef? It’s not just delicious, it’s structural—like a crispy cheese forcefield!
- What’s the best cheese for maximum meltiness?
My golden combo: sharp cheddar for flavor + Monterey Jack for stretch. Pre-shredded bags work in a pinch, but block cheese melts smoother (those anti-caking agents can make it grainy). Feeling adventurous? Add a handful of Oaxaca cheese—it’s like edible glue with epic pull!
- Can I prep these ahead for a party?
Absolutely! Cook the beef and shred the cheese up to 2 days early. Keep shells in their package until assembly—just don’t fill them more than 30 minutes before baking (they’ll lose crunch). Pro tip: Set up a DIY topping bar so guests can customize!
- Why do my taco shells tip over in the oven?
Those rascals! Crumple little foil “pillows” between shells to keep them upright—or use a muffin tin! Nestle each shell in a cup—it looks funny but works like a charm. (P.S. This is why I buy the flat-bottomed stand-and-fill kind!)
Tag us if you try this recipe—I wanna see your crispy, cheesy masterpieces! Bonus points for creative toppings and cheesy pull shots. 🌮✨
PrintOven-Baked Cheesy Tacos

Easy oven-baked cheesy tacos with a crispy shell and loaded with flavorful fillings.
- Prep Time: 10 mins
- Cook Time: 15 mins
- Total Time: 25 mins
- Yield: 8 tacos 1x
- Category: Main Course
- Method: Baking
- Cuisine: Mexican
- Diet: Low Lactose
Ingredients
- 8 taco shells
- 1 lb ground beef
- 1 packet taco seasoning
- 1/2 cup water
- 1 cup shredded cheddar cheese
- 1/2 cup chopped lettuce
- 1/4 cup diced tomatoes
- 1/4 cup sour cream
- 1/4 cup salsa
Instructions
- Preheat oven to 375°F (190°C).
- Cook ground beef in a pan over medium heat until browned. Drain excess fat.
- Add taco seasoning and water to the beef. Simmer for 5 minutes.
- Fill taco shells with beef mixture and shredded cheese.
- Place tacos on a baking sheet and bake for 10-12 minutes until crispy.
- Top with lettuce, tomatoes, sour cream, and salsa before serving.
Notes
- For extra crispiness, bake tacos a few minutes longer.
- Swap ground beef with ground turkey for a lighter option.
- Store leftover filling in an airtight container for up to 3 days.
Nutrition
- Serving Size: 1 taco
- Calories: 250
- Sugar: 2g
- Sodium: 450mg
- Fat: 15g
- Saturated Fat: 6g
- Unsaturated Fat: 7g
- Trans Fat: 0g
- Carbohydrates: 18g
- Fiber: 2g
- Protein: 12g
- Cholesterol: 40mg


