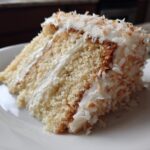
Oh, you guys! If there’s one cake that instantly transports me to sunshine, celebrations, and pure joy, it’s my absolute favorite Coconut Layer Cake! Seriously, this isn’t just any cake; it’s *the* cake that gets requested for every birthday, anniversary, and “just because” moment in my house. There’s something so incredibly magical about the moist, tender layers bursting with coconut flavor, all enveloped in the creamiest, dreamiest frosting. I’ve been baking for what feels like forever, and perfecting this Coconut Layer Cake has been a true labor of love. Trust me, as a home baker who’s seen her fair share of kitchen triumphs (and a few hilarious failures!), this recipe is a winner. It’s surprisingly simple to make, and the results? Pure bliss. Get ready to impress everyone, including yourself, with this showstopper!
Why You’ll Love This Coconut Layer Cake
Ok, so why is *this* Coconut Layer Cake the one you absolutely need in your life? Let me tell you! It’s:
- Seriously Easy: Don’t let the “layer cake” part scare you. This recipe is super straightforward, even for beginner bakers.
- Flavor Bomb: Every bite is packed with delicious, authentic coconut goodness. No weak flavors here!
- Celebration Ready: It looks impressive, tastes incredible, and is perfect for any special occasion or just a cozy Sunday treat.
- Always a Hit: Prepare for compliments, because this cake is a crowd-pleaser every single time.
The Joy of a Perfect Coconut Layer Cake
There’s nothing quite like pulling a beautifully frosted Coconut Layer Cake from the fridge, the scent of sweet coconut and vanilla wafting through the air. That first slice? Pure heaven! The way the fork glides through the soft, moist layers and creamy frosting, then that burst of tropical flavor on your tongue. It’s a moment of pure culinary bliss, and the best part is, *you* made it!
Essential Equipment for Your Coconut Layer Cake
Baking this delightful Coconut Layer Cake is a breeze, especially when you have the right tools! You don’t need a fancy chef’s kitchen, just a few essentials to make the process smooth and enjoyable. Having these handy will make sure your cake comes out perfectly every single time, ready to impress.
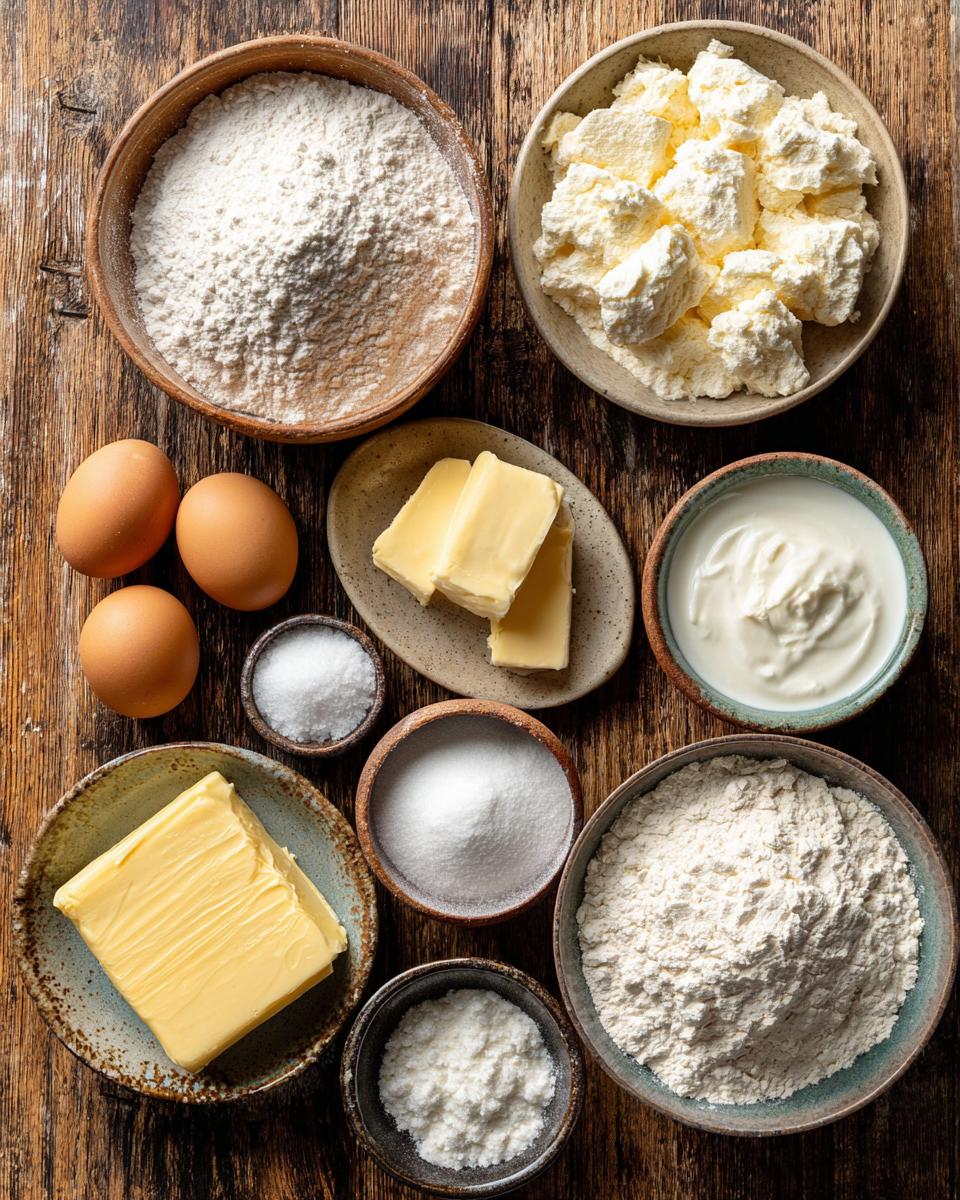
Ingredients for a Delightful Coconut Layer Cake
Alright, let’s talk ingredients! Just like Grandma always said, “Good ingredients make good food.” And for this amazing Coconut Layer Cake, that couldn’t be truer. We’re going for quality here, because every single item plays a starring role in creating that unforgettable flavor and texture. Don’t skimp, my friends! Having everything prepped and measured before you start is also a game-changer – trust me, it makes the whole process so much more relaxing. You’ll want to gather these goodies from your pantry and fridge to get started on your delicious Coconut Layer Cake journey!
Cake Components for Your Coconut Layer Cake
For the cake itself, we’re building a foundation of pure deliciousness. Here’s what you’ll need to create those incredibly moist and tender layers:
- 1 1/2 cups all-purpose flour
- 1 teaspoon baking powder
- 1/2 teaspoon baking soda
- 1/4 teaspoon salt
- 1/2 cup unsalted butter, softened (this is key!)
- 1 cup granulated sugar
- 2 large eggs
- 1 teaspoon alcohol-free vanilla extract (for that warm, classic flavor)
- 3/4 cup buttermilk (gives us that amazing tender crumb!)
- 1 cup shredded sweetened coconut (the star of the show!)
Frosting Essentials for a Creamy Coconut Layer Cake
Now for the frosting! This is where we get to be extra decadent. This creamy, dreamy frosting is the perfect hug for our coconut layers:
- 1 cup unsalted butter, softened (again, softened is super important!)
- 4 cups powdered sugar (sifted if you want extra smooth perfection)
- 1/4 cup coconut milk (brings even more coconut goodness!)
- 1 teaspoon alcohol-free vanilla extract
- 1 cup shredded sweetened coconut for garnish (because more coconut is always a good idea!)
Crafting Your Perfect Coconut Layer Cake: Step-by-Step
Okay, deep breaths everyone! We’ve gathered our amazing ingredients, and now it’s time for the fun part: bringing this incredible Coconut Layer Cake to life. Don’t worry, I’ll walk you through each step, just like I’m right there in the kitchen with you. Baking is all about precision, but also a little bit of love and intuition. We’ll start with the batter, get those cakes in the oven, and then, oh my goodness, we’ll make that heavenly frosting. Follow these steps, and you’ll have a show-stopping Coconut Layer Cake that tastes even better than it looks!
Preparing the Coconut Layer Cake Batter
First things first, preheat your oven to 350°F (175°C) and get your two 8-inch round cake pans ready by greasing and flouring them. This is crucial for a no-stick situation! In one bowl, whisk together your flour, baking powder, baking soda, and salt – this ensures everything is evenly distributed. Now, in a *large* bowl, cream together that softened butter and granulated sugar until it’s light and fluffy, almost pale. Beat in your eggs one at a time, making sure each one is fully incorporated before adding the next, then stir in the alcohol-free vanilla extract. Now for the magic: you’ll gradually add your dry ingredients to the wet, alternating with the buttermilk. Start and end with the dry ingredients, mixing *just* until combined. Seriously, don’t overmix! Gently fold in your shredded coconut, and boom, your Coconut Layer Cake batter is ready!
Baking and Cooling Your Coconut Layer Cake
Once your beautiful batter is mixed, divide it evenly between your prepared cake pans. I usually eyeball it, but if you want to be super precise, you can weigh the batter in each pan. Pop them into your preheated oven and bake for 25-30 minutes. You’ll know they’re done when a wooden skewer or toothpick inserted into the center comes out clean. Don’t rush this! Let them cool in the pans for about 10 minutes – this helps them firm up a bit – before carefully inverting them onto a wire rack to cool *completely*. This is important! A warm cake means melted frosting, and nobody wants that!
Assembling and Frosting Your Coconut Layer Cake
While your cakes are cooling, let’s get that frosting going! In a large bowl, beat your softened butter until it’s super creamy. Gradually add the powdered sugar, a cup at a time, beating after each addition until smooth. Then, stir in the coconut milk and alcohol-free vanilla extract and beat until it’s light and fluffy. Oh my, it’s going to be divine! Once your cakes are *totally* cool (I mean it!), place one layer on your serving plate, spread a generous amount of frosting, then top with the second layer. Frost the top and sides of the entire cake, and then, for the grand finale, garnish with that extra shredded sweetened coconut. Voila! Your perfect Coconut Layer Cake!

Tips for an Irresistible Coconut Layer Cake
Alright, my fellow bakers, you’ve got the steps down, but here are a few of my absolute favorite tips and tricks to make sure your Coconut Layer Cake goes from great to “oh-my-goodness-I-need-another-slice” amazing! These little secrets are what take a good cake and make it truly unforgettable. Trust me, these small details make a huge difference in flavor, texture, and overall deliciousness. Get ready to elevate your baking game and create the most irresistible Coconut Layer Cake ever!
Achieving the Best Texture for Your Coconut Layer Cake
The secret to that dreamy, moist, and tender Coconut Layer Cake texture? Room temperature ingredients! Seriously, butter, eggs, and buttermilk all need to be at room temp for proper emulsification. And remember, mix *just* until combined – overmixing develops gluten, which can make your cake tough. Gentle folds are your friend for that perfectly tender crumb!
Storing and Serving Your Coconut Layer Cake
So, you’ve baked this magnificent Coconut Layer Cake, and if there’s any left (a big “if” in my house!), you’ll want to keep it fresh and delicious. Proper storage is key to enjoying those amazing flavors for days to come. And when it comes to serving, a little presentation goes a long way to make this already stunning cake even more special!
Keeping Your Coconut Layer Cake Fresh
To keep your Coconut Layer Cake tasting its best, store any leftovers in an airtight container in the refrigerator. It’ll stay wonderfully moist and flavorful for up to 3-4 days. Just let it come to room temperature for about 30 minutes before serving for the best taste and texture!
Presentation Ideas for Your Coconut Layer Cake
Serving this beautiful Coconut Layer Cake is almost as fun as eating it! A simple dusting of powdered sugar, a few fresh berries, or even some toasted coconut flakes sprinkled on top can make it look extra fancy. A pretty cake stand always helps, too!
Frequently Asked Questions About Coconut Layer Cake
Okay, I know when you’re diving into a new recipe, especially one as delicious as this Coconut Layer Cake, questions pop up! That’s totally normal. I’ve been there, staring at a recipe, wondering if I can cheat on the buttermilk or if I can bake it tomorrow. So, I’ve rounded up some of the most common questions I get about this cake to help you out. No question is silly when it comes to baking perfection!
Can I make the Coconut Layer Cake ahead of time?
Absolutely! You can bake the cake layers a day in advance. Once completely cooled, wrap them tightly in plastic wrap and store at room temperature. Frost the Coconut Layer Cake closer to serving time for the freshest look!
What can I use if I don’t have buttermilk for my Coconut Layer Cake?
No buttermilk? No problem! You can easily make your own. Just add 1 tablespoon of white vinegar or lemon juice to a liquid measuring cup, then fill the rest with regular milk until it reaches 3/4 cup. Let it sit for 5-10 minutes until it slightly curdles. Voila!
How do I prevent my Coconut Layer Cake from sticking to the pan?
The best way to prevent sticking is to grease and flour your pans *really* well. I like to use a little butter or shortening to grease, then dust with flour, tapping out any excess. You can also use “cake goop” (equal parts flour, shortening, and oil) or line the bottom with parchment paper for extra insurance!
Estimated Nutritional Information for Coconut Layer Cake
Here’s a quick peek at the estimated nutritional breakdown for one slice of this delightful Coconut Layer Cake. Keep in mind that these values are just estimates and can vary based on the specific brands of ingredients you use. Think of it as a general guide, not a strict rule! Each serving typically comes in around 450 calories, with about 25g of fat, 55g of carbohydrates, and 5g of protein. Enjoy every delicious bite!
Share Your Coconut Layer Cake Creation
You did it! You baked an amazing Coconut Layer Cake, and now I want to hear all about it! Did you love it? Did your family go wild? Please leave a comment below, rate the recipe, or even better, share a photo of your beautiful creation on social media! Tag me with #MyBakedBliss and let’s spread the coconut love!
PrintCoconut Layer Cake with Buttermilk
A delightful coconut layer cake with creamy frosting, perfect for any celebration.
- Prep Time: 30 minutes
- Cook Time: 30 minutes
- Total Time: 1 hour 30 minutes
- Yield: 12 servings 1x
- Category: Dessert
- Method: Baking
- Cuisine: American
- Diet: Vegetarian
Ingredients
- 1 1/2 cups all-purpose flour
- 1 teaspoon baking powder
- 1/2 teaspoon baking soda
- 1/4 teaspoon salt
- 1/2 cup unsalted butter, softened
- 1 cup granulated sugar
- 2 large eggs
- 1 teaspoon alcohol-free vanilla extract
- 3/4 cup buttermilk
- 1 cup shredded sweetened coconut
- For the Frosting:
- 1 cup unsalted butter, softened
- 4 cups powdered sugar
- 1/4 cup coconut milk
- 1 teaspoon alcohol-free vanilla extract
- 1 cup shredded sweetened coconut for garnish
Instructions
- Preheat oven to 350°F (175°C). Grease and flour two 8-inch round cake pans.
- In a medium bowl, whisk together flour, baking powder, baking soda, and salt.
- In a large bowl, cream together softened butter and granulated sugar until light and fluffy.
- Beat in eggs one at a time, then stir in alcohol-free vanilla extract.
- Gradually add the dry ingredients to the wet ingredients, alternating with buttermilk, beginning and ending with dry ingredients. Mix until just combined.
- Fold in 1 cup of shredded sweetened coconut.
- Divide batter evenly between the prepared cake pans.
- Bake for 25-30 minutes, or until a wooden skewer inserted into the center comes out clean.
- Let cakes cool in the pans for 10 minutes before inverting them onto a wire rack to cool completely.
- To make the frosting: In a large bowl, beat softened butter until creamy.
- Gradually add powdered sugar, a cup at a time, beating until smooth.
- Stir in coconut milk and alcohol-free vanilla extract. Beat until light and fluffy.
- Once cakes are completely cool, frost the layers and top of the cake with the coconut frosting.
- Garnish with additional shredded sweetened coconut.
Notes
- Ensure all ingredients are at room temperature for best results.
- Do not overmix the cake batter to keep the cake tender.
- For a richer coconut flavor, toast the shredded coconut for garnish before sprinkling.
Nutrition
- Serving Size: 1 slice
- Calories: 450
- Sugar: 50g
- Sodium: 150mg
- Fat: 25g
- Saturated Fat: 18g
- Unsaturated Fat: 7g
- Trans Fat: 0g
- Carbohydrates: 55g
- Fiber: 2g
- Protein: 5g
- Cholesterol: 70mg


