Oh, you guys! There’s just something magical about a Classic Vanilla Layer Cake, isn’t there? It’s not just a dessert; it’s a centerpiece, a hug in cake form, a memory waiting to happen. I swear, every time I pull one of these beauties out of the oven, I’m instantly transported back to childhood birthdays and family gatherings. It’s that comforting, familiar scent that just screams “celebration!”
I’ve baked more cakes than I can count over the years – from elaborate wedding tiers to simple weeknight treats. And through all that whisking and frosting, I’ve learned that sometimes, the simplest things are the absolute best. This Classic Vanilla Layer Cake recipe is my go-to for that very reason. It’s elegant without being fussy, utterly delicious, and surprisingly easy to master.
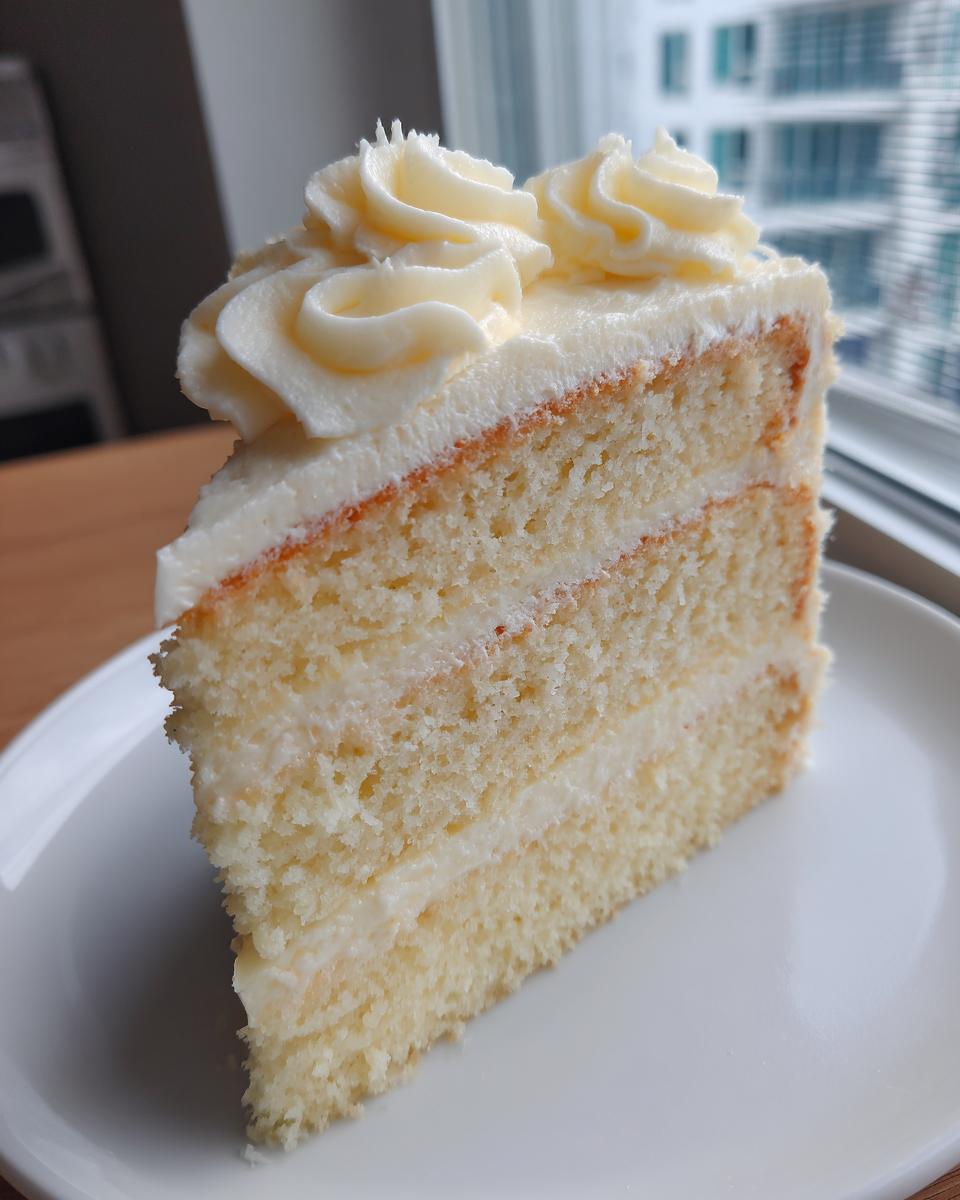
What I adore about this particular recipe is how it delivers a perfectly moist, tender crumb in a charming 6-inch package. It’s just the right size for a small gathering, or, let’s be honest, for me to enjoy over a few days without feeling *too* guilty! Trust me, this little cake is going to become your new favorite for any occasion.
Why You’ll Love This Classic Vanilla Layer Cake
Honestly, what’s not to love? This isn’t just *any* cake; it’s *the* cake you’ll keep coming back to! You’ll absolutely adore this Classic Vanilla Layer Cake because:
- It’s super easy to whip up, even if you’re new to baking!
- The flavor? Oh my goodness, it’s pure, comforting vanilla bliss.
- It’s perfect for literally *any* occasion – birthdays, holidays, or just a Tuesday!
- There’s nothing quite like the satisfaction of baking something so beautiful and delicious yourself.
The Allure of a Classic Vanilla Layer Cake
There’s a reason the Classic Vanilla Layer Cake holds such a special place in our hearts. It’s that familiar, sweet taste that instantly brings back happy memories and a sense of warmth. It’s simple, yes, but its comforting flavor and elegant look make it universally loved – truly a timeless treat!
Essential Ingredients for Your Classic Vanilla Layer Cake
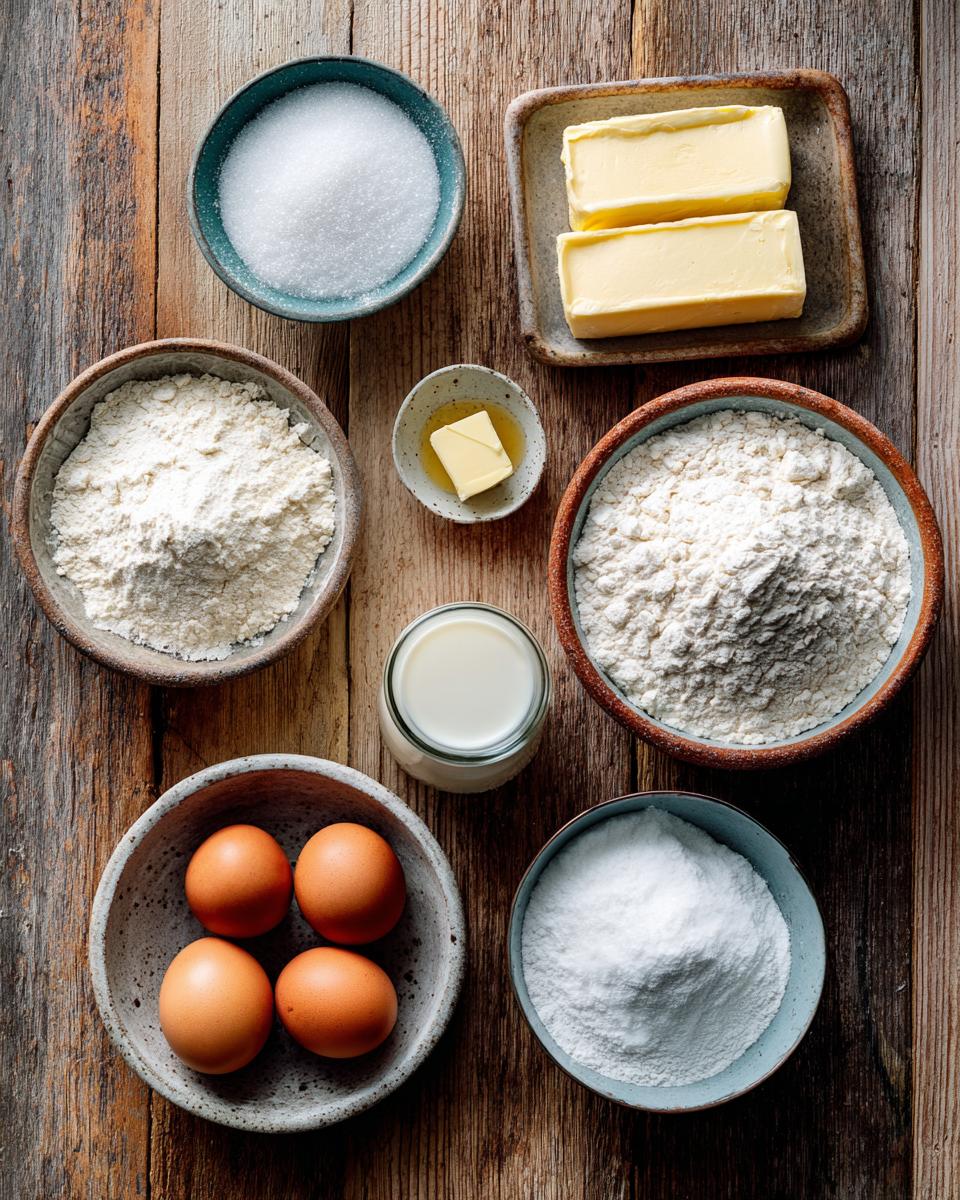
Alright, bakers, let’s talk ingredients! This is where the magic really starts for our Classic Vanilla Layer Cake. I always say, good baking starts with good ingredients, and for a cake this simple, quality truly shines through. You don’t need anything fancy, just fresh and exactly what the recipe calls for. Make sure your butter is softened, your eggs are large, and please, *please* use pure vanilla extract – it makes all the difference in that lovely vanilla flavor we’re aiming for!
Cake Batter Ingredients for a Classic Vanilla Layer Cake
For those gorgeous, moist cake layers, you’ll need 1 1/2 cups all-purpose flour, 1 1/2 teaspoons baking powder (fresh, please!), and a tiny pinch of 1/4 teaspoon salt. Then, for richness and sweetness, grab 1/2 cup unsalted butter, softened, 1 cup granulated sugar, 2 large eggs, a glorious 1 teaspoon pure vanilla extract, and 1/2 cup milk. See? Simple perfection!
Classic Vanilla Buttercream Ingredients
Now, for the dreamy, creamy Classic Vanilla Buttercream that brings it all together! You’ll need a generous 3 cups powdered sugar (sifted if you want extra smooth!), another 1 cup unsalted butter, softened, another lovely 1 teaspoon pure vanilla extract, and finally, 2-3 tablespoons milk or cream to get that perfect, spreadable consistency. So good, you’ll want to eat it with a spoon!
How to Prepare Your Classic Vanilla Layer Cake
Okay, now for the fun part – actually *making* this gorgeous Classic Vanilla Layer Cake! Don’t be intimidated; I’m going to walk you through every step, just like I’m right there in your kitchen with you. The key here is to take your time, enjoy the process, and trust the recipe. We’re going for delicious, not perfection, but I bet you’ll get both!
Remember those perfectly softened ingredients we talked about? That’s really important for a smooth, cohesive batter and buttercream. Take them out of the fridge at least an hour before you start. And please, please, *please* don’t overmix! That’s the secret to a tender cake, not a tough one. You’ve got this, let’s bake!
Baking the Classic Vanilla Layer Cake Layers
First things first, preheat your oven to a cozy 350°F (175°C). While that’s warming up, get your two 6-inch round cake pans ready. I like to grease them really well, then dust them with a little flour – it’s like giving your cakes a non-stick cozy! In a medium bowl, whisk together your flour, baking powder, and salt. Set that aside. Now, in a large bowl, cream your softened butter and granulated sugar until it’s super light and fluffy. This can take a few minutes, but it’s worth it for the texture! Beat in those eggs one at a time, then stir in the vanilla. Finally, gradually add the dry ingredients to the wet, alternating with the milk. Start and end with the dry ingredients, mixing *just* until combined. Divide the batter evenly, pop them in the oven for 25-30 minutes, or until a wooden skewer comes out clean. Let them cool in the pans for 10 minutes, then flip them onto a wire rack to cool completely. Patience, my friend, patience!
Crafting the Classic Vanilla Buttercream
While your cakes are cooling (they *must* be completely cool before frosting, trust me on this!), let’s get that dreamy Classic Vanilla Buttercream whipped up. In a large bowl, beat your softened butter until it’s beautifully creamy. Now, slowly, gradually, add your powdered sugar, beating until it’s smooth and luscious. Stir in that wonderful vanilla extract. Then, add 2 tablespoons of milk or cream. Beat it until it’s the consistency you like – if it’s too thick, add a tiny bit more milk or cream, just 1 teaspoon at a time, until it’s perfectly spreadable. It should be light, fluffy, and absolutely divine!
Assembling and Frosting Your Classic Vanilla Layer Cake
Okay, cakes completely cool? Good! If your cake layers have a little dome on top, grab a serrated knife and *gently* level them out. This makes stacking so much easier and prettier! Place one cake layer on your serving plate. Spread a generous layer of that glorious buttercream on top. Carefully place the second cake layer on, and then, with the remaining buttercream, cover the entire cake! Don’t worry about it being perfect; rustic is in! Smoothen it out with an offset spatula or knife. Now, go wild! Decorate it however your heart desires – sprinkles, berries, or just a simple swirl. It’s your masterpiece!
Tips for a Perfect Classic Vanilla Layer Cake
Want your Classic Vanilla Layer Cake to be absolutely show-stopping every single time? I’ve got some secrets for you! First, and this is a big one, make sure *all* your ingredients are at room temperature. Seriously, butter, eggs, milk – everything! It helps them emulsify better, giving you a smoother batter and a more even crumb. Also, when you’re mixing, be gentle. Overmixing is the enemy of a tender cake; it develops too much gluten and can make your cake tough. Mix just until everything is combined. And finally, let those cakes cool completely before you even *think* about frosting them. A warm cake and frosting are a melty, sliding disaster waiting to happen. Patience is a virtue, especially in baking!
Classic Vanilla Layer Cake: Common Questions Answered
Got questions about your Classic Vanilla Layer Cake? Don’t worry, I’ve heard them all! Baking can sometimes throw a curveball, but I’m here to help you troubleshoot and get that perfect cake every single time. Here are some of the most common questions I get asked about this lovely vanilla cake, and my best tips for success!
Can I Make This Classic Vanilla Layer Cake Ahead of Time?
Absolutely, you clever baker, you! You can totally bake the cake layers a day or two in advance. Once they’re completely cool, wrap them tightly in plastic wrap and store them at room temperature. For longer storage, you can even freeze unfrosted cake layers for up to 3 months! Just make sure they’re wrapped super well in plastic *and* foil to prevent freezer burn. Thaw them at room temperature before frosting.
How Do I Achieve a Moist Classic Vanilla Layer Cake?
Ah, the quest for moisture! The secret to a truly moist Classic Vanilla Layer Cake lies in a few key things. First, make sure *all* your ingredients are at room temperature. This helps everything emulsify properly. Second, and this is crucial, do NOT overmix the batter! Mix just until the ingredients are combined. Overmixing develops gluten, which can make your cake tough and dry. And lastly, don’t overbake! Keep a close eye on it, and pull it out as soon as a skewer comes out clean.
What If My Classic Vanilla Buttercream is Too Thin or Too Thick?
Buttercream woes? I’ve been there! If your Classic Vanilla Buttercream is too thin, don’t panic. Simply add more powdered sugar, a tablespoon at a time, beating well after each addition until it reaches your desired consistency. If it’s too thick, add a tiny bit more milk or cream, just 1 teaspoon at a time, until it’s perfectly spreadable. It’s all about small adjustments until it’s just right!
Storing and Serving Your Classic Vanilla Layer Cake
So you’ve baked this gorgeous Classic Vanilla Layer Cake, and now you have leftovers (if you’re lucky!). To keep it fresh and delicious, store it in an airtight container at room temperature for up to 2-3 days. If it’s warm in your kitchen, or you’ve used a cream cheese frosting, pop it in the fridge. Just remember to bring it back to room temperature for about 30 minutes before serving – that’s when the flavors and texture truly shine! Slice it up, grab a fork, and enjoy every single delightful bite!
Estimated Nutritional Information for Your Classic Vanilla Layer Cake
Just a little heads-up about the nutritional info for this Classic Vanilla Layer Cake! While I’ve done my best to give you an estimate, please remember that these numbers can totally vary. It really depends on the specific brands of ingredients you use, how much frosting you pile on (no judgment here!), and even how you slice it. So, think of this as a helpful guide, not a strict rule!
Share Your Classic Vanilla Layer Cake Creation
Well, you’ve done it! You’ve baked a beautiful Classic Vanilla Layer Cake! Now, I absolutely *have* to see it! Please, please, please share your photos on social media – tag me, use the hashtag, do whatever you need to do so I can ooh and aah over your masterpiece! And don’t forget to come back here and leave a comment. Tell me how it went, what you loved, and rate the recipe! I can’t wait to hear all about your baking adventure!
PrintClassic Vanilla Layer Cake
This recipe makes a classic 6-inch vanilla cake, perfect for any celebration. It features moist vanilla cake layers, vanilla buttercream, and a simple but elegant design. This cake is easy to make and delicious.
- Prep Time: 30 minutes
- Cook Time: 30 minutes
- Total Time: 1 hour 30 minutes
- Yield: 1 (6-inch) cake 1x
- Category: Dessert
- Method: Baking
- Cuisine: American
- Diet: Vegetarian
Ingredients
- 1 1/2 cups all-purpose flour
- 1 1/2 teaspoons baking powder
- 1/4 teaspoon salt
- 1/2 cup unsalted butter, softened
- 1 cup granulated sugar
- 2 large eggs
- 1 teaspoon pure vanilla extract
- 1/2 cup milk
- 3 cups powdered sugar
- 1 cup unsalted butter, softened
- 1 teaspoon pure vanilla extract
- 2–3 tablespoons milk or cream
Instructions
- Preheat oven to 350°F (175°C). Grease and flour two 6-inch round cake pans.
- In a medium bowl, whisk together the flour, baking powder, and salt.
- In a large bowl, cream together the softened butter and granulated sugar until light and fluffy.
- Beat in the eggs one at a time, then stir in the vanilla extract.
- Gradually add the dry ingredients to the wet ingredients, alternating with the milk, beginning and ending with the dry ingredients. Mix until just combined.
- Divide the batter evenly between the prepared cake pans.
- Bake for 25-30 minutes, or until a wooden skewer inserted into the center comes out clean.
- Let the cakes cool in the pans for 10 minutes before inverting them onto a wire rack to cool completely.
- For the vanilla buttercream, in a large bowl, beat the softened butter until creamy.
- Gradually add the powdered sugar, beating until smooth.
- Stir in the vanilla extract and 2 tablespoons of milk or cream. If the frosting is too thick, add more milk or cream, 1 teaspoon at a time, until desired consistency is reached.
- Once the cakes are completely cool, level the tops if necessary. Place one cake layer on a serving plate. Spread a layer of buttercream on top.
- Place the second cake layer on top and cover the entire cake with the remaining buttercream.
- Decorate as desired.
Notes
- Ensure all ingredients are at room temperature for best results.
- Do not overmix the batter, as this can lead to a dry cake.
- For a more intense vanilla flavor, use good quality vanilla extract.
- You can freeze unfrosted cake layers for up to 3 months. Wrap them tightly in plastic wrap and then in aluminum foil.
- This recipe can be doubled to make an 8-inch cake.
Nutrition
- Serving Size: 1 slice (1/8 of cake)
- Calories: 450
- Sugar: 55g
- Sodium: 180mg
- Fat: 25g
- Saturated Fat: 15g
- Unsaturated Fat: 8g
- Trans Fat: 0.5g
- Carbohydrates: 60g
- Fiber: 1g
- Protein: 4g
- Cholesterol: 80mg


