Okay, friend, let’s talk turkey! You know how sometimes the thought of making a big holiday bird can feel like a whole production? All that brining, the giant cooler, the overnight soaking… it can be a lot! But what if I told you there’s a way to get a gloriously juicy, incredibly flavorful roasted turkey without any of that fuss? Seriously, I’m here to spill the beans on my absolute favorite method for an **Easy No Brine Turkey**!
For years, I thought brining was the only path to a moist turkey, but then I had a holiday meltdown (picture flour everywhere and a very unhappy bird). In a fit of desperation, I just seasoned it up and popped it in the oven. And guess what? It was one of the best turkeys I’d ever made! That moment changed everything for me. This recipe isn’t just easy; it’s tried and true, delivering consistently delicious results that’ll have everyone asking for seconds. Trust me, it’s a game-changer for stress-free holiday cooking!
Why You’ll Love This Easy No Brine Turkey
Oh, where do I even begin? This isn’t just a recipe; it’s a revelation! You’re going to fall head over heels for this method because it takes all the intimidation out of roasting a turkey and leaves you with pure, unadulterated deliciousness. Forget the huge commitment and messy cleanup of brining. This way, you get to enjoy the process and, more importantly, the amazing results!
- No more brining mess: Say goodbye to giant buckets and sloshing liquid!
- Less stress, more flavor: Seriously, it’s so much simpler with incredible taste.
- Perfectly juicy every time: You won’t miss the brine, I promise.
- More time for fun: Spend less time prepping and more time with your loved ones.
The Simplicity of Easy No Brine Turkey
Let’s be real, who needs extra steps when you’re already juggling a million things in the kitchen? This **Easy No Brine Turkey** is a lifesaver for busy cooks (and let’s face it, that’s all of us during the holidays!). You just season it up, pop it in the oven, and let it do its thing. It’s truly as straightforward as it gets, freeing you up for all the other delicious side dishes!
Flavorful Results with Your Easy No Brine Turkey
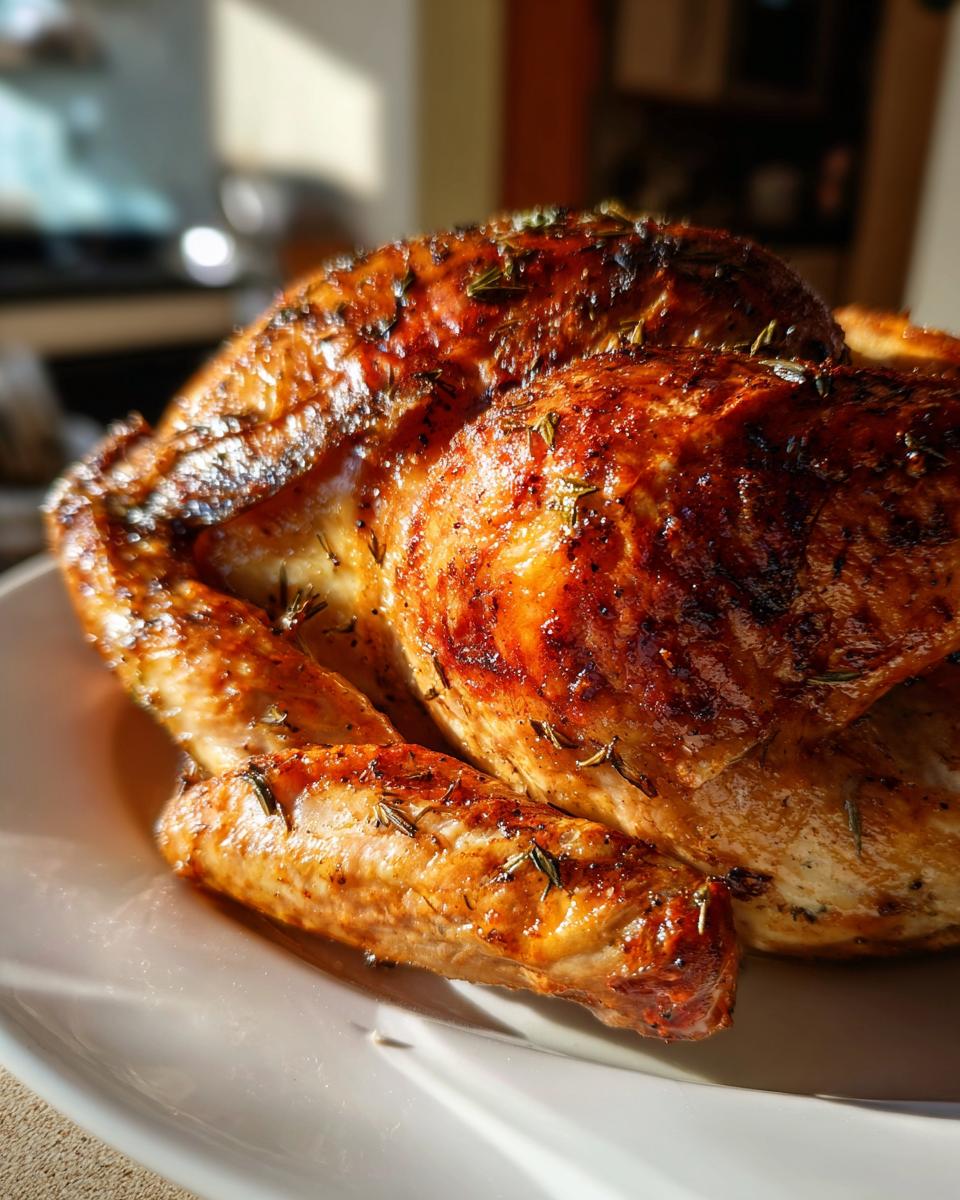
Now, just because it’s easy doesn’t mean we’re skimping on flavor, oh no! This method locks in all those beautiful turkey juices, creating a bird that’s incredibly moist and tender. The herb butter mixture gets super crispy on the skin, giving you that irresistible golden-brown perfection. Every bite of this **Easy No Brine Turkey** is packed with savory goodness, proving you don’t need a brine for an unforgettable meal!
Essential Equipment for Your Easy No Brine Turkey
Alright, before we dive into the fun part, let’s quickly chat about the tools you’ll need. Don’t worry, nothing fancy here! Most of these you probably already have stashed away in your kitchen. Having the right gear just makes the whole process smoother and ensures your turkey comes out perfectly every single time. It’s like having the right paintbrush for your masterpiece!
- A sturdy roasting pan with a rack
- A reliable meat thermometer (digital is my favorite!)
- Plenty of paper towels
- A small bowl for mixing the herb butter
- Aluminum foil
Must-Have Tools for Roasting Easy No Brine Turkey
Your roasting pan and rack are non-negotiable for this **Easy No Brine Turkey**. The rack lifts the turkey, letting air circulate for even cooking and crispy skin. And please, please, please get a good meat thermometer! It’s your best friend for ensuring a perfectly cooked, safe, and juicy bird without any guesswork. Trust me on this one!
Ingredients for Easy No Brine Turkey
Okay, let’s gather our goodies! The beauty of this **Easy No Brine Turkey** is that the ingredient list is super straightforward, no crazy, hard-to-find stuff here. Just simple, fresh ingredients that really let the turkey shine. You’ll want to make sure your butter is softened so it mixes beautifully – I usually set mine out on the counter a couple of hours before I plan to get cooking. And don’t skimp on the fresh veggies; they add so much flavor to the pan drippings for later!
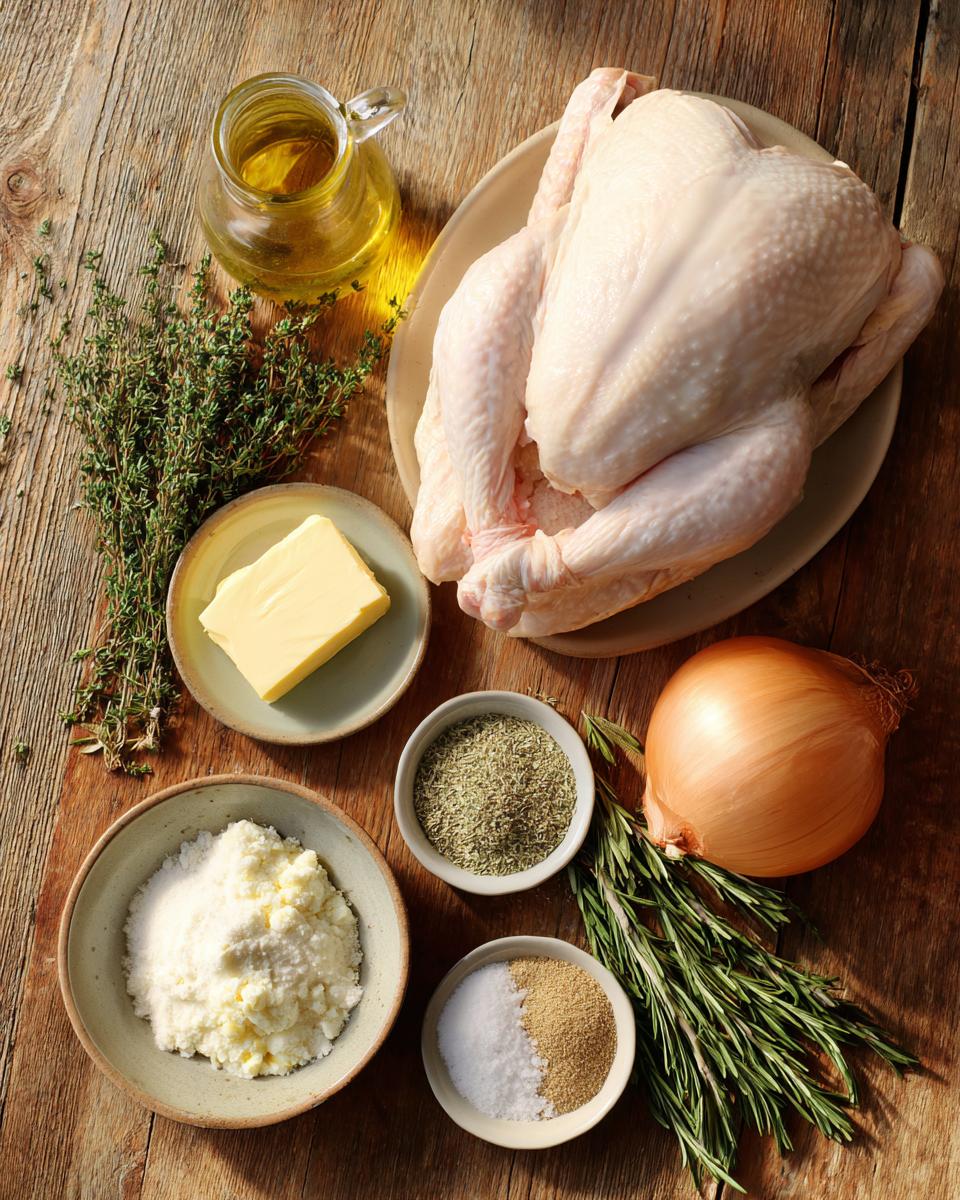
- 1 (12-14 pound) whole turkey
- 1/2 cup butter, softened
- 1 tablespoon dried rosemary
- 1 tablespoon dried thyme
- 1 teaspoon garlic powder
- 1 teaspoon onion powder
- 1 teaspoon black pepper
- 1 teaspoon salt
- 1 large onion, quartered
- 2 carrots, roughly chopped
- 2 celery stalks, roughly chopped
- 4 cups chicken broth
How to Prepare Your Easy No Brine Turkey
Alright, this is where the magic happens! Don’t be intimidated; I’m going to walk you through every single step to get that perfect, juicy, and incredibly flavorful **Easy No Brine Turkey**. We’re talking simple, clear instructions that even a beginner can nail. Just follow along, and you’ll be carving up a masterpiece in no time. The key here is good technique and a little bit of love, just like Grandma always taught me!
- Preheat your oven to 325°F (160°C).
- Remove the giblets and neck from the turkey cavity. Pat the turkey dry with paper towels.
- In a small bowl, mix the softened butter with rosemary, thyme, garlic powder, onion powder, black pepper, and salt.
- Rub the butter mixture all over the turkey, including under the skin of the breast.
- Place the quartered onion, chopped carrots, and chopped celery into the turkey cavity.
- Place the turkey on a rack in a large roasting pan. Pour the chicken broth into the bottom of the roasting pan.
- Roast for 3 to 3.5 hours, or until a meat thermometer inserted into the thickest part of the thigh reads 165°F (74°C).
- Baste the turkey every hour with the pan juices.
- If the skin starts to brown too quickly, tent loosely with aluminum foil.
- Once cooked, remove the turkey from the oven and let it rest for 15-20 minutes before carving. This allows the juices to redistribute, resulting in a more tender and flavorful turkey.
Prepping Your Turkey for an Easy No Brine Roast
First things first, you’ve gotta get that turkey ready! Pull out the giblets and neck from inside the cavity (don’t forget the ones sometimes tucked into the front!). Then, and this is super important for crispy skin, pat that turkey DRY with paper towels. I mean, really dry! Like you’re trying to absorb every last drop of moisture. This step makes a huge difference for that golden-brown skin we all crave on our **Easy No Brine Turkey**.
Flavoring and Roasting Your Easy No Brine Turkey
Now for the fun part: flavor! In a small bowl, mix that lovely softened butter with all your herbs and spices. Get your hands in there if you need to! Then, generously rub this glorious butter mixture all over the turkey. Don’t be shy! Gently lift the skin over the breast and rub some underneath too – that’s where the real flavor magic happens. Stuff your cavity with the veggies, place it on the rack in your roasting pan, pour in that broth, and into the oven it goes! Remember to baste every hour to keep things moist and happy.
Achieving Perfect Doneness with Your Easy No Brine Turkey
This is where your trusty meat thermometer comes in! For your **Easy No Brine Turkey**, you’re looking for 165°F (74°C) in the thickest part of the thigh, making sure not to hit the bone. Once it hits that temp, pull it out! Don’t worry if the skin is getting a little too dark; just tent it loosely with foil. And please, for the love of all that is delicious, let it REST for 15-20 minutes before carving. Seriously, this step is non-negotiable for a juicy, tender bird!
Tips for Success with Your Easy No Brine Turkey
Alright, you’ve got the basics down, but I’ve got a few extra tricks up my sleeve to make sure your **Easy No Brine Turkey** isn’t just good, but absolutely *legendary*. These are the little things that take it from a great meal to an unforgettable one. Trust me, these tips come from years of trial and (mostly) triumph in the kitchen!
- Don’t peek too much! Every time you open that oven door, you lose heat, which means a longer cooking time and potentially a drier bird.
- Room temperature turkey: Try to let your turkey sit out for about an hour before roasting. It helps it cook more evenly.
- Be generous with the butter: It’s your flavor and moisture secret weapon here.
- Always rest: I know I said it before, but it’s *that* important!
Ensuring a Crispy Skin on Your Easy No Brine Turkey
Who doesn’t love crispy turkey skin? For your **Easy No Brine Turkey**, patting it super dry before applying the butter is key. If you want *extra* crispy skin, crank up the oven to 400°F (200°C) for the last 20-30 minutes of cooking. Keep a close eye on it, though! You want golden brown, not burnt. That high heat really helps render the fat and get that perfect crunch.
Making the Most of Your Easy No Brine Turkey Drippings
Oh, the drippings! These are pure gold, my friend. Don’t even *think* about throwing them away. Once your **Easy No Brine Turkey** is resting, carefully pour those pan drippings into a fat separator, or just skim the fat off the top. This flavorful liquid is the base for the most incredible gravy you’ll ever make. It’s packed with all those herbs and turkey goodness – a true holiday staple!
Common Questions About Easy No Brine Turkey
I know you’re probably buzzing with excitement to make your own amazing **Easy No Brine Turkey**, but a few questions might be swirling around your head. Don’t worry, I’ve got you covered! Here are some of the most common questions I get about this recipe, so you can tackle your roast with total confidence. No silly questions here, just great answers to ensure your turkey is a triumph!
Can I use a smaller or larger turkey with this Easy No Brine Turkey recipe?
Absolutely! This **Easy No Brine Turkey** recipe is pretty flexible. Just remember to adjust your cooking time. A good rule of thumb is about 13-15 minutes per pound for an unstuffed turkey, but always rely on that meat thermometer!
How long should I rest my Easy No Brine Turkey?
Resting is crucial for a juicy bird! For your **Easy No Brine Turkey**, I recommend letting it rest for at least 15-20 minutes. This allows all those delicious juices to redistribute throughout the meat, making every slice incredibly tender.
Can I prepare the butter mixture ahead of time for Easy No Brine Turkey?
Oh, yes, you totally can! This is a fantastic time-saver. Just mix up your herb butter the day before, cover it, and keep it in the fridge. Let it soften at room temperature for about 30 minutes before you’re ready to rub down your **Easy No Brine Turkey**.
Serving Suggestions for Easy No Brine Turkey
Okay, so you’ve nailed the main event – your incredible **Easy No Brine Turkey**! Now, what goes with such a star? The beauty of this simple turkey is that it pairs perfectly with all your favorite holiday sides. Think classic comfort food, but elevated. Here are some of my go-to pairings that always disappear fast!
- Creamy mashed potatoes (a must!)
- Homemade gravy (made from those precious pan drippings!)
- Roasted root vegetables (carrots, parsnips, sweet potatoes)
- Classic green bean casserole
- Fluffy dinner rolls
- Cranberry sauce (homemade or store-bought, no judgment here!)
Estimated Nutritional Information
I know some of you like to keep an eye on the numbers, so I’ve put together an estimate for this **Easy No Brine Turkey**. Just remember, these are approximate values, and things like the exact size of your turkey, how much butter you use (don’t skimp, though!), and even the brand of chicken broth can tweak these a little. Think of it as a helpful guide, not a strict rulebook!
- Serving Size: 4 ounces
- Calories: 350
- Sugar: 0g
- Sodium: 450mg
- Fat: 20g
- Saturated Fat: 8g
- Unsaturated Fat: 10g
- Trans Fat: 0g
- Carbohydrates: 2g
- Fiber: 0g
- Protein: 38g
- Cholesterol: 120mg
Easy No Brine Turkey
Roast a delicious and juicy turkey without the need for brining. This recipe focuses on simple preparation for a flavorful result.
- Prep Time: 20 minutes
- Cook Time: 3 hours 30 minutes
- Total Time: 3 hours 50 minutes
- Yield: 10-12 servings 1x
- Category: Main Dish
- Method: Roasting
- Cuisine: American
- Diet: Gluten Free
Ingredients
- 1 (12-14 pound) whole turkey
- 1/2 cup butter, softened
- 1 tablespoon dried rosemary
- 1 tablespoon dried thyme
- 1 teaspoon garlic powder
- 1 teaspoon onion powder
- 1 teaspoon black pepper
- 1 teaspoon salt
- 1 large onion, quartered
- 2 carrots, roughly chopped
- 2 celery stalks, roughly chopped
- 4 cups chicken broth
Instructions
- Preheat your oven to 325°F (160°C).
- Remove the giblets and neck from the turkey cavity. Pat the turkey dry with paper towels.
- In a small bowl, mix the softened butter with rosemary, thyme, garlic powder, onion powder, black pepper, and salt.
- Rub the butter mixture all over the turkey, including under the skin of the breast.
- Place the quartered onion, chopped carrots, and chopped celery into the turkey cavity.
- Place the turkey on a rack in a large roasting pan. Pour the chicken broth into the bottom of the roasting pan.
- Roast for 3 to 3.5 hours, or until a meat thermometer inserted into the thickest part of the thigh reads 165°F (74°C).
- Baste the turkey every hour with the pan juices.
- If the skin starts to brown too quickly, tent loosely with aluminum foil.
- Once cooked, remove the turkey from the oven and let it rest for 15-20 minutes before carving. This allows the juices to redistribute, resulting in a more tender and flavorful turkey.
Notes
- For extra crispy skin, increase the oven temperature to 400°F (200°C) for the last 20-30 minutes of cooking.
- Save the pan drippings to make gravy.
- Adjust seasonings to your preference.
- Ensure the turkey is completely thawed before roasting.
Nutrition
- Serving Size: 4 ounces
- Calories: 350
- Sugar: 0g
- Sodium: 450mg
- Fat: 20g
- Saturated Fat: 8g
- Unsaturated Fat: 10g
- Trans Fat: 0g
- Carbohydrates: 2g
- Fiber: 0g
- Protein: 38g
- Cholesterol: 120mg


