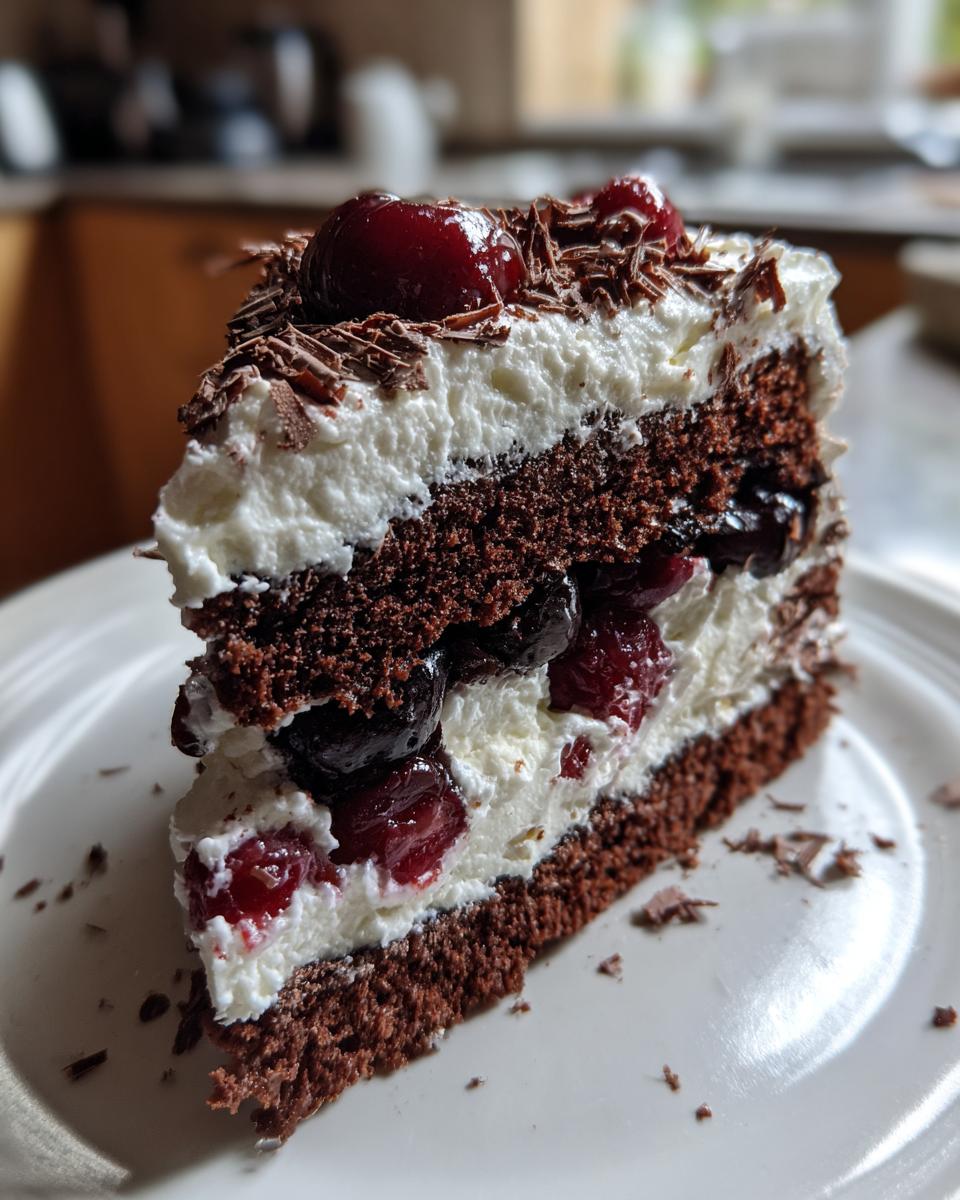
Oh, Black Forest Cake! Just saying the name brings a little sparkle to my eye. There’s something so utterly enchanting about those rich chocolate layers, swirled with billows of fresh whipped cream, and those jewel-toned cherries peeking out. It’s not just a cake; it’s a whole experience, a culinary hug in dessert form! I remember the first time I ever tasted a truly authentic slice – it was at a little German bakery, and I swear the angels sang. I was hooked, utterly and completely!
This isn’t just any old cake recipe, friends. This is my go-to, the one I pull out when I really want to impress or when I’m craving that perfect balance of sweet, tart, and decadent. It’s got a bit of history, hailing from Germany’s Black Forest region, and traditionally features chocolate sponge, a cherry spirit, cherries, and cream. But don’t worry, we’re making it super accessible and absolutely delicious. Trust me, I’ve baked more Black Forest Cakes than I can count, and this version? It’s a winner every single time!
Why You’ll Love This Black Forest Cake
Honestly, what’s not to love? This Black Forest Cake isn’t one of those fussy recipes that makes you want to pull your hair out. It’s surprisingly straightforward, especially for how utterly gorgeous and delicious it turns out! You’ll adore it because:
- It’s easier to make than it looks, I promise!
- The flavor is just *chef’s kiss* – rich, deep, and perfectly balanced.
- It looks incredibly impressive on any dessert table, making you look like a total baking superstar.
- It’s perfect for literally any celebration, or just a Tuesday when you need a little joy!
The Allure of Black Forest Cake
Oh, the magic combo! It’s that perfect dance between the dark, moist chocolate sponge, the light-as-air whipped cream, and those sweet-tart cherries that just sings. Every bite is a little symphony of textures and flavors, making it truly unforgettable.
Ingredients for Your Black Forest Cake
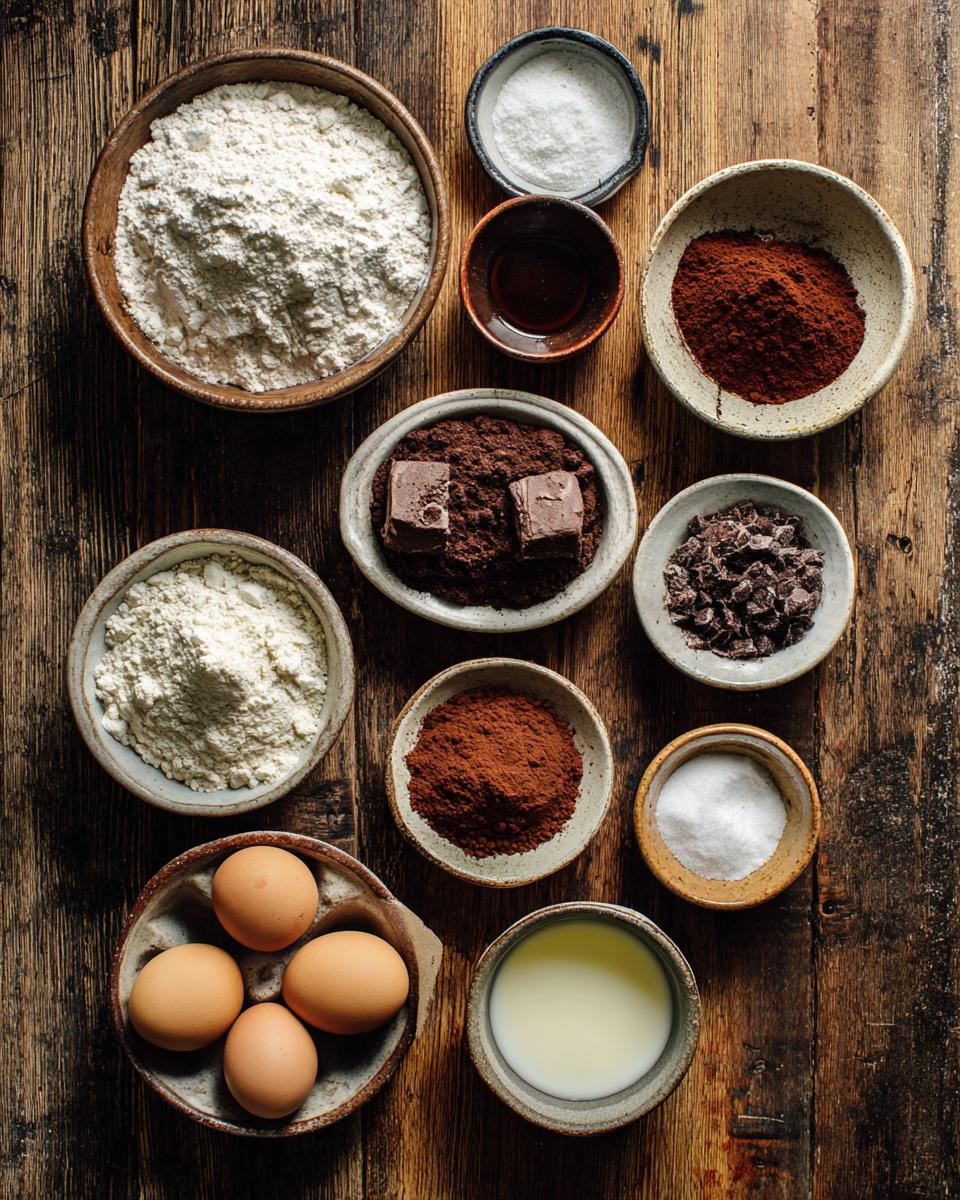
Alright, let’s talk ingredients! You won’t find anything too wild or crazy on this list, just good, honest pantry staples that come together to create something truly magical. Freshness matters, especially for the cream, but otherwise, this is all stuff you probably have or can easily grab. No obscure spices, just pure deliciousness!
For the Chocolate Sponge Cake Layers
For our decadent chocolate cake layers, you’ll need all-purpose flour, granulated sugar, and unsweetened cocoa powder for that deep chocolate flavor. Then, baking soda and baking powder are our leavening heroes! Don’t forget the buttermilk for tenderness and hot water to bloom that cocoa, plus vegetable oil, eggs, and a touch of vanilla extract.
For the Cherry Filling and Whipped Cream
Our luscious filling calls for heavy cream, powdered sugar, and a splash of vanilla extract for that classic, sweet cloud. The star, of course, is a can of pitted sour cherries – make sure to drain them but *definitely* reserve that juice! If you want a little extra something, you can use a cherry flavoring or just more of that reserved cherry juice.
For Black Forest Cake Garnish
To finish off our masterpiece, we’ll need some lovely chocolate shavings. They add that perfect touch of elegance and an extra burst of chocolatey goodness, making your cake look as amazing as it tastes!
How to Prepare Your Black Forest Cake
Alright, let’s get baking! Don’t be intimidated; this is where the magic really happens, and I’ll walk you through every single step. It’s all about enjoying the process, and trust me, the reward is so worth it. We’ll start with those gorgeous chocolate layers, then move on to that dreamy cream and cherry filling, and finally, bring it all together into a showstopper!
Baking the Perfect Black Forest Cake Layers
First things first, preheat your oven to a good and steady 350°F (175°C). While it’s warming up, grab two 9-inch round cake pans and give them a good grease and flour – this is crucial for easy release! In a big bowl, whisk together your dry ingredients: flour, sugar, cocoa powder, baking soda, baking powder, and salt. Make sure there are no lumps! Next, add the buttermilk, oil, eggs, and that first teaspoon of vanilla. Beat it all on medium speed until everything is beautifully combined. Now, carefully stir in the hot water. Don’t panic; the batter will be quite thin, almost like soup, but that’s exactly what we want for a super moist cake! Divide the batter evenly between your prepared pans and pop them in the oven for 30-35 minutes. You’ll know they’re done when a wooden skewer poked into the center comes out clean. Let them cool in the pans for about 10 minutes before flipping them onto a wire rack to cool completely. Patience here is key!
Crafting the Cherry Filling and Whipped Cream
Okay, while your cakes are cooling, let’s whip up some magic! Grab your heavy cream, powdered sugar, and the second teaspoon of vanilla extract. Pour them into a cold bowl (a chilled metal bowl works wonders!) and whip, whip, whip until you see those glorious stiff peaks forming. You want it firm enough to hold its shape, but not over-whipped, or it’ll get grainy. Now for the cherries! If you’re using a cherry flavoring, mix that in with your drained cherries. Otherwise, just make sure you have that reserved cherry juice handy – it’s going to add so much deliciousness to our cake!
Assembling Your Black Forest Cake Masterpiece
This is my favorite part – seeing it all come together! Once your cake layers are completely cool (seriously, no warm cakes or your cream will melt!), place one layer on your prettiest serving plate. Now, take some of that reserved cherry juice and brush it generously over the top of the cake layer. This adds moisture and a lovely cherry flavor. Next, spread a good, thick layer of your whipped cream over the cake. Then, scatter half of your prepared cherries evenly over the cream. Place the second cake layer carefully on top, give it another brush with that cherry juice, and then spread the remaining whipped cream all over the top and sides of the cake. Don’t be shy! Arrange the rest of your cherries on top, making it look all fancy. Finally, garnish with those chocolate shavings – pile them high, or arrange them neatly, whatever makes you happy! Now, the hardest part: pop that beautiful cake in the fridge for at least an hour. This chilling time lets all those flavors meld together and sets the cream perfectly. Trust me, it’s worth the wait!
Tips for a Flawless Black Forest Cake
Okay, you’ve done the hard part, now let’s make sure your Black Forest Cake is absolutely perfect! My biggest tip? Room temperature ingredients for the cake batter are non-negotiable – it helps everything combine smoothly. Also, seriously, do NOT overmix that batter! Gentle is the name of the game for a tender crumb. And if you’re planning a party, good news! This cake is fantastic made a day ahead; it gives all those amazing flavors time to really get to know each other in the fridge.
Ensuring Your Black Forest Cake Success
To avoid a dry cake, don’t overbake! Keep an eye on it, and pull it out as soon as that skewer comes clean. For perfectly stable whipped cream, make sure your cream and bowl are super cold. And remember, chilling time isn’t just for show; it really helps the cake set up and taste its best. You got this!
Black Forest Cake Storage and Reheating
Okay, so you’ve got some glorious leftovers (lucky you!). The best way to keep your Black Forest Cake fresh is to store it in an airtight container in the refrigerator. It’ll stay delicious for about 3-4 days. There’s no need to reheat it – this cake is absolutely divine served chilled, straight from the fridge!
Frequently Asked Questions About Black Forest Cake
I get a lot of questions about this Black Forest Cake recipe, which is awesome because it means you’re just as passionate about it as I am! Here are some of the most common ones I hear. Don’t be shy if you have more; I’m always happy to chat about cake!
Can I Make Black Forest Cake Ahead of Time?
Absolutely, yes! In fact, I often recommend it. Making your Black Forest Cake a day in advance gives all those incredible flavors a chance to meld and deepen, making it even more delicious. Just assemble it, wrap it loosely (or put it in an airtight cake carrier), and pop it in the fridge overnight. Easy peasy!
Black Forest Cake Ingredient Substitutions?
Good question! If you don’t have buttermilk, you can make your own by adding 1 tablespoon of white vinegar or lemon juice to a measuring cup, then filling it with regular milk until it reaches 1 cup. Let it sit for 5 minutes. For the cherry flavoring, if you prefer not to use it, simply use extra reserved cherry juice or even a little almond extract for a lovely depth of flavor in your Black Forest Cake.
What is the Best Way to Serve Black Forest Cake?
Oh, the best way? Chilled, definitely! Take your Black Forest Cake out of the fridge about 15-20 minutes before serving so the cream softens just a tiny bit, but it’s still nice and cool. It’s truly perfect on its own, but a little extra fresh cherry on the side or a tiny dollop of whipped cream never hurt anyone!
Estimated Nutritional Information for Your Black Forest Cake
Okay, for those of you keeping an eye on the numbers, here’s an estimate for our delicious Black Forest Cake! Please remember, these values are just an approximation. They can totally change based on the specific brands you use, how big your slices are (no judgment here!), and any little tweaks you make. But generally, for one glorious slice, you’re looking at around 550 calories, with about 30g of fat (18g saturated), 65g of carbs (55g sugar), and 6g of protein. Enjoy every bite!
Share Your Black Forest Cake Experience
Alright, my fellow cake lovers, now it’s YOUR turn! I absolutely adore hearing from you. Did you make this Black Forest Cake? How did it turn out? Please, please, please leave a comment below and let me know all about it! Rate the recipe, tell me your favorite part, or even better, share your gorgeous creations on social media and tag me! I can’t wait to see your masterpieces!
PrintEasy Black Forest Cake
A classic Black Forest Cake featuring layers of chocolate sponge cake, whipped cream, and cherries, often with a hint of cherry flavoring.
- Prep Time: 45 minutes
- Cook Time: 35 minutes
- Total Time: 1 hour 20 minutes
- Yield: 12 servings 1x
- Category: Dessert
- Method: Baking
- Cuisine: German
- Diet: Vegetarian
Ingredients
- 1 3/4 cups all-purpose flour
- 2 cups granulated sugar
- 3/4 cup unsweetened cocoa powder
- 1 1/2 teaspoons baking soda
- 1 teaspoon baking powder
- 1 teaspoon salt
- 1 cup buttermilk
- 1/2 cup vegetable oil
- 2 large eggs
- 1 teaspoon vanilla extract
- 1 cup hot water
- 2 cups heavy cream
- 1/2 cup powdered sugar
- 1 teaspoon vanilla extract (for cream)
- 1 (15-ounce) can pitted sour cherries, drained (reserve juice)
- 1/4 cup cherry liqueur (optional, or use cherry juice)
- Chocolate shavings, for garnish
Instructions
- Preheat oven to 350°F (175°C). Grease and flour two 9-inch round cake pans.
- In a large bowl, whisk together flour, sugar, cocoa powder, baking soda, baking powder, and salt.
- Add buttermilk, oil, eggs, and 1 teaspoon vanilla extract to the dry ingredients. Beat on medium speed until well combined.
- Stir in hot water until the batter is smooth. It will be thin.
- Divide batter evenly between the prepared cake pans.
- Bake for 30-35 minutes, or until a wooden skewer inserted into the center comes out clean.
- Let cakes cool in pans for 10 minutes, then invert onto a wire rack to cool completely.
- For the filling, whip heavy cream, powdered sugar, and 1 teaspoon vanilla extract until stiff peaks form.
- If using, mix cherry liqueur (or reserved cherry juice) with the drained cherries.
- To assemble, place one cake layer on a serving plate. Brush with some of the reserved cherry juice.
- Spread a layer of whipped cream over the cake, then scatter half of the cherries on top.
- Place the second cake layer on top, brush with more cherry juice, and spread remaining whipped cream. Arrange remaining cherries on top.
- Garnish with chocolate shavings.
- Refrigerate for at least 1 hour before serving.
Notes
- For best results, make sure all ingredients are at room temperature.
- Do not overmix the cake batter, as this can lead to a dry cake.
- The cake can be made a day in advance and stored in the refrigerator.
- Substitute almond extract for vanilla extract in the whipped cream for a different flavor.
Nutrition
- Serving Size: 1 slice
- Calories: 550
- Sugar: 55g
- Sodium: 350mg
- Fat: 30g
- Saturated Fat: 18g
- Unsaturated Fat: 10g
- Trans Fat: 0.5g
- Carbohydrates: 65g
- Fiber: 3g
- Protein: 6g
- Cholesterol: 90mg


