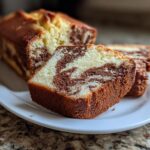
Oh my goodness, let me tell you about my absolute favorite cake to bake when I want to impress without really trying: this incredible Marble Pound Cake! It’s not just a cake; it’s a work of art, with those gorgeous swirls of vanilla and chocolate peeking through every slice. Seriously, it’s rich, it’s buttery, and it has that perfect dense-yet-tender crumb that just melts in your mouth.
I remember the first time I ever made a Marble Pound Cake. I was probably about ten, standing on a stool next to my aunt, who was a baking wizard. She made it look so effortless, just swirling the two batters together with a knife, and then, *poof*! Out came this stunning cake from the oven. The smell alone was intoxicating – that warm, sweet dance of vanilla and chocolate. Ever since then, it’s been my go-to for potlucks, birthdays, or just when I need a little pick-me-up. There’s something so comforting and nostalgic about it, isn’t there? It truly is the best of both worlds, and I promise you, once you try this recipe, you’ll be hooked too!
Why You’ll Love This Marble Pound Cake
Okay, so why should *you* make this Marble Pound Cake? Because it’s seriously a winner on all fronts! It’s one of those recipes that looks super fancy, but it’s deceptively easy to pull off. You get that rich, comforting butteriness with a delightful dance between vanilla and chocolate. Plus, it just *looks* amazing, doesn’t it? Every slice is a little surprise!
- It’s surprisingly simple to make, even for beginner bakers.
- The flavor combo of vanilla and chocolate is a crowd-pleaser every single time.
- That beautiful marbled swirl makes every slice look like a gourmet treat.
- It’s incredibly versatile – perfect for breakfast, dessert, or an afternoon snack.
The Allure of Marble Pound Cake
There’s just something magical about a Marble Pound Cake, isn’t there? That first bite, where you get the sweet vanilla and the deep cocoa all at once – it’s pure bliss. And the smell that fills your kitchen while it’s baking? Oh my goodness, it’s heavenly! It’s such a classic for a reason; it brings back all those cozy, happy feelings. It’s elegant enough for a special occasion, but comforting enough for a lazy Sunday morning. Trust me, this cake always hits the spot!

Essential Ingredients for Your Marble Pound Cake
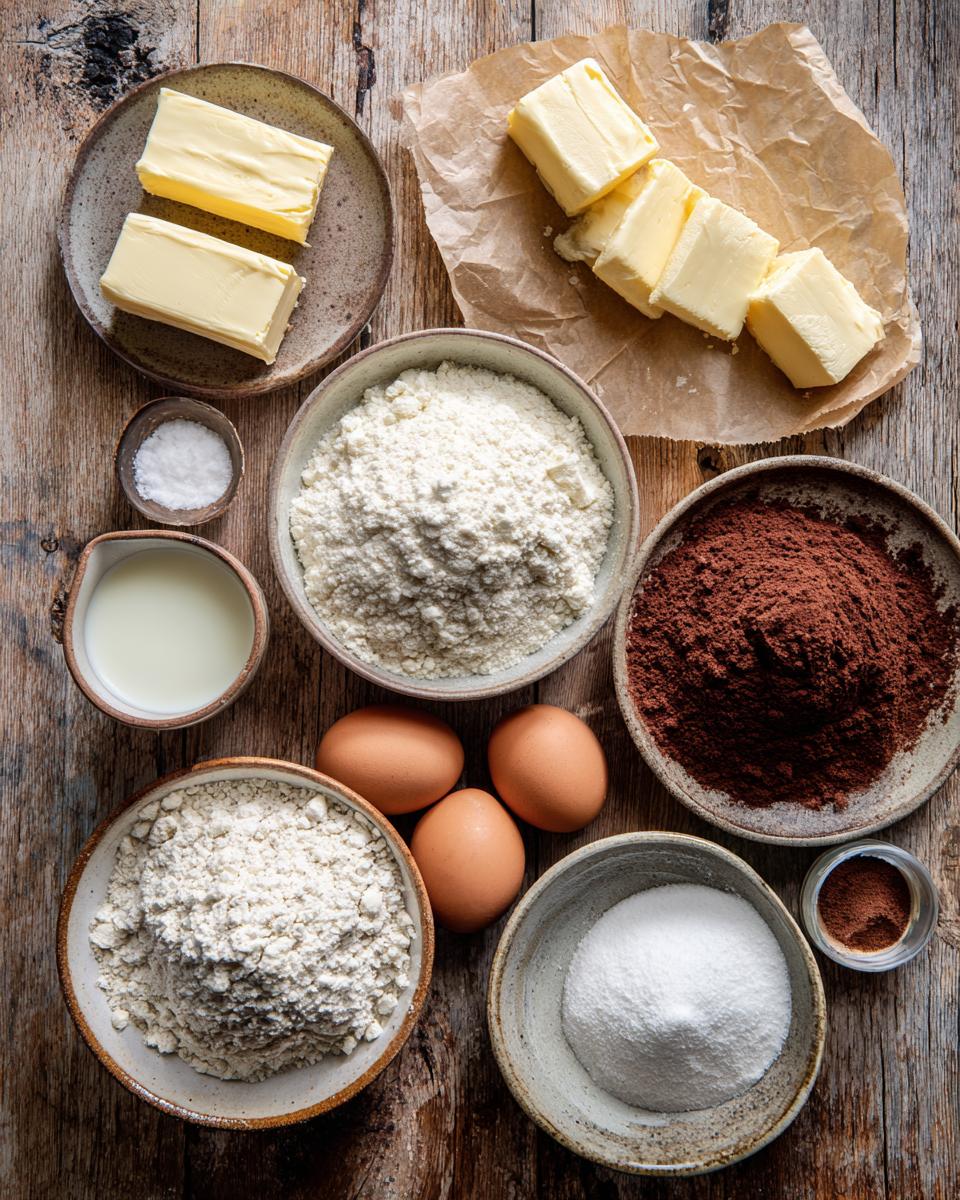
Alright, let’s talk ingredients! This Marble Pound Cake doesn’t need anything super fancy, which is part of its charm. It’s all about good quality basics, and making sure they’re prepped just right. You’ll want to gather everything before you start – it makes the whole process so much smoother, trust me!
Here’s what you’ll need:
- 1 cup (that’s 2 sticks!) unsalted butter, softened
- 1 1/2 cups granulated sugar
- 4 large eggs
- 1 teaspoon alcohol-free vanilla extract
- 2 1/4 cups all-purpose flour
- 1 teaspoon baking powder
- 1/2 teaspoon salt
- 1/2 cup milk
- 1/4 cup unsweetened cocoa powder
- 2 tablespoons milk (for the chocolate part!)
Wet Ingredients for the Best Marble Pound Cake
Okay, let’s dive into the wet stuff! First up, that 1 cup of unsalted butter. It *has* to be softened, not melted! If it’s too cold, it won’t cream properly with the sugar, and if it’s melted, your cake will be dense. Just leave it out on the counter for an hour or two before you plan to bake. Then, you’ll need 4 large eggs – also room temperature, please! They’ll emulsify much better into the batter. And for that lovely scent and taste, we’re using 1 teaspoon of pure, alcohol-free vanilla extract. Finally, 1/2 cup of milk – again, room temp is best! It helps everything mix together beautifully.
Dry Ingredients for a Perfect Marble Pound Cake
Now for our dry team! We’ve got 2 1/4 cups of all-purpose flour. I always give it a quick whisk with the baking powder and salt to make sure everything is evenly distributed. You don’t want a lump of baking powder in one bite, right? That’s our leavening, making sure our Marble Pound Cake gets a nice lift. And for the chocolate swirl, you’ll need 1/4 cup of unsweetened cocoa powder. Make sure it’s good quality; it really makes a difference in flavor! We’ll mix that into half the batter later with a tiny bit more milk.
Step-by-Step: How to Prepare Your Marble Pound Cake
Okay, deep breaths everyone! This is where the magic happens. Don’t be intimidated; we’re going to walk through this Marble Pound Cake recipe step-by-step, and I promise you, it’s easier than it looks. Just follow along, and you’ll have a gorgeous, delicious cake in no time. The most important thing is to have fun with it! Baking should be a joy, not a chore.
First things first, let’s get that oven preheating. You want it at 325°F (that’s about 160°C) before your batter even thinks about going in. While that’s warming up, we’ll get our pan prepped. Then, it’s all about mixing, swirling, and baking! Remember, room temperature ingredients really do make a difference, so if you haven’t already, let those eggs and butter hang out on the counter for a bit.
Preparing Your Pan for Marble Pound Cake Success
This is a crucial step for any pound cake, especially our beautiful Marble Pound Cake! There’s nothing worse than a perfectly baked cake that gets stuck in the pan. So, grab your 9×5 inch loaf pan. You’ll want to generously grease it with butter or cooking spray, getting into all the corners and up the sides. Then, sprinkle a tablespoon or two of all-purpose flour into the greased pan. Tilt and tap the pan, rotating it until the flour coats every greased surface. Tap out any excess flour – you don’t want big clumps! This creates a non-stick barrier that helps your cake release like a dream. Trust me, a well-prepped pan saves you so much heartache later!
Crafting the Vanilla and Chocolate Marble Pound Cake Batters
Alright, let’s get mixing! In a big bowl, cream together that softened butter and granulated sugar until it’s light and super fluffy. This usually takes a good 2-3 minutes with an electric mixer. Next, beat in your eggs, one at a time, making sure each one is fully incorporated before adding the next. Then, stir in your alcohol-free vanilla extract – oh, that smell! In a separate, medium bowl, whisk together your all-purpose flour, baking powder, and salt. Now, it’s time to combine everything! Gradually add the dry ingredients to the wet, alternating with the 1/2 cup of milk. Start and end with the dry ingredients, mixing *just* until combined. Seriously, stop as soon as you don’t see any more streaks of flour. Overmixing is the enemy of a tender pound cake!
Now for the fun part: dividing the batter! Carefully scoop roughly half of your beautiful vanilla batter into another bowl. To the first half (the one still in the main bowl), add the unsweetened cocoa powder and the extra 2 tablespoons of milk. Mix this until it’s just combined and you have a lovely, rich chocolate batter. Now you have two distinct, delicious batters ready for marbling!
Achieving the Signature Swirl in Your Marble Pound Cake
This is where your Marble Pound Cake gets its name and its gorgeous looks! Take your prepared loaf pan. You’re going to spoon alternating dollops of the vanilla and chocolate batter into the pan. Don’t worry about being too perfect; just plop spoonfuls here and there. Maybe a dollop of vanilla, then chocolate next to it, then vanilla on top of the chocolate, and so on. Once all the batter is in the pan, grab a butter knife or a wooden skewer. Gently drag it through the batters in a swirling motion, maybe once or twice lengthwise, and then a couple of times crosswise. Don’t overdo it, though! You want distinct swirls, not a uniform muddy color. A light hand is key here for that beautiful marbled effect. Pop it into your preheated oven and bake for 60-70 minutes, or until a wooden skewer inserted into the center comes out clean. Let it cool in the pan for about 10 minutes before flipping it out onto a wire rack to cool completely. Patience is a virtue here!
Tips for a Flawless Marble Pound Cake
Baking is a science, but it’s also an art, and sometimes those little tricks make all the difference between a good Marble Pound Cake and an absolutely *amazing* one! I’ve learned a few things over the years that help ensure your cake comes out perfect every single time. These aren’t just suggestions; they’re like little secrets to baking success. So, let’s unlock those secrets together and make sure your Marble Pound Cake is the star of the show!
Room Temperature Matters for Marble Pound Cake
Okay, this is a big one, folks! I know it’s tempting to just grab everything straight from the fridge, but trust me, letting your butter and eggs come to room temperature is CRUCIAL for a tender Marble Pound Cake. When butter is soft (but not melted!), it creams beautifully with sugar, creating tiny air pockets. These pockets expand in the oven, giving your cake that lovely, light texture. Cold eggs just won’t emulsify properly with the butter and sugar, leading to a lumpy batter and a denser cake. So, plan ahead! Take them out an hour or two before you start baking.
Avoiding Overmixing Your Marble Pound Cake Batter
This is probably the most common mistake I see new bakers make, and it’s a total game-changer for your Marble Pound Cake! Once you add the flour to your wet ingredients, you need to mix *just* until everything is combined. As soon as you don’t see any more streaks of dry flour, stop! Overmixing develops the gluten in the flour too much, making your cake tough, chewy, and dry. We want tender, moist, melt-in-your-mouth goodness, not a rubbery brick! So, mix gently and sparingly after the flour goes in.
Serving and Storing Your Marble Pound Cake
You’ve put all that love into baking this gorgeous Marble Pound Cake, so let’s make sure you enjoy every single crumb! This cake is fantastic on its own, but there are definitely ways to make it even more special. And, because we want to savor every bit, I’ll tell you the best way to keep it fresh for days!
Creative Serving Suggestions for Marble Pound Cake
Oh, the possibilities! My favorite way to eat a slice of Marble Pound Cake is just as it is, maybe with a cup of coffee or tea. But if you want to jazz it up a bit, a dusting of powdered sugar always looks elegant. You could also serve it with a dollop of fresh whipped cream and some berries – strawberries or raspberries are divine with the chocolate and vanilla. A scoop of vanilla bean ice cream on the side, especially if the cake is slightly warm, is pure heaven! For a little extra indulgence, a drizzle of chocolate ganache or a light vanilla glaze would be amazing too. Don’t be afraid to experiment!
Keeping Your Marble Pound Cake Fresh
So, you’ve got some glorious leftover Marble Pound Cake (if that’s even a thing in your house!). The key to keeping it delicious is to store it properly. Once it’s completely cooled (and I mean *completely*), wrap it tightly in plastic wrap or place it in an airtight container. You can keep it at room temperature for up to 3 days, and it’ll stay wonderfully moist. If you want to keep it longer, you can freeze individual slices, wrapped well, for up to a month. Just thaw them at room temperature when a craving strikes!
Frequently Asked Questions About Marble Pound Cake
I get asked a lot of questions about this Marble Pound Cake recipe, which I totally get! It’s one of those things that looks so impressive, people want to make sure they get it just right. So, I’ve gathered some of the most common questions here to help you troubleshoot or just get a little more insight into making your perfect Marble Pound Cake. Don’t be shy if you have more questions after reading these, just ask!
Can I substitute ingredients in this Marble Pound Cake recipe?
You know, for a classic Marble Pound Cake, I really recommend sticking to the recipe as closely as possible, especially for your first go-around! Baking is a science, and every ingredient plays a specific role. For instance, using margarine instead of real butter will definitely change the texture and flavor of your pound cake. You *could* try a plant-based milk if you need a dairy-free option, but it might alter the richness slightly. And please, please, use real eggs! They’re essential for the structure. Small tweaks are okay, but big substitutions can really change the outcome of your delicious vanilla chocolate cake.
What causes a dry Marble Pound Cake?
Oh, a dry Marble Pound Cake is such a disappointment, isn’t it? The most common culprits are usually overmixing the batter once the flour is added (remember, just until combined!), or simply baking it for too long. Every oven is a little different, so even if the recipe says 60-70 minutes, start checking around 55 minutes. You want that skewer to come out clean, but not bone dry. Also, not using room temperature ingredients can sometimes lead to a less tender crumb, which can feel dry. And make sure your measuring cups are accurate!
How do I get a more pronounced marble effect in my pound cake?
Ah, the art of the swirl! To get those really stunning, distinct ribbons of vanilla and chocolate in your Marble Pound Cake, the key is not to over-swirl. Think of it like finger painting – a few gentle strokes are all you need. Spoon alternating dollops, then just one or two passes with a knife or skewer. Don’t stir it like you’re mixing soup! You want to move the batters around to create those beautiful patterns, but not blend them completely. Less is definitely more here for a gorgeous visual effect in your loaf cake!
Estimated Nutritional Information for Marble Pound Cake
Alright, for those of you who like to keep an eye on what you’re eating (or just curious!), here’s an estimated peek at the nutritional breakdown for a single slice of this delicious Marble Pound Cake. Now, remember, these numbers are just estimates! Things like the exact brands of butter, flour, or cocoa powder you use, and even how big you slice your cake, can nudge these figures up or down a bit. But this should give you a good general idea!
- Serving Size: 1 slice
- Calories: Approximately 350 kcal
- Total Fat: Around 18g
- Saturated Fat: Roughly 11g
- Unsaturated Fat: About 5g
- Trans Fat: Less than 0.5g (phew!)
- Cholesterol: About 90mg
- Sodium: Around 200mg
- Total Carbohydrates: Approximately 45g
- Dietary Fiber: About 1g
- Total Sugars: Roughly 35g
- Protein: Around 5g
See? It’s a treat, and a pretty satisfying one at that! Enjoy every single, delicious bite!
Share Your Marble Pound Cake Creation
So, you’ve baked up this stunning Marble Pound Cake, and I bet it smells amazing! I’d absolutely LOVE to see your creations. Snap a picture and share it on social media with #MyMarblePoundCake. You can also leave a comment below and tell me how it turned out, any little tweaks you made, or just how much you loved it. Don’t forget to give the recipe a rating too!
PrintMarble Pound Cake
This Marble Pound Cake is rich, buttery, and features a beautiful swirl of vanilla and chocolate flavors. It’s perfect for dessert or a snack.
- Prep Time: 20 minutes
- Cook Time: 70 minutes
- Total Time: 90 minutes
- Yield: 1 loaf (10-12 slices) 1x
- Category: Dessert
- Method: Baking
- Cuisine: American
- Diet: Vegetarian
Ingredients
- 1 cup (2 sticks) unsalted butter, softened
- 1 1/2 cups granulated sugar
- 4 large eggs
- 1 teaspoon vanilla extract
- 2 1/4 cups all-purpose flour
- 1 teaspoon baking powder
- 1/2 teaspoon salt
- 1/2 cup milk
- 1/4 cup unsweetened cocoa powder
- 2 tablespoons milk (for chocolate batter)
Instructions
- Preheat oven to 325°F (160°C). Grease and flour a 9×5 inch loaf pan.
- In a large bowl, cream together the softened butter and granulated sugar until light and fluffy.
- Beat in the eggs one at a time, then stir in the vanilla extract.
- In a separate bowl, whisk together the all-purpose flour, baking powder, and salt.
- Gradually add the dry ingredients to the wet ingredients, alternating with the 1/2 cup milk, beginning and ending with the dry ingredients. Mix until just combined.
- Divide the batter in half. In one half, stir in the unsweetened cocoa powder and the additional 2 tablespoons of milk until well combined.
- Spoon alternating dollops of vanilla and chocolate batter into the prepared loaf pan.
- Swirl the batters together gently with a knife or skewer to create a marbled effect.
- Bake for 60-70 minutes, or until a wooden skewer inserted into the center comes out clean.
- Let the cake cool in the pan for 10 minutes before inverting it onto a wire rack to cool completely.
Notes
- Ensure all ingredients are at room temperature for best results.
- Do not overmix the batter, as this can result in a dry cake.
- For a richer chocolate flavor, use dark cocoa powder.
- Store leftover pound cake in an airtight container at room temperature for up to 3 days.
Nutrition
- Serving Size: 1 slice
- Calories: 350
- Sugar: 35g
- Sodium: 200mg
- Fat: 18g
- Saturated Fat: 11g
- Unsaturated Fat: 5g
- Trans Fat: 0.5g
- Carbohydrates: 45g
- Fiber: 1g
- Protein: 5g
- Cholesterol: 90mg


