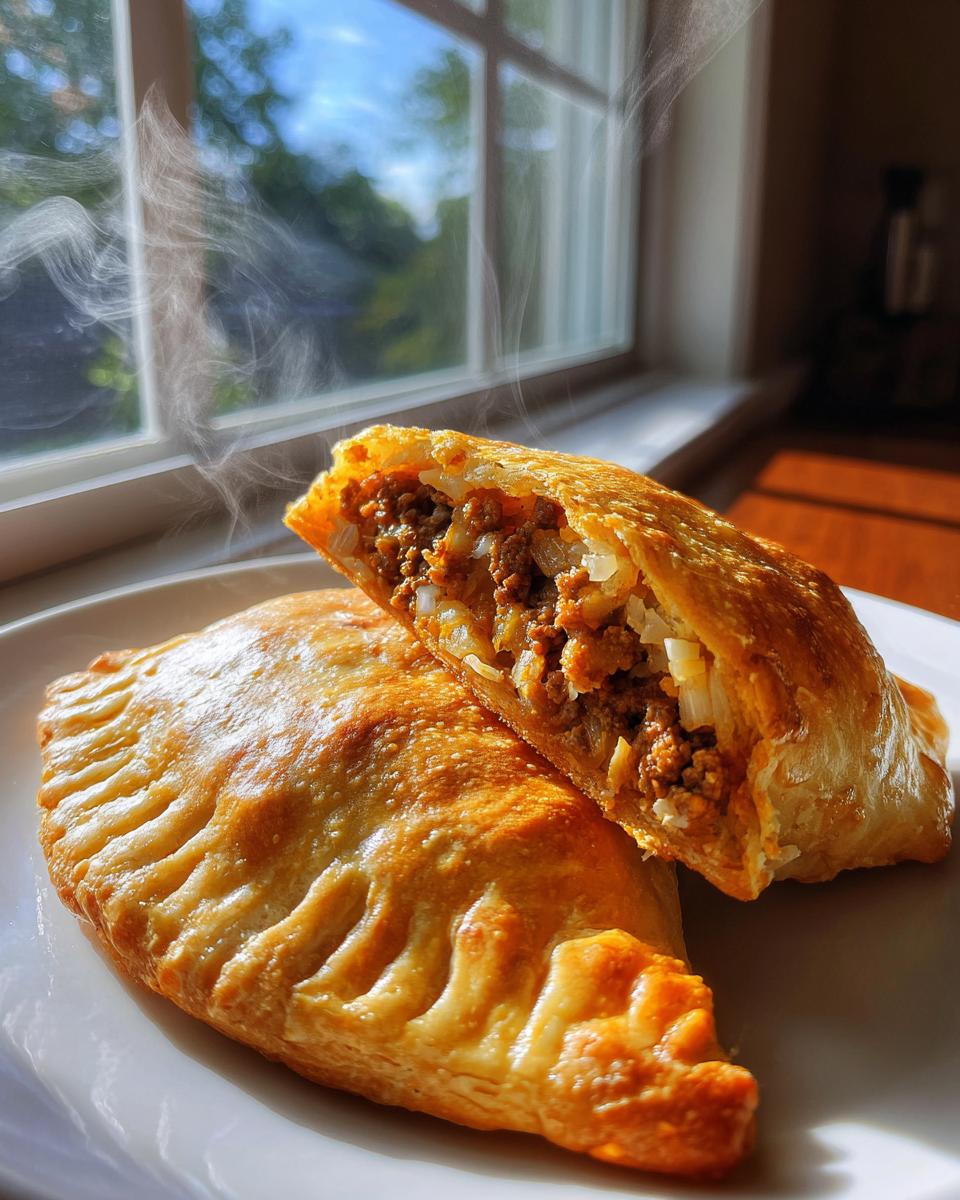
Oh my goodness, you guys! There’s just something about a warm, savory pocket of dough bursting with flavor that screams “comfort food,” right? And when we’re talking about next-level comfort, we HAVE to talk about the incredible Runza! I swear, the first time I bit into one of these German-Russian beauties, it was like a warm hug from the inside out. My friend Brenda, who has roots in Nebraska, introduced me to them years ago, and I was instantly hooked. It’s not just a meal; it’s an experience!
This isn’t your average pastry; it’s a hearty, satisfying dream come true, packed with seasoned ground beef and tender cabbage, all tucked inside a perfect yeast dough. Trust me, as someone who spends probably way too much time in the kitchen baking everything from sourdough to elaborate cakes, and who has a special soft spot for all things German-Russian cuisine, this Runza recipe is a total winner. You’re going to absolutely adore making these, and even more, eating them!
Why You’ll Love This Runza Recipe
Okay, so why *this* Runza recipe, you ask? Because it’s not just good; it’s genuinely spectacular and totally doable, even if you’re new to working with yeast dough. My recipe brings that authentic, rustic German-Russian flavor right into your kitchen. You’ll love that it:
- Creates the most tender, pillowy yeast dough that’s a dream to work with.
- Features a perfectly seasoned filling that’s savory, hearty, and incredibly flavorful.
- Is super satisfying and makes a complete meal all on its own!
- Is perfect for meal prep – they freeze beautifully, which is a huge win on busy weeknights.
Seriously, get ready to add a new favorite to your comfort food rotation!
The Comfort of Homemade Runza
There’s just something magical about pulling a tray of golden brown Runzas out of the oven. The smell alone is enough to transport you! Each bite is a delightful combination of soft dough and warm, savory filling – it’s pure, unadulterated comfort. It’s the kind of food that makes everyone gather around the table, happy and satisfied.
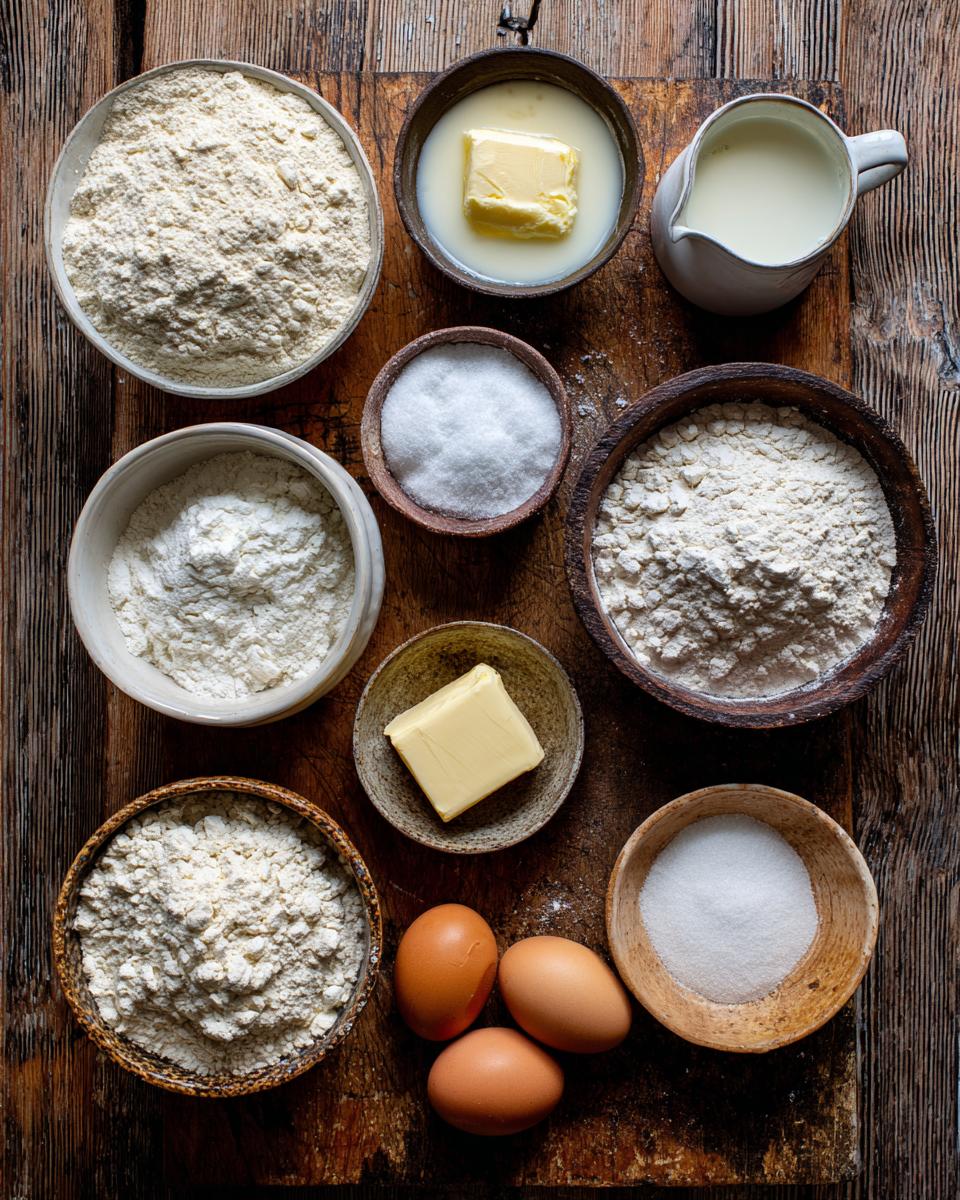
Essential Ingredients for Your Runza
Alright, let’s talk ingredients! This is where the magic really starts to happen for our Runza. You don’t need anything fancy, but using good quality, fresh ingredients makes all the difference in the world. Trust me, I’ve tried cutting corners, and it just doesn’t yield the same amazing results. We’re aiming for that rich, savory flavor and perfectly tender dough, and that starts with what you put in. So, grab your shopping list, and let’s get ready to make some incredible Runzas!
Dough Ingredients for Perfect Runza
For that dreamy, soft, and slightly chewy dough that wraps around our delicious filling, you’ll need a handful of pantry staples. Make sure your active dry yeast is fresh – that’s crucial for a good rise! We’ll be using warm water, a little sugar to wake up that yeast, warm milk, melted butter, a touch of salt, one large egg, and about 4 cups of all-purpose flour, divided for mixing.
Savory Runza Filling Ingredients
Now for the heart of our Runza – that incredibly flavorful filling! You’ll need 1 pound of good quality ground beef (I usually go for 80/20 for great flavor without being too greasy). Next up, one medium onion, finely chopped, and about 4 cups of finely shredded cabbage. Don’t forget your seasonings: 1/2 teaspoon of salt and 1/4 teaspoon of black pepper to bring out all those delicious tastes!
Step-by-Step: How to Make Runza
Okay, it’s time to get our hands dirty and bring these amazing Runzas to life! Don’t you just love that feeling when a recipe starts coming together? I’ve broken down every step so you can confidently tackle this, even if it’s your first time. We’re going to make sure that yeast dough is perfect, the filling is packed with flavor, and your finished Runzas are golden brown and utterly irresistible. Just follow along, and you’ll be a Runza pro in no time!
Preparing the Runza Dough
First things first, let’s get that beautiful dough going! In a big bowl, combine your warm water, yeast, and sugar. Give it a little stir and then just let it hang out for about 5 minutes. You’ll see it get all foamy and bubbly – that means your yeast is alive and happy! Next, stir in the warm milk, melted butter, salt, and your egg. Now, gradually add in about 2 cups of the flour, mixing until it’s smooth. Keep adding the remaining flour, about 1/2 cup at a time, until you have a soft dough that’s not too sticky. Turn it out onto a lightly floured surface and knead it for a good 5-7 minutes until it’s smooth and elastic. Pop it into a greased bowl, flip it once to coat, cover it with plastic wrap, and let it rise in a warm spot for about 1 to 1.5 hours, or until it’s doubled in size. This is where the magic happens!
Crafting the Runza Filling
While our dough is doing its thing and getting all fluffy, let’s whip up that savory filling! Grab a large skillet and toss in your ground beef and chopped onion. Cook it over medium heat, breaking up the beef, until it’s nicely browned and the onion is tender and translucent. Nobody wants a greasy Runza, so make sure to drain any excess fat really well at this point. Then, stir in your finely shredded cabbage, salt, and pepper. Let it cook for another 10-15 minutes, until that cabbage is beautifully tender. Take it off the heat and let it cool down a bit – we don’t want to cook our dough prematurely!
Assembling and Baking Your Runza
Alright, dough’s risen, filling’s cooled – time to assemble! Gently punch down your risen dough and divide it into 12 equal pieces. I usually eyeball it, but you can weigh them if you want to be super precise. On a lightly floured surface, roll each piece into a 6-inch circle. Spoon about 1/4 cup of that delicious filling right into the center of each circle. Now for the fun part: bring the edges of the dough together over the filling and pinch them *really* tightly to seal, forming a neat little pocket. Place your assembled Runzas, seam-side down, on a greased baking sheet. Preheat your oven to 375 degrees F (190 degrees C). Bake them for 20-25 minutes, or until they’re gloriously golden brown. Serve them warm, and prepare for happy sighs!
Tips for the Best Runza
Okay, so you’ve got the basic steps down, but I’ve picked up a few little tricks over the years that will take your Runzas from “good” to “OMG, these are amazing!” These are the things that really make a difference, avoiding those little pitfalls that can sometimes sneak up on you. Trust me, paying attention to these small details will ensure your Runzas are consistently delicious, beautifully golden, and perfectly satisfying every single time you bake them.
Mastering Your Runza Dough
The dough is everything for a truly tender Runza! Make sure your yeast is active – if it doesn’t foam, start over. Don’t add all the flour at once; go slowly until the dough is soft but not sticky. Knead it well until it’s smooth and elastic, and give it plenty of time to rise in a warm, draft-free spot. A slow, full rise equals a wonderfully light and airy texture!
Runza FAQs
Okay, so you’ve made a batch of these incredible Runzas, and naturally, questions pop up! No worries, I’ve got you covered with some of the most common things people ask me about making and enjoying these savory pockets. From prep to leftovers, I’ll share my best advice so you can get the most out of your Runza experience. Let’s dive in!
Can I Prepare Runza Ahead of Time?
Absolutely! You can make the Runza filling a day or two in advance and store it in the fridge. For the dough, you can make it, let it do its first rise, punch it down, and then store it in a greased, covered bowl in the fridge for up to 24 hours. Just let it come to room temperature for about 30 minutes before dividing and assembling your Runzas!
What Can I Serve with Runza?
A classic Runza is a meal in itself, but a simple side always complements it beautifully! I love serving them with a crisp green salad with a tangy vinaigrette to cut through the richness. A bowl of warm, creamy tomato soup is also a fantastic pairing. Or, for a super simple option, some quick pickles or a bit of sauerkraut on the side are just perfect!
How to Store and Reheat Leftover Runza
Leftover Runzas are a treat! Once completely cooled, store them in an airtight container in the fridge for up to 3-4 days. To reheat, I love popping them in a preheated oven at 350°F (175°C) for about 10-15 minutes, or until warmed through. This keeps the crust nice and crisp. You can also microwave them, but the dough might be a little softer.
Estimated Runza Nutritional Information
I know some of you like to keep an eye on the numbers, so I’ve included estimated nutritional information for these Runzas. Just a friendly reminder, though: these are estimates! The actual values can totally vary depending on the specific brands of ingredients you use, how much filling you cram into each pocket (no judgment here!), and even the exact size you roll them. Think of it as a helpful guide, not a strict rulebook!
Share Your Runza Experience
Okay, now it’s YOUR turn! I absolutely LOVE hearing from you all. If you make these Runzas, please, please, please come back and leave a comment below. Tell me how they turned out, what your family thought, or any fun tweaks you made! And if you share your amazing creations on social media, don’t forget to tag me! Happy baking, friends!
PrintHomemade Runza with Beef and Cabbage

This recipe makes a savory Runza, a German-Russian yeast dough pocket filled with ground beef, cabbage, and onions. It is a hearty and satisfying meal.
- Prep Time: 45 minutes
- Cook Time: 25 minutes
- Total Time: 2 hours 10 minutes
- Yield: 12 Runzas 1x
- Category: Main Dish
- Method: Baking
- Cuisine: German-Russian
- Diet: None
Ingredients
- 1 cup warm water (105–115 degrees F)
- 1 tablespoon active dry yeast
- 1 teaspoon sugar
- 1/2 cup warm milk
- 1/4 cup butter, melted
- 1 teaspoon salt
- 1 large egg
- 4 cups all-purpose flour, divided
- 1 pound ground beef
- 1 medium onion, chopped
- 4 cups finely shredded cabbage
- 1/2 teaspoon salt
- 1/4 teaspoon black pepper
Instructions
- To make the dough, combine warm water, yeast, and sugar in a large bowl. Let stand for 5 minutes, until foamy.
- Stir in warm milk, melted butter, salt, and egg. Gradually add 2 cups of flour, mixing until smooth.
- Add remaining flour, 1/2 cup at a time, until a soft dough forms.
- Turn dough onto a lightly floured surface and knead for 5-7 minutes, until smooth and elastic.
- Place dough in a greased bowl, turn once to coat, and cover with plastic wrap. Let rise in a warm place for 1-1.5 hours, or until doubled in size.
- While the dough rises, prepare the filling. In a large skillet, cook ground beef and onion over medium heat until beef is browned and onion is tender. Drain any excess fat.
- Stir in shredded cabbage, salt, and pepper. Cook for 10-15 minutes, or until cabbage is tender. Remove from heat and let cool slightly.
- Punch down the risen dough and divide into 12 equal pieces.
- On a lightly floured surface, roll each piece of dough into a 6-inch circle.
- Place about 1/4 cup of filling in the center of each circle.
- Bring the edges of the dough together over the filling and pinch to seal, forming a tight pocket.
- Place the Runzas seam-side down on a greased baking sheet.
- Preheat oven to 375 degrees F (190 degrees C).
- Bake for 20-25 minutes, or until golden brown.
- Serve warm.
Notes
- You can add a variety of seasonings to the beef and cabbage filling, such as garlic powder, paprika, or caraway seeds.
- For a richer flavor, you can brush the tops of the Runzas with melted butter before baking.
- Runzas can be frozen after baking. To reheat, thaw and bake at 350 degrees F (175 degrees C) until heated through.
Nutrition
- Serving Size: 1 Runza
- Calories: 350
- Sugar: 5g
- Sodium: 450mg
- Fat: 15g
- Saturated Fat: 7g
- Unsaturated Fat: 6g
- Trans Fat: 0g
- Carbohydrates: 35g
- Fiber: 3g
- Protein: 20g
- Cholesterol: 50mg


