Oh my goodness, get ready to dive into the absolute joy of making the perfect classic cheeseburger right in your own kitchen! Seriously, there’s nothing quite like biting into a juicy, perfectly cooked patty, topped with melty cheese and all your favorite fixings, nestled in a toasted bun. It’s just pure comfort food, isn’t it? For me, the first time I truly *got* the magic of a homemade classic cheeseburger was at a backyard BBQ, sun shining, laughter everywhere. That burger was just… transcendent. It wasn’t fancy, just perfectly seasoned and cooked with love.
And that’s what I want to share with you today! I’ve spent years tinkering, grilling, and pan-frying to figure out the secrets to truly delicious home-cooked meals, and this classic cheeseburger recipe is one of my absolute go-to’s. It’s a foundational burger, meaning it’s fantastic as is, but also a brilliant canvas for all your wildest burger dreams. It’s versatile, incredibly satisfying, and honestly, way easier than you might think to master. Let’s get cooking!
Why You’ll Love This Classic Cheeseburger Recipe
Okay, so why *this* classic cheeseburger recipe, you ask? Well, let me tell ya, it’s not just another burger! This one, my friend, is a total game-changer for your weeknight dinners or weekend cookouts. You’re going to absolutely adore it because:
- It’s unbelievably easy to make! Seriously, you don’t need to be a gourmet chef to whip up these beauties.
- Customization is king! While it’s perfect as is, you can totally make it your own with endless topping possibilities.
- The flavor is out of this world! That juicy patty, the melted cheese, the fresh toppings – it all just sings together.
- It’s quick! From start to finish, you’ll have a delicious, satisfying meal on the table in no time.
It’s just simple, straightforward deliciousness that hits the spot every single time!
Essential Equipment for Your Classic Cheeseburger
You don’t need a fancy, decked-out kitchen to make an amazing classic cheeseburger, promise! Just a few key pieces of equipment will get you where you need to be. We’re talking basic, everyday stuff that helps make sure your burger comes out perfectly juicy and cooked just right. Having the right tools really does make a difference, even for something as seemingly simple as a burger!
Tools for Crafting the Perfect Classic Cheeseburger
First up, you’ll want a good, large skillet or, even better, a grill for that smoky flavor. A sturdy spatula is non-negotiable for flipping those patties without breaking them. And a couple of mixing bowls? Super handy for prepping your meat and toppings. See, nothing too wild!
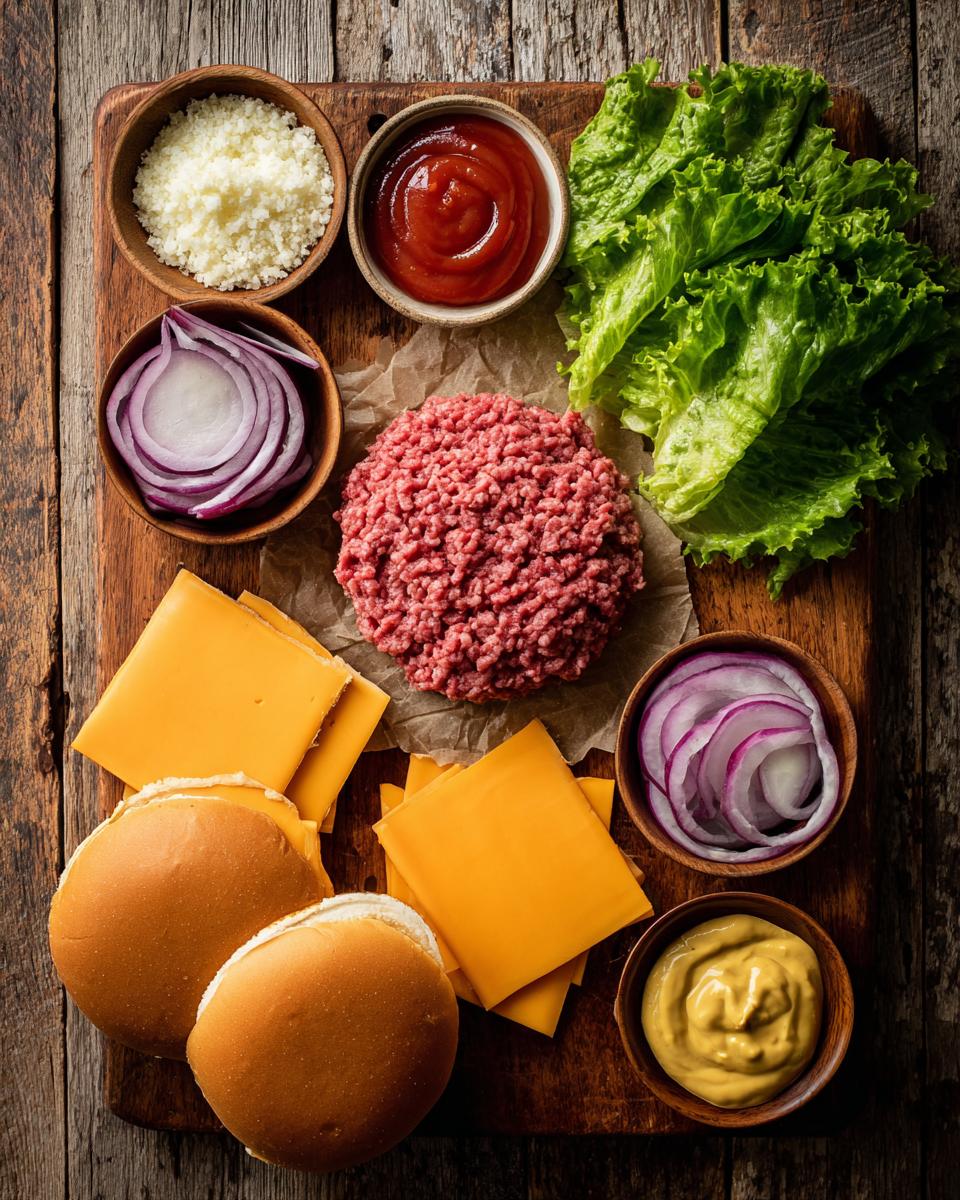
Ingredients for a Juicy Classic Cheeseburger
Alright, now for the star of the show: the ingredients! This is where we lay the foundation for that epic, juicy classic cheeseburger. I’m a firm believer that good ingredients make all the difference, so let’s get specific. Here’s what you’ll need to grab:
- 1 ½ pounds ground beef: And this isn’t just *any* ground beef. We’re talking 80/20 lean-to-fat ratio. Trust me on this one; that fat content is key for a truly juicy, flavorful burger.
- 1 teaspoon salt: Don’t skimp, seasoning is crucial!
- ½ teaspoon black pepper: Freshly ground if you can, it just adds that extra oomph.
- 4 slices sharp cheddar cheese: I love sharp cheddar for its melty goodness and tangy kick, but use your favorite!
- 4 large hamburger buns: Brioche, sesame, potato – whatever makes your heart sing, just make sure they’re fresh.
- 4 crisp lettuce leaves: Iceberg or green leaf work wonderfully for that satisfying crunch.
- 4 slices ripe tomato: Pick a good, firm one with vibrant color.
- 4 thin slices red onion: For a little zing and beautiful color.
- 4 tablespoons ketchup, 4 tablespoons mustard, 4 tablespoons mayonnaise: Or your favorite amounts of your go-to condiments!
See? Simple, but mighty! Each component plays its part in creating that perfect bite.
Sourcing the Best Ingredients for Your Classic Cheeseburger
Okay, a quick word on sourcing because it *really* elevates your classic cheeseburger. For the ground beef, try to get it from a local butcher if you can. They often have fresher, higher-quality meat. When it comes to your veggies, hit up the farmer’s market or pick the firmest, most vibrant produce you can find. A ripe tomato makes all the difference, and good quality buns are the unsung heroes here. Don’t underestimate them!
How to Prepare Your Classic Cheeseburger
Alright, let’s get down to business! This is the part where we actually *make* that incredible classic cheeseburger. Don’t worry, I’m going to walk you through every single step, just like I would if you were standing right next to me in my kitchen. We’ll break it all down so it’s super easy to follow. You’ll be flipping burgers like a pro in no time, I promise!
Forming and Seasoning the Classic Cheeseburger Patties
First things first, grab that glorious ground beef! Divide it into four equal portions. Now, here’s a little secret for a perfectly flat burger: form each portion into a ½-inch thick patty, and then, with your thumb, make a slight indentation right in the center. Trust me, this little dimple stops your burger from bulging up into a meatball while it cooks! Once they’re shaped, season *both* sides generously with that salt and pepper we talked about. Don’t be shy; this is where a lot of the flavor comes from for your classic cheeseburger!
Cooking Your Classic Cheeseburger to Perfection
Time to cook! Get your large skillet or grill screaming hot over medium-high heat. You want a good sizzle when those patties hit the pan. Carefully place your seasoned patties down. Now, for the timing: for a beautiful medium-rare, you’re looking at about 3-5 minutes per side. If you like it a bit more done, just add another minute or two per side. During the *very last minute* of cooking, slap a slice of that cheddar cheese on top of each patty. Let it get all melty and gooey – that’s the good stuff! While your burgers are doing their thing, don’t forget to lightly toast those hamburger buns on the skillet or grill. Golden brown and slightly crispy is what we’re aiming for.
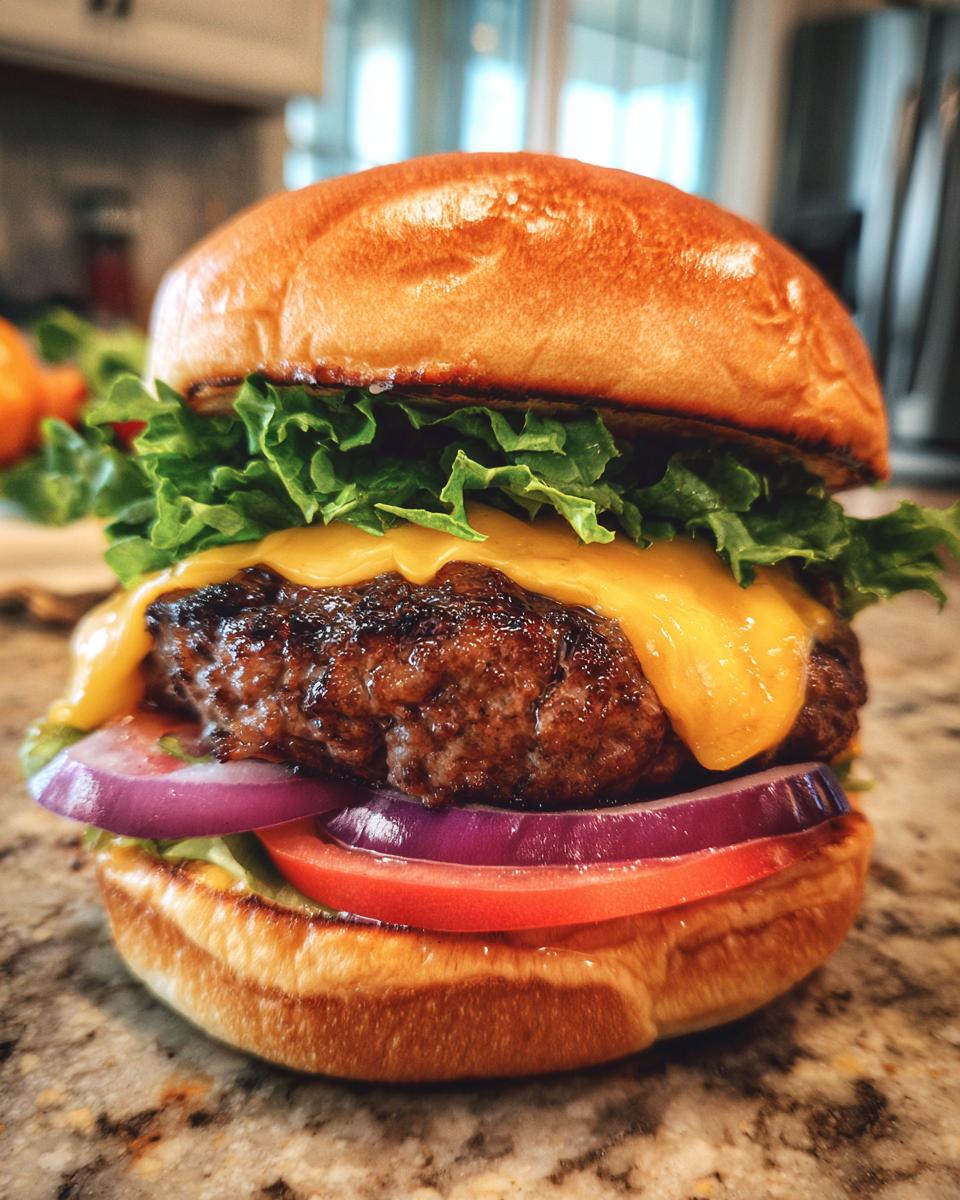
Assembling Your Classic Cheeseburger
Okay, all the components are ready, now for the grand finale – assembly! Grab those perfectly toasted buns. Spread your ketchup, mustard, and mayonnaise (or whatever condiments you love!) on both halves. On the bottom bun, layer a crisp lettuce leaf, a juicy tomato slice, and a thin slice of red onion. Then, carefully place that hot, cheesy patty right on top. Crown it with the other half of the bun. And there you have it – your very own, absolutely perfect classic cheeseburger, ready to be devoured! Serve it up immediately while it’s hot and fresh.
Tips for the Ultimate Classic Cheeseburger
You’ve got the basics down, but if you want to take your classic cheeseburger from great to absolutely *unforgettable*, I’ve got a few extra tricks up my sleeve. These are the little things that really make a difference!
- Flavor Boosters: For an extra layer of savory goodness, try mixing a pinch of garlic powder and onion powder right into your ground beef before you form the patties. It just wakes everything up!
- Know Your Doneness: Don’t be afraid to adjust cooking times. Everyone likes their classic cheeseburger a little different. A meat thermometer is your best friend here if you’re unsure, or just go by sight and feel.
- Cheese, Please! While cheddar is a classic, don’t limit yourself! American cheese gives you that iconic diner melt, Swiss adds a nutty flavor, or provolone for a sharper bite. Experiment and find your favorite cheese for *your* ultimate classic cheeseburger.
- Rest Your Meat: Just like a steak, letting your cooked patty rest for a minute or two off the heat before assembling helps redistribute the juices, keeping it extra moist.
Classic Cheeseburger Variations and Serving Suggestions
Okay, so you’ve mastered the classic cheeseburger – high five! Now, let’s talk about how to keep things exciting. This recipe is fantastic as a base, but it’s also a blank canvas for all sorts of delicious adventures. I love getting creative with my burgers, and you totally should too! And of course, every amazing burger deserves some equally amazing company on the plate, right?
Creative Twists on Your Classic Cheeseburger
Want to mix it up? Go for it! Instead of cheddar, try some creamy Monterey Jack, spicy pepper jack, or even a tangy blue cheese for a gourmet twist. Load it up with caramelized onions, a fried egg, or some crispy beef bacon. Sautéed mushrooms and Swiss cheese? A match made in heaven for your classic cheeseburger!
What to Serve with Your Classic Cheeseburger
What goes better with a classic cheeseburger than some classic sides? My absolute favorites are crispy, golden french fries (duh!), a fresh, tangy coleslaw, or a simple green salad with a zesty vinaigrette. Sweet potato fries are always a hit too! Don’t forget a cold drink to wash it all down!
Frequently Asked Questions About the Classic Cheeseburger
Got questions about whipping up your best classic cheeseburger? You’re not alone! These are some of the most common things people ask me when they’re tackling this amazing recipe. Let’s clear up any confusion so you can cook with confidence!
Can I make Classic Cheeseburger patties ahead of time?
Absolutely! You can totally form your classic cheeseburger patties a few hours, or even a day, in advance. Just stack them with a piece of parchment paper between each one, pop them into an airtight container, and keep them chilled in the fridge. Easy peasy!
How do I prevent my Classic Cheeseburger from drying out?
The key to a juicy classic cheeseburger is that 80/20 ground beef ratio and not overcooking! Also, making that little thumbprint in the center of the patty helps, and only flipping once or twice. Don’t press down on them with your spatula, either – that squeezes out all the delicious juices!
What’s the best way to store leftover Classic Cheeseburger?
If you happen to have any classic cheeseburger left (a rare occurrence in my house!), let it cool completely. Then, store the patty and the bun/toppings separately in airtight containers in the fridge for up to 3-4 days. Reheat the patty gently in a skillet or microwave.
Estimated Nutritional Information for This Classic Cheeseburger
Hey, I get it – sometimes you just want to know what you’re putting into your body, even when it’s something as deliciously indulgent as a classic cheeseburger! So, I’ve got some estimated nutritional info for you. Just a friendly heads-up, though: these numbers are estimates! They can totally swing around depending on the specific brands of beef, cheese, buns, and condiments you use. Think of it as a helpful guide, not a strict rulebook!
Share Your Classic Cheeseburger Experience
And there you have it – your very own, absolutely perfect classic cheeseburger! I just *love* seeing your creations, so please, don’t be shy! Leave a comment below with how your burger turned out, what fun toppings you added, or any questions you have. You can also rate the recipe, or even better, snap a pic and share it on social media! Tag me, I can’t wait to see your masterpiece!
PrintClassic Cheeseburger Recipe

This classic cheeseburger recipe delivers a juicy patty, melted cheese, and fresh toppings on a toasted bun. It’s a foundational burger that can be customized to your liking.
- Prep Time: 15 minutes
- Cook Time: 15 minutes
- Total Time: 30 minutes
- Yield: 4 servings 1x
- Category: Main Course
- Method: Pan-Frying
- Cuisine: American
- Diet: None
Ingredients
- 1 1/2 pounds ground beef (80/20 lean-to-fat ratio recommended)
- 1 teaspoon salt
- 1/2 teaspoon black pepper
- 4 slices cheddar cheese
- 4 hamburger buns
- 4 lettuce leaves
- 4 slices tomato
- 4 slices red onion
- 4 tablespoons ketchup
- 4 tablespoons mustard
- 4 tablespoons mayonnaise
Instructions
- Divide the ground beef into four equal portions. Form each portion into a 1/2-inch thick patty, making a slight indentation in the center of each patty to prevent it from bulging during cooking.
- Season both sides of the patties generously with salt and pepper.
- Heat a large skillet or grill over medium-high heat.
- Place the patties on the hot skillet or grill and cook for 3-5 minutes per side for medium-rare, or longer for desired doneness.
- During the last minute of cooking, place a slice of cheddar cheese on top of each patty, allowing it to melt.
- While the burgers are cooking, lightly toast the hamburger buns on the skillet or grill.
- Assemble the cheeseburgers: Spread ketchup, mustard, and mayonnaise on the toasted buns. Place a lettuce leaf, tomato slice, and red onion slice on the bottom bun. Add the cooked patty with melted cheese. Top with the other half of the bun.
- Serve immediately.
Notes
- For extra flavor, mix a pinch of garlic powder and onion powder into the ground beef before forming patties.
- Adjust cooking time based on your preferred level of doneness.
- Feel free to add other toppings like pickles, bacon, or sautéed mushrooms.
- Use your favorite type of cheese, such as American, Swiss, or provolone.
Nutrition
- Serving Size: 1 burger
- Calories: 650
- Sugar: 8g
- Sodium: 1000mg
- Fat: 40g
- Saturated Fat: 18g
- Unsaturated Fat: 15g
- Trans Fat: 1g
- Carbohydrates: 40g
- Fiber: 2g
- Protein: 35g
- Cholesterol: 120mg


