Picture this: It’s the first crisp fall evening of the season, and your friends are coming over for a cozy gathering. You need an appetizer that’s as easy as it is impressive – that’s where my showstopper pumpkin cheese ball comes in! I first made this for a Halloween party years ago, and now it’s my most requested dish every autumn. The best part? You probably have most ingredients in your fridge right now.
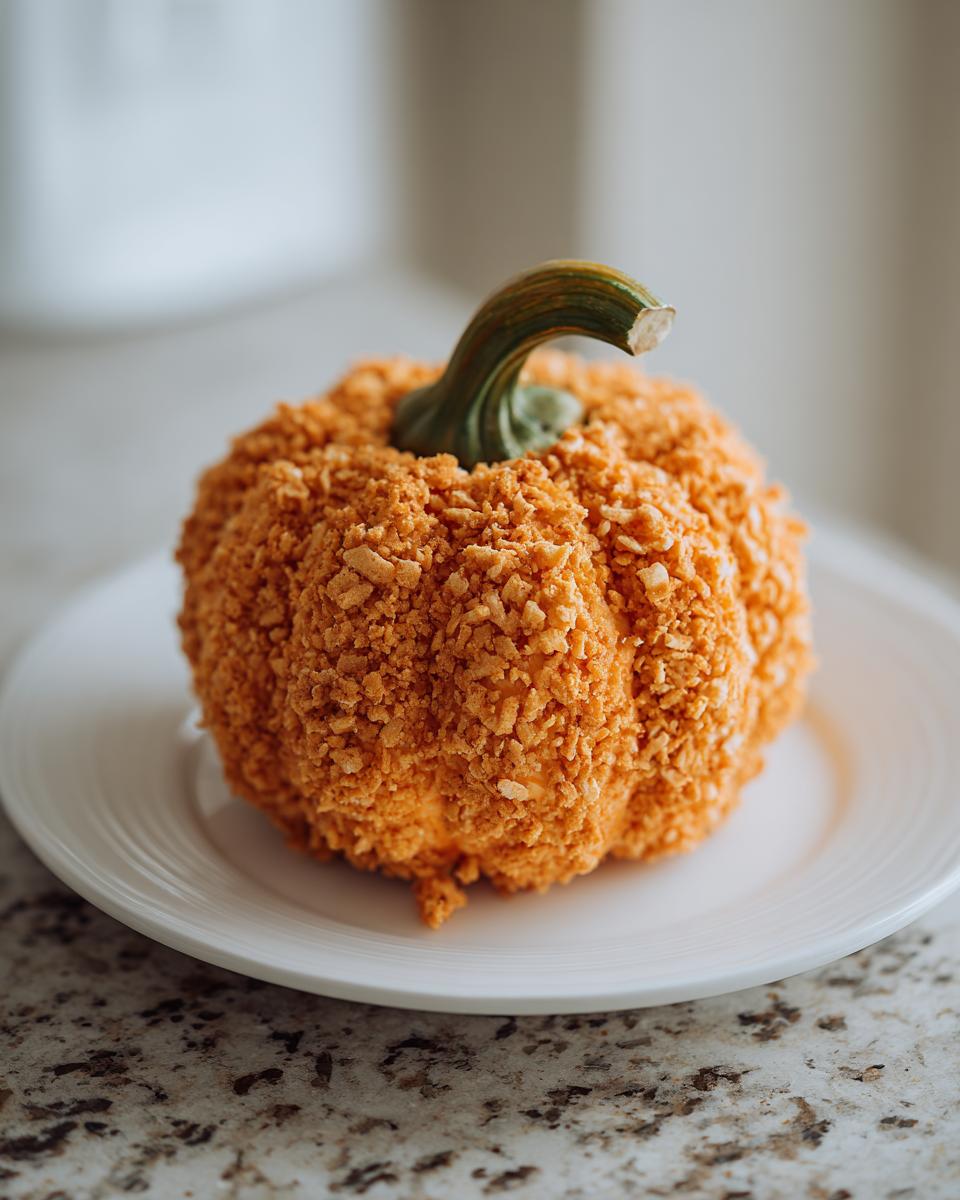
This pumpkin-shaped cheese ball isn’t just adorable – it’s seriously delicious. The creamy cheddar and cream cheese mixture gets a savory kick from garlic and paprika, while that crunchy cracker coating adds the perfect texture. And let me tell you, when you bring this little pumpkin to the table with its cute bell pepper stem, people go wild. It’s the kind of appetizer that disappears faster than you can say “trick or treat!”
Why You’ll Love This Showstopper Pumpkin Cheese Ball Recipe
Trust me, this isn’t just another cheese ball – it’s a guaranteed party hit! Here’s why:
- Effortless elegance: Looks fancy but takes just 15 minutes of hands-on time
- Total crowd-pleaser: The creamy, savory flavor disappears faster than Halloween candy
- Seasonal superstar: That adorable pumpkin shape makes it perfect for fall gatherings
- Endlessly customizable: Switch up cheeses or spices to match your taste
- Make-ahead magic: Stays perfect in the fridge until party time
I’ve lost count of how many times guests have asked me for this recipe – it’s that good!
Ingredients for the Showstopper Pumpkin Cheese Ball Recipe
Okay, let’s gather our goodies! Here’s everything you’ll need to create this little pumpkin masterpiece. I’ll share my exact measurements and some pro tips I’ve learned after making this dozens of times.
- 8 oz cream cheese, softened – Not melted! Leave it out for about 30 minutes until it gives slightly when pressed. Cold cream cheese will make your arms ache from mixing.
- 2 cups shredded sharp cheddar cheese – I prefer orange cheddar for that perfect pumpkin color, but white cheddar works too if you’re feeling fancy.
- 1 tsp garlic powder – The subtle savory backbone of this recipe. Don’t skip it!
- 1 tsp onion powder – Adds that irresistible “what is that delicious flavor?” factor.
- 1/2 tsp paprika – For a hint of warmth and gorgeous color.
- 1 cup crushed buttery crackers – Ritz or similar. Crush them fine but not to dust – you want some texture.
- 1 bell pepper stem – The magic touch! Look for a nice green stem with a little curl to make your pumpkin look real.
See? Nothing too crazy – just simple ingredients that come together to create something truly special. Now let’s get mixing!
How to Make the Showstopper Pumpkin Cheese Ball Recipe
Alright, let’s turn these simple ingredients into your new favorite party appetizer! I’ll walk you through each step – it’s easier than carving an actual pumpkin, I promise. The key is taking your time with each stage for that perfect texture and shape.
Mixing the Cheeses
First, grab a large bowl and your softened cream cheese. This is where elbow grease pays off! Use a sturdy spoon to mix until it’s completely smooth – no lumps allowed. Now add your shredded cheddar along with the garlic powder, onion powder, and paprika. Keep mixing until everything is beautifully blended and you can’t see any streaks of cream cheese. The mixture should hold together when pressed.
Shaping and Chilling
Here comes the fun part! Scoop all that cheesy goodness onto plastic wrap. Use your hands (lightly dampened if it’s sticky) to form a smooth, round ball – think pumpkin shape, not perfect sphere. Wrap it tightly and pop it in the fridge for at least an hour. This chill time is crucial – it firms up the cheese so it holds its shape when we add the coating.
Adding the Crunchy Coating
Time for the magic! Spread your crushed crackers on a plate. Unwrap your now-firm cheese ball and gently roll it in the crumbs, pressing lightly to make sure they stick all over. If you find bare spots, just pat on more crumbs with your fingers. Don’t worry about perfection – real pumpkins aren’t perfectly smooth either!
Decorating Like a Pumpkin
The finishing touch! Take your bell pepper stem and gently press it into the top center of your cheese ball at a slight angle. Voilà – instant pumpkin transformation! If it’s not staying put, make a small indent with your finger first. Now step back and admire your adorable edible masterpiece before everyone devours it!
Tips for the Perfect Showstopper Pumpkin Cheese Ball Recipe
After making this pumpkin cheese ball dozens of times, I’ve learned a few tricks that make all the difference. First, always use full-fat cream cheese – the low-fat stuff just doesn’t hold its shape as well. Second, don’t skip that chill time! An hour in the fridge makes coating so much easier.
Want to get creative? Try mixing in a pinch of cayenne for heat or swapping the crackers for crushed pretzels. And here’s my secret – if your coating won’t stick, lightly dampen the cheese ball with water before rolling. Works like a charm every time!
Variations for Your Showstopper Pumpkin Cheese Ball Recipe
One of my favorite things about this recipe is how easily you can make it your own! Want to mix things up? Try one of these tasty twists that always impress my guests:
- Bacon Lover’s Dream: Stir in 1/4 cup cooked, crumbled bacon to the cheese mixture – the smoky flavor pairs perfectly with the cheddar.
- Spicy Southwest Style: Swap the cheddar for pepper jack cheese and add 1/4 tsp chipotle powder for some heat.
- Everything Bagel Version: Use crushed everything bagel chips for coating – the sesame and garlic flavors are incredible.
- Sweet & Savory: Mix in 2 tbsp chopped dried cranberries and use pecans instead of crackers for a holiday-worthy twist.
- Pretzel Crunch: Replace the crackers with finely crushed pretzels – that salty crunch is addictively good!
Don’t be afraid to get creative – I’ve even used crushed Cheez-Its for an extra cheesy coating that had everyone raving!
Serving Suggestions for the Showstopper Pumpkin Cheese Ball Recipe
Now for the best part – showing off your adorable pumpkin creation! I love placing mine on a rustic wooden board surrounded by an assortment of dippers. The contrast makes the orange cheese ball really pop. Here’s how I like to serve it:
- The Classic: Buttery round crackers (like Ritz or Club) are my go-to – their mild flavor lets the cheese shine.
- Veggie Lovers: Crisp celery sticks, carrot coins, and cucumber slices add a fresh crunch that balances the richness.
- Sweet Pairings: Thin apple or pear slices work surprisingly well – the sweetness plays off the savory cheese beautifully.
- Bread Varieties: Small toasted baguette slices or pita chips give you that satisfying crunch factor.
For extra festive flair, arrange your dippers around the cheese ball to look like pumpkin vines! I sometimes add a few autumn leaves (food-safe or real, well-cleaned ones) around the board for that wow factor. And don’t forget to put out a small knife – this pumpkin is meant to be shared!
Storing and Make-Ahead Tips
Here’s the beauty of this pumpkin cheese ball – it actually gets better as it chills! I always make mine at least a few hours ahead, but here’s everything you need to know about storing your showstopper:
Your cheese ball will stay perfectly fresh in the fridge for up to 2 days when wrapped tightly in plastic wrap. I like to wait to add the cracker coating until just before serving – this keeps it nice and crisp. If you do coat it in advance, don’t worry if the crackers soften slightly; the flavor will still be amazing!
Now, I learned the hard way – freezing is a no-go. The texture changes completely, turning grainy when thawed. Trust me, fresh is best with this recipe! For parties, I’ll often mix and shape the cheese mixture up to 2 days early, then simply coat and decorate it that morning. Easy peasy pumpkin squeezy!
Pro tip: If your cheese ball gets a little too soft after sitting out at your party, just pop it back in the fridge for 15 minutes to firm up again. Works like magic every time!
Showstopper Pumpkin Cheese Ball Recipe FAQs
Over the years, I’ve gotten so many questions about this recipe from friends who try it. Here are the most common ones with my tried-and-true answers:
Can I use flavored cream cheese?
Absolutely! I love using garlic-herb or chive cream cheese for extra flavor. Just reduce the garlic powder slightly since your cream cheese already has seasoning. Avoid super sweet flavors like strawberry – trust me, that’s a combo best left untested!
How far in advance can I assemble it?
You can make the cheese mixture 2 days ahead, but wait to add the coating until 1-2 hours before serving. The crackers stay crispier this way. The shaped cheese ball keeps perfectly in the fridge wrapped tight – no flavor loss at all!
What if my coating doesn’t stick?
Don’t panic! Lightly dampen the cheese ball with water – just a quick spritz or rub with wet fingers does the trick. The moisture helps the crumbs adhere beautifully. If some fall off while serving? Call it “rustic charm” and keep the party going!
Can I make this gluten-free?
You bet! Simply swap the crackers for gluten-free pretzels or your favorite GF crackers. The texture stays wonderfully crunchy. I’ve even used crushed gluten-free corn chips for a fun fiesta twist that everyone loved.
What’s the best way to transport it?
Place your coated cheese ball in a shallow container lined with parchment. Bring the stem separately and pop it in when you arrive. Pro tip: Pack your serving board and dippers separately too – no one wants a squished pumpkin!
Nutritional Information
Here’s the scoop on what’s in each delicious bite of our showstopper pumpkin cheese ball! Remember, these are estimates – your exact values might vary slightly depending on your specific ingredients.
- Serving Size: 1/8 of cheese ball (about 2 tbsp)
- Calories: 180
- Total Fat: 15g (8g saturated)
- Cholesterol: 40mg
- Sodium: 220mg
- Total Carbohydrates: 6g
- Protein: 7g
Not too shabby for such a decadent-tasting appetizer, right? The protein from the cheese helps balance things out, and since you’re typically pairing it with veggies or crackers, you’re getting a nice mix of nutrients.
Try this recipe and share your pumpkin cheese ball creations below!
PrintPumpkin Cheese Ball with Bell Pepper Stem

A delicious pumpkin-shaped cheese ball that’s perfect for parties and gatherings.
- Prep Time: 15 minutes
- Cook Time: 0 minutes
- Total Time: 1 hour 15 minutes
- Yield: 1 cheese ball 1x
- Category: Appetizer
- Method: No Cook
- Cuisine: American
- Diet: Vegetarian
Ingredients
- 2 cups shredded cheddar cheese
- 8 oz cream cheese, softened
- 1 tsp garlic powder
- 1 tsp onion powder
- 1/2 tsp paprika
- 1 bell pepper stem (for decoration)
- 1 cup crushed crackers (for coating)
Instructions
- Mix cheddar cheese, cream cheese, garlic powder, onion powder, and paprika in a bowl until well combined.
- Shape the mixture into a ball and refrigerate for 1 hour.
- Roll the cheese ball in crushed crackers to coat evenly.
- Use the bell pepper stem to create a pumpkin stem effect on top.
- Serve with crackers or vegetable sticks.
Notes
- For a spicier version, add 1/4 tsp cayenne pepper.
- Make ahead and refrigerate for up to 2 days.
Nutrition
- Serving Size: 1/8 of cheese ball
- Calories: 180
- Sugar: 1g
- Sodium: 220mg
- Fat: 15g
- Saturated Fat: 8g
- Unsaturated Fat: 5g
- Trans Fat: 0g
- Carbohydrates: 6g
- Fiber: 0g
- Protein: 7g
- Cholesterol: 40mg


