Mornings in my house are pure chaos – kids scrambling for backpacks, the dog barking at squirrels, and me desperately trying to remember where I left my coffee cup. That’s why these Simple Baked Breakfast Tacos became my secret weapon. They’re faster than drive-thru, tastier than cereal, and somehow make me feel like I’ve got my life together (even when I don’t).
The magic? You probably have everything you need right now – eggs, tortillas, whatever veggies are wilting in the fridge. My “aha” moment came last year when I accidentally burned a batch of stovetop tacos (oops!) and threw them in the oven to salvage them. Turns out, baking makes the tortillas perfectly crisp while keeping the eggs fluffy. Now my kids beg for “Mom’s special tacos” – though they don’t need to know it only takes 20 minutes start to finish!
Why You’ll Love These Simple Baked Breakfast Tacos
Listen, I know mornings can be rough – that’s exactly why these tacos are about to become your new best friend. Here’s what makes them so special:
- Lightning fast: From fridge to table in 20 minutes flat (even with sleepy eyes and bedhead)
- Almost no dishes: One bowl, one skillet, one baking sheet – that’s it! The oven does most of the work while you sip coffee
- Kid-approved magic: My picky eaters go crazy for the “breakfast pizza” vibe (I don’t correct them)
- Meal prep superstar: Make a double batch and reheat all week – they actually get crispier in the toaster oven
Honestly? The hardest part is deciding whether to eat them at the table or straight off the baking sheet (no judgment either way).

Ingredients for Simple Baked Breakfast Tacos
Here’s the beautiful part – you likely have most of these hanging around your kitchen already! I’ve made these tacos with everything from fancy farmers market eggs to the last sad tortillas hiding in my bread drawer. Here’s what you’ll need:
- 4 large eggs: Room temperature works best (I just pop them in warm water for 5 minutes if I forget to take them out)
- 1/2 cup shredded cheese: I’m Team Sharp Cheddar, but Monterey Jack or pepper jack add great flavor too
- 1/4 cup diced bell peppers: Any color works – I use frozen tri-color peppers when I’m extra lazy
- 1/4 cup diced onions: Red onions add nice bite, but yellow onions caramelize beautifully
- 4 small flour tortillas: The 6-inch ones are perfect – corn tortillas will work but get crispier faster
- 1/2 cup cooked breakfast sausage (optional): Or bacon! Or ham! Or leave it out entirely
- 1 tbsp butter: For that golden scramble – don’t skip it!
- Salt and pepper: Sounds basic, but freshly cracked pepper makes all the difference
My favorite part? The “choose your own adventure” toppings: avocado slices, hot sauce, fresh cilantro, or salsa verde straight from the jar when I’m feeling fancy.
Equipment Needed for Simple Baked Breakfast Tacos
Don’t worry – you won’t need any fancy gadgets here! Just grab:
- A trusty baking sheet (no parchment needed if it’s nonstick)
- One medium mixing bowl (I’ve used cereal bowls in a pinch)
- A skillet – any kind works, even that slightly warped one from college
- A spatula for scrambling (wooden spoons work too if you’re mid-renovation like me)
That’s it! Now let’s make some magic happen.

How to Make Simple Baked Breakfast Tacos
Okay, friend, here’s where the magic happens! I’ve made these tacos enough times (sometimes while half-asleep) to know these steps by heart. Just follow along and you’ll be crunching into perfection in no time.
Step 1: Prepare the Egg Mixture
First things first – crank that oven to 350°F (175°C). While it’s heating, grab your eggs and give them a good whisk in a bowl. Here’s my secret: I add a tiny splash of water (about 1 tsp) to make them extra fluffy. Season generously with salt and pepper – trust me, bland eggs are the saddest breakfast crime!
Now melt your butter in the skillet over medium heat. Pour in the eggs and stir occasionally with a spatula. The key is to stop cooking when they’re just set – still slightly glossy, about 2-3 minutes. They’ll finish cooking in the oven, and this keeps them from getting rubbery. Fold in your peppers, onions, and sausage if using.
Step 2: Assemble the Tacos
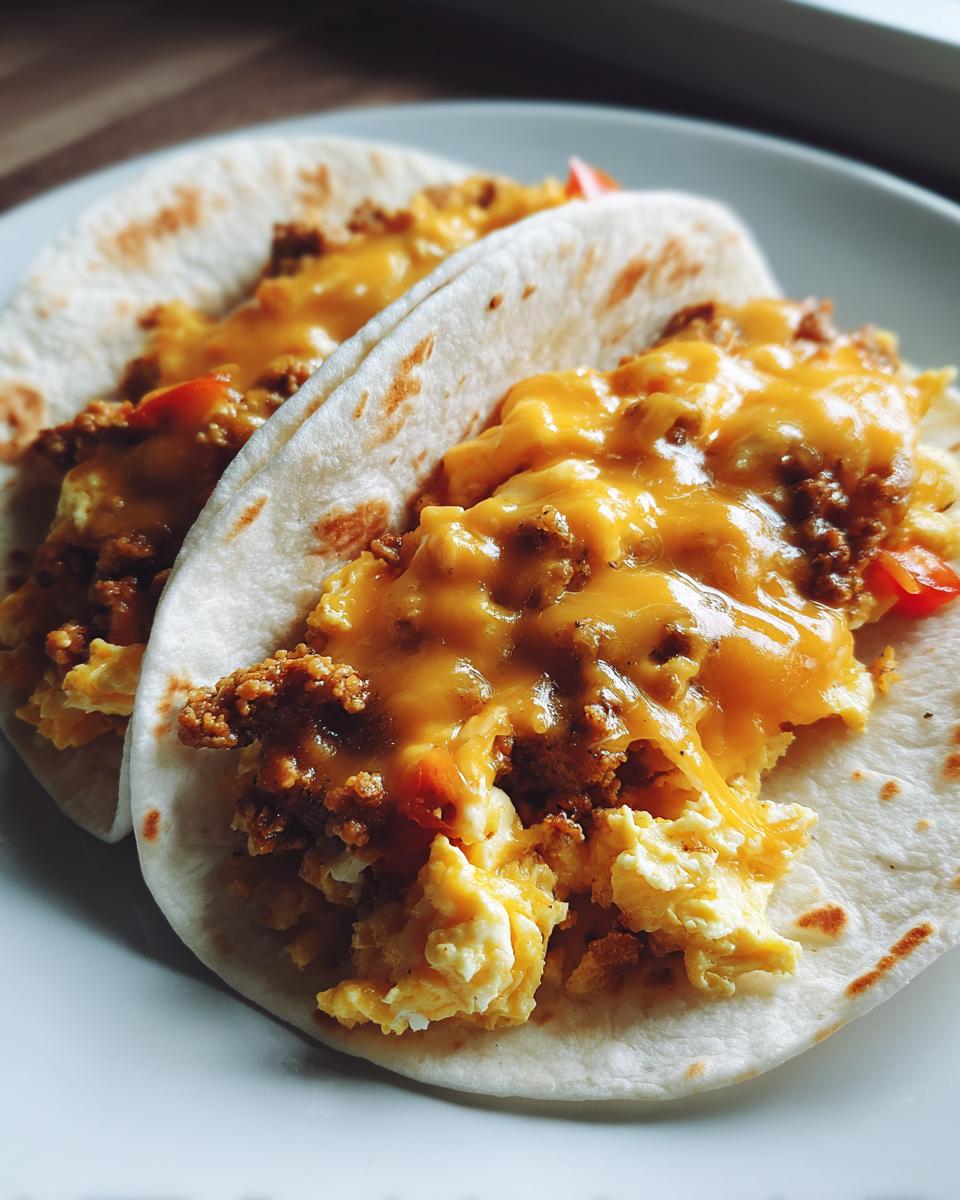
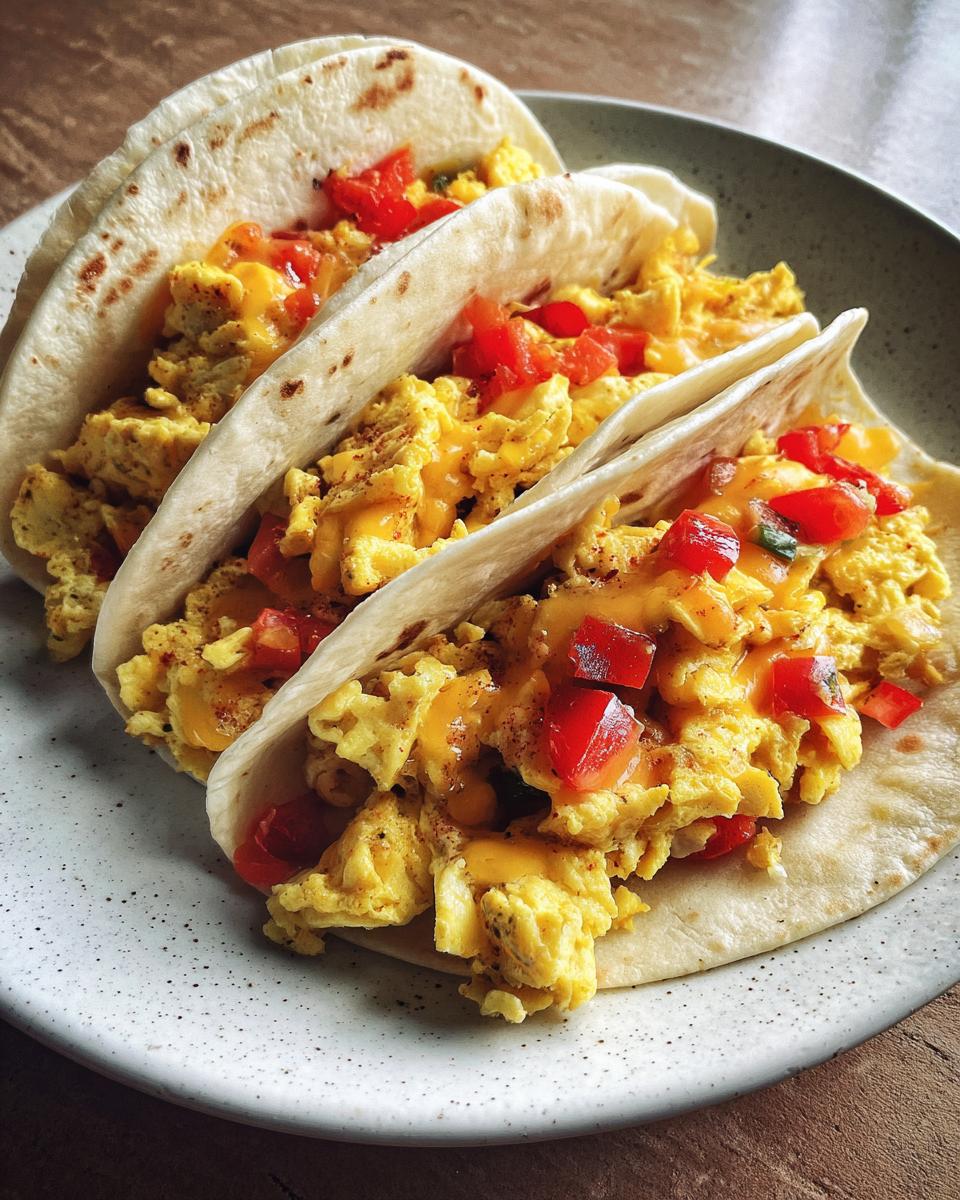
Lay your tortillas out on the baking sheet like little edible plates. I leave about an inch between them so they crisp up evenly. Now spoon that beautiful egg mixture evenly among them – about 1/4 cup per taco. Warning: resist the urge to overfill! Too much and you’ll have a melty mess (learned that the hard way).
Next comes the cheese blanket! Sprinkle about 2 tablespoons on each taco. Pro tip: leave a small border around the edges – this helps prevent cheese from dripping onto the pan and smoking (another lesson from my “learning experiences”).
Step 3: Bake to Perfection
Slide those beauties into your preheated oven for 5-7 minutes. You’re waiting for two things: the cheese to melt into gooey perfection (about 5 minutes in), and the tortilla edges to just start turning golden (usually another minute or two).
Watch closely after the 5-minute mark – ovens vary, and nobody wants sad, burnt tacos! When you see those bubbly cheese craters forming and smell that incredible toasty aroma, they’re done. Let them cool for exactly 47 seconds (okay, maybe a full minute) before digging in. The cheese will set slightly so it doesn’t all slide off when you take that first glorious bite!
Tips for Perfect Simple Baked Breakfast Tacos
After burning more tacos than I’d like to admit (we don’t talk about The Great Char Incident of 2021), I’ve picked up some foolproof tricks to guarantee taco success every time:
- Toast those tortillas first: A quick 2-minute bake before adding fillings makes them extra crisp – no more soggy bottoms!
- Room temp eggs are your friend: Cold eggs don’t whip up as fluffy. If you forgot (like I always do), just soak them in warm water for 5 minutes.
- Fresh toppings go on last: Add avocado, cilantro, or salsa after baking so they stay vibrant and cool against the warm eggs.
- The cheese shield technique: Sprinkle a light layer of cheese directly on the tortilla before adding eggs – it creates a moisture barrier that keeps tortillas crispy.
Bonus tip from my 5-year-old: “More cheese makes everything better.” Can’t argue with that logic!
Customizing Your Simple Baked Breakfast Tacos
Here’s where the real fun begins! These tacos are like a blank canvas – you can dress them up a hundred different ways depending on your mood. My family has tried them all (some more successfully than others – RIP to the kimchi experiment). Here are my favorite twists:
- Vegetarian delight: Swap sausage for black beans (drained well!) or sautéed mushrooms. My friend adds crumbled tofu with taco seasoning – shockingly good!
- Spice lovers unite: Toss in diced jalapeños with the onions, or add a pinch of cayenne to the eggs. My husband drizzles sriracha mayo on top – fair warning, it’s addictive.
- Low-carb option: Use crisp lettuce leaves instead of tortillas (bake fillings in a dish, then spoon in). Bonus: you get to call it a “breakfast taco bowl” and feel fancy.
The best part? You can split the batch and make everyone happy – I often do one spicy, one veggie, and two classic for my crew. Breakfast peace treaty achieved!
Serving and Storing Simple Baked Breakfast Tacos
Here’s the best part – these tacos taste amazing straight from the oven, but they’re just as good later! I love serving them with a big mug of strong coffee (essential) and whatever fruit is in season – sliced oranges or berries add a nice fresh contrast to the rich eggs and cheese.
If you somehow have leftovers (rare in my house!), let them cool completely before stacking them in an airtight container with parchment paper between layers. They’ll keep in the fridge for 2 days. To reheat, skip the microwave (soggy tortilla alert!) and pop them in a 350°F oven for 5 minutes instead. They come out almost better than fresh – the edges get extra crispy!
Nutritional Information for Simple Baked Breakfast Tacos
Just so you know what you’re biting into – each taco (with cheese and sausage) clocks in around 220 calories. They’ve got a good punch of protein to keep you full and just enough carbs to fuel your morning. Remember, these numbers shift depending on your add-ons – extra avocado or bacon will change the game (but oh, what a delicious change!). Nutritional values are estimates and vary based on ingredients used.
Frequently Asked Questions About Simple Baked Breakfast Tacos
Got questions? I’ve got answers! Here are the most common things people ask me about these tacos (and yes, I’ve probably asked myself the same things at 6 a.m.):
- Can I make these ahead? Absolutely! Assemble the tacos (without baking) and store them in the fridge overnight. Just add 2-3 extra minutes to the bake time in the morning. Perfect for those “I can’t even” days.
- Can I use corn tortillas? You can, but they crisp up faster than flour tortillas. Keep an eye on them after 4 minutes, and maybe spray them lightly with oil to prevent cracking.
- What if I don’t have sausage? No worries! Bacon, ham, or even leftover rotisserie chicken work great. Or skip the meat entirely – they’re just as tasty veggie-style.
- Can I freeze them? Surprisingly, yes! Bake them first, let them cool completely, then wrap individually in foil. Reheat in the oven for 10 minutes – they’re like little breakfast gifts from Past You.
Still curious? Try this recipe and share your twist in the comments – I’m always looking for new ideas (especially on Mondays)!
Print20-Minute Simple Baked Breakfast Tacos Your Kids Will Devour

Easy and delicious breakfast tacos baked to perfection. Perfect for a quick morning meal or brunch.
- Prep Time: 10 mins
- Cook Time: 10 mins
- Total Time: 20 mins
- Yield: 4 tacos 1x
- Category: Breakfast
- Method: Baking
- Cuisine: Mexican-inspired
- Diet: Low Lactose
Ingredients
- 4 large eggs
- 1/2 cup shredded cheese
- 1/4 cup diced bell peppers
- 1/4 cup diced onions
- 4 small flour tortillas
- 1/2 cup cooked breakfast sausage (optional)
- 1 tbsp butter
- Salt and pepper to taste
Instructions
- Preheat oven to 350°F (175°C).
- In a bowl, whisk the eggs and season with salt and pepper.
- Melt butter in a skillet over medium heat and scramble the eggs until just set.
- Stir in bell peppers, onions, and cooked sausage (if using).
- Place tortillas on a baking sheet and divide the egg mixture evenly among them.
- Sprinkle shredded cheese on top.
- Bake for 5-7 minutes until cheese is melted.
- Serve warm.
Notes
- Customize with your favorite toppings like avocado or salsa.
- For a crispier tortilla, lightly toast before filling.
- Store leftovers in the fridge for up to 2 days.
Nutrition
- Serving Size: 1 taco
- Calories: 220
- Sugar: 2g
- Sodium: 380mg
- Fat: 12g
- Saturated Fat: 5g
- Unsaturated Fat: 6g
- Trans Fat: 0g
- Carbohydrates: 18g
- Fiber: 1g
- Protein: 11g
- Cholesterol: 190mg


